• Skip to primary navigation
  • Skip to main content
  • Skip to primary sidebar
Cook with Sharmila
  • Home
  • About Me
    • Video Recipes
    • Media Mentions
    • Privacy Policy
  • Recipe Index
    • Recipes
  • Nanjilnad Recipes
  • Shop
menu icon
go to homepage
search icon
Homepage link
  • Recipes
  • Instant Pot Recipes
  • About Me
    • Facebook
    • Instagram
    • Pinterest
    • YouTube
  • ×

    Home » Recipes » Blogging Marathon » Kodo Millet Pongal| Varaguarisi Pongal

    Kodo Millet Pongal| Varaguarisi Pongal

    Posted on Aug 4, 2017 · Last Updated on Jan 22, 2022 by sharmila kingsly

    Sharing is caring!

    0 shares
    • Share
    • Tweet
    Jump to Recipe Print Recipe
    Varagu Arisi Pongal

    Kodo millet | varagu Arisi Pongal recipe with step by step photos. Kodo millet is called as Varagu Arisi in Tamil, Kodra in Hindi, and Arikelu in Telugu. It is so healthy as it is gluten-free and rich in fiber. Recently my hubby started dieting and he wanted me to include a lot of Millets and healthy grains in his Food. So I decided to give a try to a few Millet Recipes.

    I usually prepare Pongal only on Weekends as it has to be accompanied by Chutney, Sambar and Vadai . Hence I prefer it for Weekend brunch. So for this Blogging Marathon when I selected the theme as Weekend breakfast I decided to try Millet Pongal. Now let see how to prepare Varagu Arisi Ven Pongal
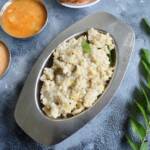
    Other Pongal Recipes which I have already posted in blog are Ven Pongal/White Pongal ,Kalkandu Pongal | sugar Candy Pongal ,Sakkarai Pongal
    Varagu Arisi Pongal

    Varagu Arisi Pongal

          Step by step Method with pictures:
          1.    Dry roast the moong Dal till it gives a nice aroma and set aside. Wash the Kodo millet really well. In a Pressure cooker take the Kodo millet and moong Dal add in Water and Salt and mix well.
    Step 1 How to prepare Varagu Arisi Pongal
          2.    Pressure cook it for 4 whistles in a medium flame and wait till the pressure gets released all by itself. Once the pressure gets released open the cooker mash the rice and Dal mix well and set aside. Now get ready with the tempering ingredients. Heat a pan with Ghee
    Step 2 How to prepare Varagu Arisi Pongal

    3.    Add in the ingredients one by one from the “To Temper” table once everything splutter and gives a nice aroma switch off the flame and add to the cooked Pongal and mix well. Serve hot.

     
    Step 3 How to prepare Varagu Arisi Pongal

    Serve hot with a dash of ghee along with Chutney, Sambar, and Vadai.

    Varagu Arisi Pongal

    Check out the Blogging Marathon page for the other Blogging Marathoners doing this BM

    Kodo Millet Ven Pongal
    Print Recipe Pin Recipe
    No ratings yet

    Kodo Millet Pongal Recipe | Varaguarisi Pongal

    Kodo Millet Pongal is a healthy gluten free breakfast dish made with Millets. It goes very well with some Sambar and Chutney.
    Prep Time15 mins
    Cook Time15 mins
    Total Time30 mins
    Course: Breakfast
    Cuisine: Indian
    Servings: 2
    Calories:
    Author: sharmila kingsly
    Prevent your screen from going dark

    Standard 1 cup measures 240 ml

    Ingredients

    • Kodo millet – ½ cup
    • Moong Dal – 3 tbsp
    • Water – 2 ¼ cup
    • Salt as needed

    To Temper:

    • Ghee – 1 tbsp
    • Whole Pepper – 1 tbsp
    • Ginger a small piece crushed
    • Green Chilli - 1
    • Cashew nuts – 6 -8 pieces
    • Curry leaves a spring
    • Cumin Seeds – 1 tsp

    Instructions 

    • Dry roast the moong Dal till it gives a nice aroma and set aside. Wash the Kodo millet really well. In a Pressure cooker take the Kodo millet and moong Dal add in Water and Salt and mix well.
    • Pressure cook it for 4 whistles in a medium flame and wait till the pressure gets released all by itself. Once the pressure gets released open the cooker mash the rice and Dal mix well and set aside. Now get ready with the tempering ingredients. Heat a pan with Ghee
    • Add-in the ingredients one by one from the “To Temper” table once everything splutters and gives a nice aroma switch off the flame and add to the cooked Pongal and mix well. Serve hot.

    Notes

    · Always serve the Pongal hot as it tends to thicken once it becomes cold.
    · Serve with Chutney, Sambar, and Vadai.
    Keyword Kodo Millet Pongal, Varaguarisi Pongal
    Tried this recipe?Mention @happietrio or tag #happietrio
    Subscribe to my Channelclick for more videos
    « 5 taste Uthappam Recipe | Weekend Breakfast Ideas
    Ragi Rava Dosa Recipe | Instant Ragi Dosa | Semolina Finger millet Crepes »

    Sharing is caring!

    0 shares
    • Share
    • Tweet

    Reader Interactions

    Leave a Reply Cancel reply

    Your email address will not be published. Required fields are marked *

    Recipe Rating


    Primary Sidebar

    connect with us

    • Facebook
    • YouTube
    • Instagram
    • Pinterest
    • Twitter

    Get To Know about me!!

    Food Blogger, Biryani Lover , Software Engineer .. In no particular order.I love to cook and that is why I am here!! Welcome to my space!!. Read more about me!

    Soups

    Mutton bone soup

    Mutton Bone Soup Recipe |Mutton Soup

    Drumstick Leaves Soup

    Drumstick Leaves Soup| Murungai Keerai Soup

    Instant Pot Pumpkin Soup

    Instant Pot Pumpkin Soup

    Lemon Chicken Orzo Soup Instant Pot

    Lemon Chicken Orzo Soup - Instant Pot

    PAlak Soup

    Palak Soup Recipe| Spinach Soup Recipe

    ButterNut Squash Soup

    Instant Pot Curried Butternut Squash Soup

    More soup recipes

    Top Posts & Pages

    Lemon Chicken Orzo Soup - Instant Pot
    Mini Pizza - Airfryer & Oven
    Mutton Bone Soup Recipe |Mutton Soup
    Mango Ladoo | How to Prepare Mango Ladoo
    Ragi Buttermilk| Ragi Malt with Buttermilk | Ragi Ambli
    Air Fryer Grilled Shrimp | Shrimp Skewers
    Garlic Naan Bread
    Green Chutney for Tandoori and Kebabs
    Chicken lollipop | Air fryer Chicken Lollipop
    Chicken Clear Soup | How to prepare Chicken Soup

    Footer

    ↑ back to top

    As an Amazon Associate I earn from qualifying purchases.

    Copyright ©  2023 COOK WITH SHARMILA