
Mutton Masala Kuzhambu Recipe | Mutton Masala Gravy step by step pictures. Mutton kuzhambu made with a yummy masala blend makes it really delicious. It makes a perfect side dish with roti,Idli or Dosa. Now lets see how to prepare mutton masala Kuzhambu.

Step by step Method with pictures:
1. In a blender add in all the ingredients mentioned under the “To Grind” section to a fine paste by adding little water.

2. In a pressure cooker add in the cleaned mutton pieces along with this add in ½ cup water and then add in the ground mutton masala mix well.

3. To this add in Salt and turmeric powder and then pressure cook for 6-8 whistles in a medium flame until the mutton is cooked well. Wait till the pressure subsides on its own and then open the cooker.

4. In a pan add in the oil to this add fennel seeds, Cinnamon stick, Bay leaves and curry leaves saute and then add in sliced onions and cook till they turn slightly golden.

5. Now add this to the cooked mutton and mix well .

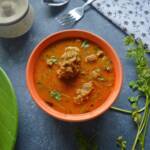
6. Bring the kuzhambu to a boil and check for salt and spice and then finally garnish with coriander leaves and switch off the flame.

I served Mutton Kuzhambu with Kerala Appam.

📖 Recipe
Mutton Masala Kuzhambu Recipe | Mutton Masala Gravy
Mutton kuzhambu made with a yummy masala blend makes it really delicious. It makes a perfect side dish with roti,Idli or Dosa.
Servings: 2
Calories:
Standard 1 cup measures 240 ml
Ingredients
- Mutton – ½ kg
- Turmeric powder – ¼ tsp
- Salt as needed
- Oil – 1 tbsp
- Cinnamon stick – 1 inch piece
- Bay Leaves – 1
- Fennel seeds – ½ tsp
- Curry Leaves a spring
- Onion – 1
- Coriander leaves to garnish
- To Grind:
- Poppy Seeds – 3 tbsp
- Fennel Seeds – 1 tbsp
- Cumin Seeds – 1 tbsp
- Coriander Seeds – 2 tbsp
- Coconut – ¼ cup
- Dry Red Chili – 10 to 12
- Cashew nuts - 10
- Garlic pods - 10
- Ginger – 2 inch piece
Instructions
- In a blender add in all the ingredients mentioned under the “To Grind” section to a fine paste by adding little water.
- In a pressure cooker add in the cleaned mutton pieces along with this add in ½ cup water and then add in the ground mutton masala mix well.
- To this add in Salt and turmeric powder and then pressure cook for 6-8 whistles in a medium flame until the mutton is cooked well. Wait till the pressure subsides on its own and then open the cooker.
- In a pan add in the oil to this add fennel seeds, Cinnamon stick, Bay leaves and curry leaves saute and then add in sliced onions and cook till they turn slightly golden.
- Now add this to the cooked mutton and mix well .Bring the kuzhambu to a boil and check for salt and spice and then finally garnish with coriander leaves and switch off the flame
Notes
- Use coconut oil for tempering to give a yummy aroma,
- Goes well with roti, Idli ,Dosa and Rice.
Tried this recipe?Mention @happietrio or tag #happietrio
Subscribe to my Channelclick for more videos
ashok
Guys, Thanks For sharing this Great Recipe. My Family Loved it. I am definitely sharing this recipe and this website with my friend. Hope they also love it. Thank you again for sharing such a great recipe.