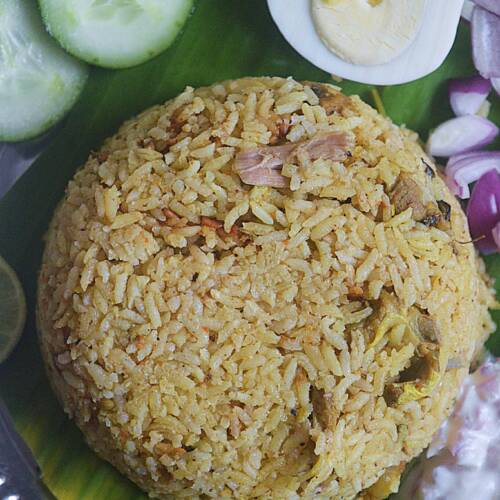
Hyderabadi Mutton Dum Biryani is prepared by cooking the marinated mutton in raw papaya paste and then layered with rice.

Hyderabadi Mutton Dum Biryani | How to cook Hyderabadi Style Mutton Dum Biryani. Hyderabadi biryani is a famous version of biryani introduced by the Mughals who invaded to India. In this version, we marinate the mutton with raw papaya paste and many other spices. This makes the meat tender. The marinated mutton and rice are layered with mint coriander, Saffron milk, and a generous sprinkle of nuts. Everything is put in Dum and slow-cooked to perfection.
I prepared Hyderabadi Mutton Biryani almost Last September month and misplace the step-by-step pictures. So will update the post once I get them, Now let’s see how to prepare Hyderabadi Mutton Dum Biryani.
Check out the Mutton Dum Biryani and PressureCooker Mutton Biryani Recipes too

Serve with Raita and Brinjal Gosthu.
Hyderabadi Mutton Dum Biryani

Similar Recipes


★ Did you enjoy this recipe? If you happen to try it out, I would love to hear from you! I’d appreciate it if you could rate and leave a review below in the comments. Your reviews help others know the recipe better too. Thanks for your time ? You can also follow me on Facebook, Pinterest, Instagram, Youtube and Twitter for more updates from me.
📖 Recipe
Hyderabadi Mutton Dum Biryani
Standard 1 cup measures 240 ml
Ingredients
For Garam Masala:
- 1 tablespoon Fennel Seeds
- 1 tablespoon Cumin Seeds
- 1 tablespoon Whole Pepper
- 1 Kashmiri Red Chill
- 1 Bay Leaf
- 10 Green Cardamom
- 2 Black Cardamom
- 2 inch Cinnamon sticks
- 3 Cloves
- 3 Star Anise
- 2 Mace
- 3 Black Stone Flower
To Marinate:
- ½ kg Mutton
- 1.5 tablespoon Raw Papaya paste
- 2 tablespoon Ginger Garlic paste
- 2 Green Chilli
- 2 teaspoon Red Chilli powder
- ½ teaspoon Turmeric powder
- 3 tablespoon Garam Masala
- 1 cup Mint + Coriander leaves
- ½ cup Curd
- 1 cup Fried Onions
- Salt as needed
- 1 tablespoon Lemon Juice
- ½ cup Milk
Other Ingredients:
- 4 tablespoon Oil / Ghee
- 2 tablespoon Raisins
- 10 Cashew nuts
- 2.5 cups Basmati Rice
- 3 Green Chilli
- 4 Onion
- ¼ cup Mint leaves
- ¼ cup Coriander leaves
- 2 tablespoon Milk
- 1 tablespoon Saffron
- Rose Water few drops
- Biryani essence few drops
Instructions
- Dry roast all the ingredients together mentioned under the Garam Masala section in a low heat until it gives a nice aroma. Allow it to cool down and then blend it to a fine powder.
- In a vessel take the cleaned Mutton pieces, to this add in the Raw Papaya Paste, Ginger Garlic paste.
- Next add in the Garam Masala Powder, Chilli powder, Turmeric powder, Lemon Juice and Salt.
- And then add in the Curd, Green Chilli, Fried Onions, Coriander and Mint Leaves and mix well.
- Next add in the milk mix well together and then allow it to marinate for 2 hours. Meanwhile soak the basmati rice and cook till its 50 % done. Soak the saffron in milk and set it aside.
- Next take the vessel which is used to cook the biryani, spread it with ghee and then add in the Mutton masala and cook for 5 mins and switch off the heat.
- Spread it with half of the rice. Top it with saffron soaked milk and then sprinkle few mint and coriander leaves.
- Then top the vessel with the remaining basmati rice and then again sprinkle the fried onions, mint, coriander leave sand saffron milk. Finally add in the Biryani essence and Rice water.
- Top it with ghee fried cashew nuts and raisins.
- Now seal the vessel with atta and then close with the lid.
- Slow cook in the lowest possible flame for about 45 mins. Once done open the vessel and fluff the rice. Yummy Hyderabadi Mutton dum biryani is ready to be served.
Notes
- Raw papaya paste is a key ingredient so don’t omit it.
- Make sure you cook the basmati rice correctly else the rice will get mashed while cooking the dum.
Nutrition
Disclaimer: I am not a nutritionist, the nutrition value provided here is an estimate. It will vary based on the quantity and brands of the products used.


Swati says
Though I do not cook non-veg biryanis or in fact any other dish except chicken very occasionally.. I am loving all your versions and am tempted to make some with chicken. Lovely share.
CookwithRenu says
The Hydrebadi mutton Biryani looks so inviting. I understand the addition of raw papaya taste is to something with the meat if I am not wrong. Love your nonv veg biryanis.
Sowmya :) says
Each biryani of yours is so unique and you have mastered this royal dish. The rice has been cooked perfectly...love the texture. And making your own garam masala is awesome!
Kalyani says
such a hearty dish,, the raw papaya is so unique I am hearing it in a biryani for the first time... u r rocking the biryani series, Sharmi...
Pavani says
I love mutton biryani so I cannot wait to try your recipe later! Thank you for sharing!
Srividhya says
I have the veggie version of it coming soon. Between the raw papaya paste sounds interesting. I should try marinating the veggies with it. Good one sharmi.
sushma says
Mutton biryani looks super delicious. Adding papaya paste truly makes the meat nice and tender. Good one.
Gayathri Kumar says
Such a classic biryani. Looks absolutely yum. The ingredient list is pretty long, but guess that is what gives the maximum flavor to the dish.
Srivalli says
That bowl surely looks so classic Sharmila, hope you get to update the pictures again. The recipe sounds very good and I would surely want to try this sometime!
Harini R says
Looks very colorful and definitely must be flavorful with so many interesting spices.
vaishali sabnani says
That sure is a lengthy Biryani . The Mughals surely gave us some very delicious cuisine , and Mughlai cuisine is so rich , perfect for weddings and parties .
Nicely presented Biryani , like the placement of that egg , looks unique .
Suma Gandlur says
Addition of papaya paste sounds unique and the biryani has a beautiful texture.