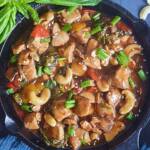
Instant Pot Thai Basil Chicken is a popular chicken dish with sweet and spicy umami sauce and fresh basil leaves. This flavorful restaurant-style dish is best enjoyed with jasmine rice. This flavorful one-pot meal is packed with tender chicken and authentic Thai spices for a healthier, homemade take on the takeout favorite.
Follow us on Pinterest for delicious pins. Join our Facebook group for more Instant Pot and Air Fryer recipes.

Tender chicken, aromatic Thai basil, and bold flavors make this Instant Pot Thai Basil Chicken a quick and delicious meal. Ready in under 30 minutes, this flavorful dish is a weeknight dinner game-changer.
Perfect for a busy working day or weeknight dinner. If you crave something delicious basil chicken is a perfect choice.
Jump to:
Thai Basil
Thai Basil is a type of Basil that is native to Southeast Asia. It is one of the primary ingredients in Thai Cuisine. Thai basil has small narrow leaves, purple stems, and pinkish purple flowers. It has a slightly spicy and anise-like flavor. It is also suitable for cooking under high cooking temperatures.
About Basil Chicken
Thai basil chicken gets their name from the basil leaves used. Basil leaves are known as Krapow in Thai. While my version of basil chicken is slightly different from the popular Thai street food Pad Krapow Gai or Gai Pad Krapow.
Pad Krapow Gai uses ground chicken along with sauces and stir-fried veggies. Pad Karapow Stands for Pad means Stir-fried, Krapow means Basil and Gai stands for Chicken. So it's stir-fried basil chicken.
Instead of chicken, you may also use Shrimp or Crab.

Ingredients
Thai Basil Leaves - The primary ingredient and the main flavoring agent for basil chicken.
Chicken - Boneless breast pieces are suitable for this dish.
Onion - Use both white and red ones.
Bell Pepper - Use any colored peppers. I prefer using different colors as they make the dish more appetizing
Cashewnuts - They add a crunch and are most in Thai dishes.
Sauces - Uses a combination of chili sauce, Soy Sauce, and rice vinegar. They bring a balance to the taste.
Sesame oil - Another main ingredient. Never replace the oil with any other cooking oil.
Corn flour - We add corn flour slurry to thicken the dish.
Sesame seeds - Gives a nutty flavor to the chicken.
Green Onions or Spring onions - Gives the traditional touch to all the Asian dishes
FAQ's
Can I replace Thai Basil with regular basil?
If you have access to both I do not recommend replacing regular basil with Thai basil. If you do not source Thai basil leaves, you may definitely use regular sweet basil leaves. Though the dish may have a slight difference in taste it still tastes awesome.

How to make Thai Basil Chicken
Switch on the Instant Pot in saute mode. Add in the sesame oil, and let it get hot. Add the cashew nuts and saute until they turn slightly golden and aromatic. Remove from the pot and set aside for later use.

2. Into the add the sliced garlic. Saute for 1few secs and then add the diced onion. Saute for a min.

3. Now add the diced bell pepper along with the white onion. Saute for 2 mins. If you want the peppers to be crunchy, you may saute them, remove them from the pot, and add them later. Else let them be.3.

4. Now add the boneless chicken pieces. Saute for a min.

5. Next, add the Soy Sauce, Sweet chili sauce, Rice Vinegar, and Brown Sugar. Combine once.

6. Now add the black pepper powder and the required salt.

7. Also, add ½ cup of Water or chicken stock. Combine everything and deglaze the pot once. Close the Instant Pot. move the pressure value to the sealing position. Press cancel and then press the pressure cook option. Set 5 mins in high pressure.

8. Once the cooking time is over. Do a quick release and open the Instant Pot. Combine the corn flour with water and make it a slurry. Switch on the Instant Pot in saute mode and add the corn flour slurry.

9. The sauce thickens in a min or two and then switch off the Instant Pot. Now add in the fresh Basil leaves. you may add them as a whole or tear them roughly and then add them.

10. Also, add the roasted cashew nuts. Mix everything once and then keep the Instant Pot closed for another 10 mins.

11. Open after 10 mins. The basil leaves will have wilted. Garnish with spring onion greens and toasted sesame seeds and serve hot.

Instant Pot Thai basil chicken is now ready.

Stove Top Instructions:
Follow the same instructions from steps 1 - step 7. Once you add the liquid, cover and cook on a medium flame until the chicken gets cooked. May take 8-10 mins on a medium flame on the stovetop.
Once the chicken is cooked. Add the corn flour slurry if the sauce needs to thicken, Add fresh basil and leaves and the roasted cashew nuts. Keep them covered for 10-15 mins or till the basil leaves wilt.
Tips & Variations
- Always use fresh basil leaves for a fresh and authentic taste. Do not replace the fresh leaves with dried basil leaves.
- Use Thai basil leaves, If it's not available go for holy basil or regular basil.
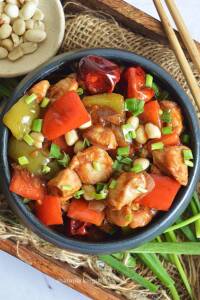
- It is a semi-dry dish and hence you may just mix and have them with jasmine rice.
- Check out our Kung Pao Chicken and Sesame chicken recipes too
Serving Suggestions
Goes well with Jasmine Rice. You can also pair them with the fusion dishes like fried rice. Or just serve as an appetizer.
Storage Options
You may store the Thai basil chicken in the fridge for up to 4 days in a fridge container. I do not recommend freezing as we cook the chicken in sauce, it tends to get soggy.
Similar Recipes


★ Did you enjoy this recipe? If you happen to try it out, I would love to hear from you! I’d appreciate it if you could rate and leave a review below in the comments. Your reviews help others know the recipe better too. Thanks for your time. You can also follow me on Facebook, Pinterest, Instagram, Youtube and Twitter for more updates from me.
📖 Recipe
Instant Pot Thai Basil Chicken
Standard 1 cup measures 240 ml
Equipment
- Instant Pot 6 Qz
- Instant Pot 6 Qz
Ingredients
- 2 tablespoon Sesame Oil
- 20 Cashewnuts
- 6 clove Garlic
- 1 Onion Medium sized diced
- 1 Bell Pepper I used ½ Yellow and ½ Red
- 2 tablespoon White Onion
- ½ teaspoon Ginger minced
- 300 gms Chicken preferably breast pieces
- ¼ cup Soy Sauce
- 1 tablespoon Sweet Chilli Sauce
- 2 tablespoon Rice Vinegar
- 1 tablespoon Brown Sugar
- ½ teaspoon Pepper Powder
- Salt as needed
- ½ cup Chicken Stock or Water
- 1 cup Thai Basil Leaves
- 2 tbsp Spring onions (Green)
- 1 teaspoon Toasted White sesame seeds to garnish
Instructions
- Switch on the Instant Pot in saute mode. Add in the sesame oil, and let it get hot. Add the cashew nuts and saute until they turn slightly golden and aromatic. Remove from the pot and set aside for later use.
- Into the add the sliced garlic. Saute for 1few secs and then add the diced onion. Saute for a min.
- Now add the diced bell pepper along with the white onion. Saute for 2 mins. If you want the peppers to be crunchy, you may saute them, remove them from the pot, and add them later. Else let them be.
- Now add the boneless chicken pieces. Saute for a min.
- Next, add the Soy Sauce, Sweet chili sauce, Rice Vinegar, and Brown Sugar. Combine once.
- Now add the black pepper powder and the required salt.
- Also, add ½ cup of Water or chicken stock. Combine everything and deglaze the pot once. Close the Instant Pot. move the pressure value to the sealing position. Press cancel and then press the pressure cook option. Set 5 mins in high pressure.
- Once the cooking time is over. Do a quick release and open the Instant Pot. Combine the corn flour with water and make it a slurry. Switch on the Instant Pot in saute mode and add the corn flour slurry.
- The sauce thickens in a min or two and then switch off the Instant Pot. Now add in the fresh Basil leaves. you may add them as a whole or tear them roughly and then add them.
- Also, add the roasted cashew nuts. Mix everything once and then keep the Instant Pot closed for another 10 mins.
- Open after 10 mins. The basil leaves will have wilted. Garnish with spring onion greens and toasted sesame seeds and serve hot.
- Instant Pot Thai basil chicken is now ready.
Video
Nutrition
Disclaimer: I am not a nutritionist, the nutrition value provided here is an estimate. It will vary based on the quantity and brands of the products used.


Lisa Heath says
Very good! I used Braggs soy sauce and would like to cut down the saltiness, any ideas?
sharmila kingsly says
Try using low sodium Soy Sauce. That will help to cut down the salt a bit.