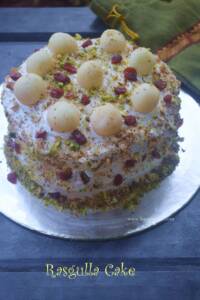
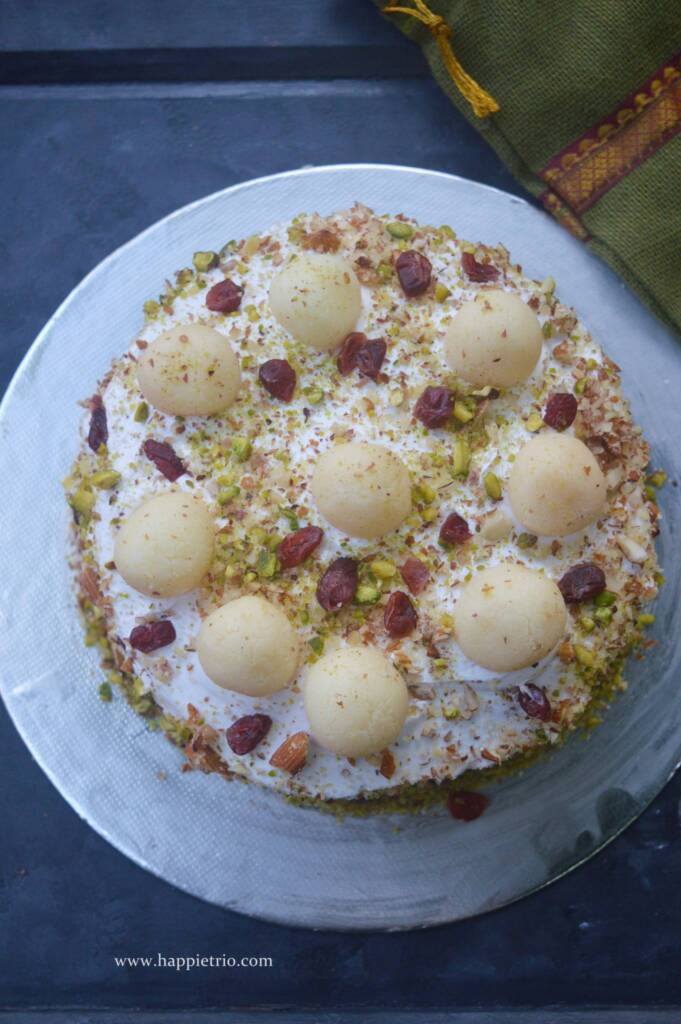
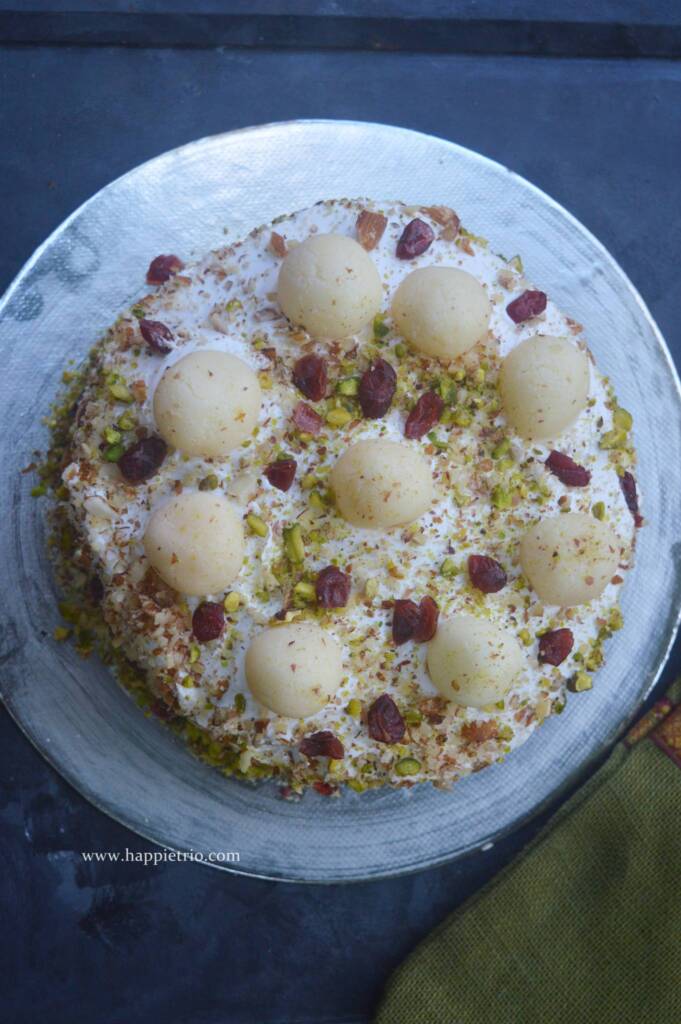
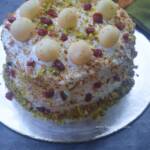
Rasgulla cake is a party cake with Indian Flavours. We have flavored it with rasgulla, saffron, cardamom, and nuts. It is perfect for parties.
Birthdays are always fun. We have more food, cake, friends, family and lots of happiness. Covid has given us a lot of home time and this year for my daughter's birthday I utilized the time I had in hand.
Yes, I came out of my comfort zone and baked my daughter's birthday cake. I have been baking for almost 6 years now. I always try naked caked but never frosted and made a party cake. This is the first time.
My parents insisted I bake a cake for my daughter's cake. That is when the idea of making the party cake sparked. Also, I too got a why not though. I have made enough cakes, high time I bake a frosted party cake.
When I was thinking about the cakes, the Rasgulla cake was in my mind for quite some time now. So I picked it and developed the flavors based on the availability of the ingredients I had in hand.
Also, I recite, now it self. The cake may not be perfect, but it's the taste and mother's, love. I wanted to document my first attempt here. Now lets get started.
[feast_advanced_jump_to]What is Rasgulla
Rasgulla or Rosogolla is a Bengali dessert made with the chenna from curdling the milk. It is spongy, fluffy, and a sugary delight.
Rasgulla is a popular Bengali Milk sweet which is predominantly consumed over the Asian countries. It is prepared from Chenna (Cottage Cheese) and cooked in sugar syrup.
The name Rasgulla is from the Bengali Word Rosogolla or Roshogolla where ‘Ras’ means juice and ‘gulla’ means ball. Rasgulla tastes best when served chilled.
I already have a detailed post on the blog about how to prepare Rasgulla. you can check it out for more tips, tricks to prepare the perfect homemade rasgulla.
How to prepare Rasgulla Cake
Rasgulla Cake is prepared with Vanilla Sponge cake as the base. I have flavored the Ras from the rasgulla with Saffron, Rose Syrup, and Cardamom. For the final makeover, I have layered the vanilla sponge cake. Between the cake, I have used the ras from rasgulla and then whipped cream frosting.
Once again the entire cake is cover with whipped cream. I keep the decorations as simple as possible. Decorated the cake with Crushed Almonds, pistachios, and dried cranberry.
So totally the entire process is done in 3 steps
- Bake the sponge Cake
- Prepare the Rasgulla
- Frost the cake and decorate
Prep Work for Rasgulla Cake
- Bake the Sponge cakes the previous day and keep it ready.
- You will need 2 layers of sponge cake.
- Prepare the rasgullas as well.Chop the nuts and keep it ready for decorating the cake.
For Whipped Cream
- If using a tetra pack. Keep it in the freezer.
- Just 24 hours before you are about to frost keep it in the refrigerator section.
- See the package instructions for more details.
- Many brands are available these days.
- Check the ingredients if it has sugar or not. If needed add icing sugar only. The cream which I used has sugar already so I dint add and it was perfect for me
- Keep the Ice cubes ready, So the whipped cream has to be whipped at a 2 Deg C also work on an AC Room for best results.

Ingredients for Rasgulla Cake
Sponge Cake
Rasgulla cake recipe calls for two vanilla cakes as the base. You can use either eggless or Sponge cakes with eggs. I have both the recipes in the blog. You can check them for the detailed recipe.
Rasgulla
Again Rasgulla you can make it from scratch in-home or even the tinned or can rasgulla works well. If you are organizing a party and pressed with time store-bought rasgulla works well. Check the blog post on Rasgulla to make rasgulla from scratch at home.
Saffron
The flavor I had in mind was Rose Cardamom and Saffron, So I went ahead and added them in the Juice of the Rasgulla. The flavors were subtle but perfect for the cake.
Rose Water
If you like rose flavor, this definitely is not to be skipped. It is just perfect when added with rose and cardamom.
Whipped Cream
I used store-bought tetra pack Whipping Cream. I then whipped them till stiff peaks and then frosted the cake. You can also use butter cream or any frosting as you prefer.
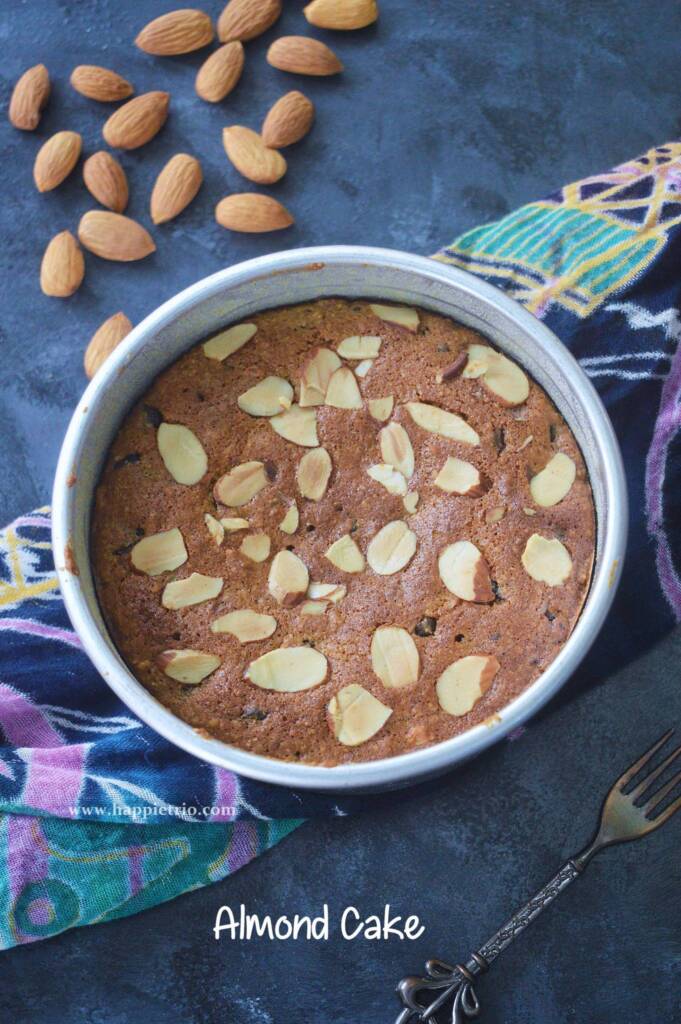
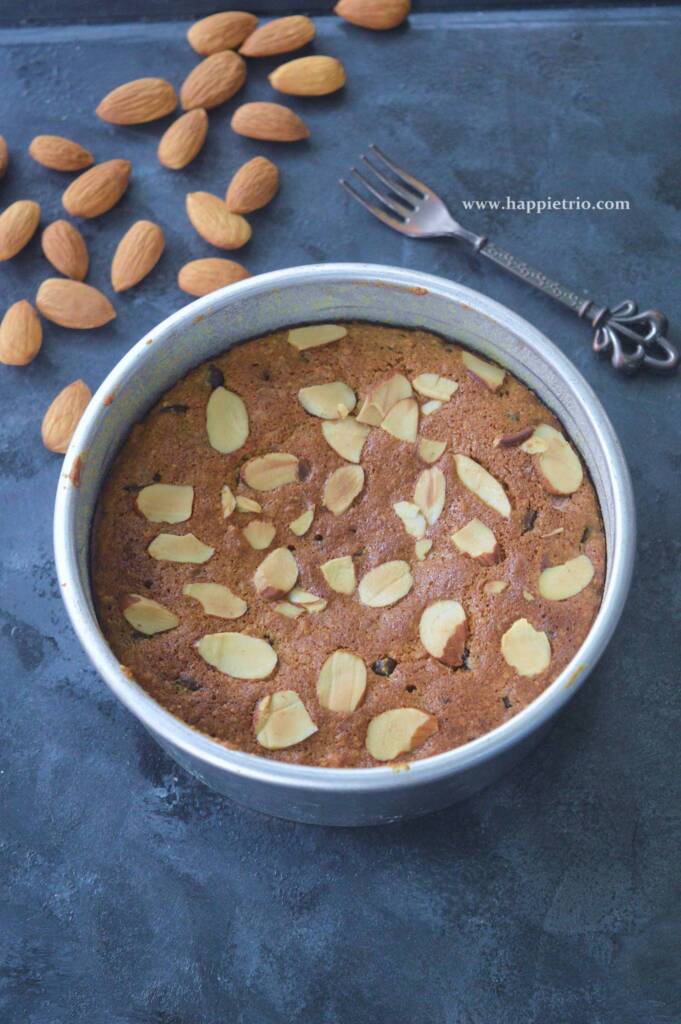
Almonds & Pistachios
Instead of edible decorations like sprinkles and sugars. I went with the almonds and Pistachios for decorating the cake. Since I baked for the kids I was particular about the decorations. Almonds and pistachios complimented very well when added to the whipped cream cake.
Dry Fruits
I wanted to add rose petals too for decorating the cake but I was out of stock. So went ahead and added dried cranberries.
How to bake Sponge Cake
Sponge cake is the basis for many cakes. While frosting the cakes also the first thing we look for a sponge cake. Sponge cake is very light and soft and airy. I baked two sponge cakes of uniform thickness. Slice the top doom part if any and make them of equal size.
Sponge cake usually has butter, Eggs, Sugar, and Flour as the base. The Eggless version is also available in the blog. If you make the sponge cakes ahead. Wrap it well and free them. Thaw it before you use it.
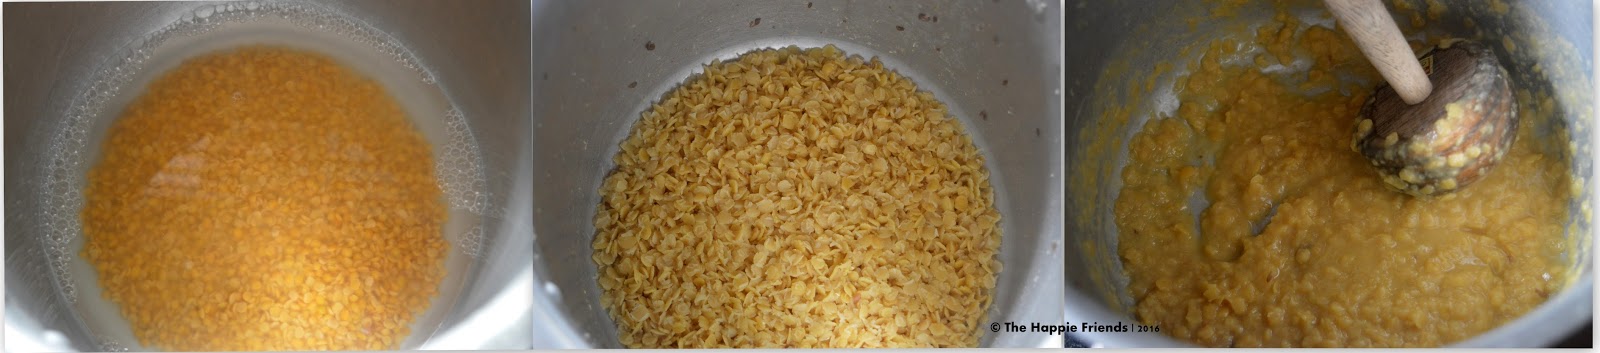
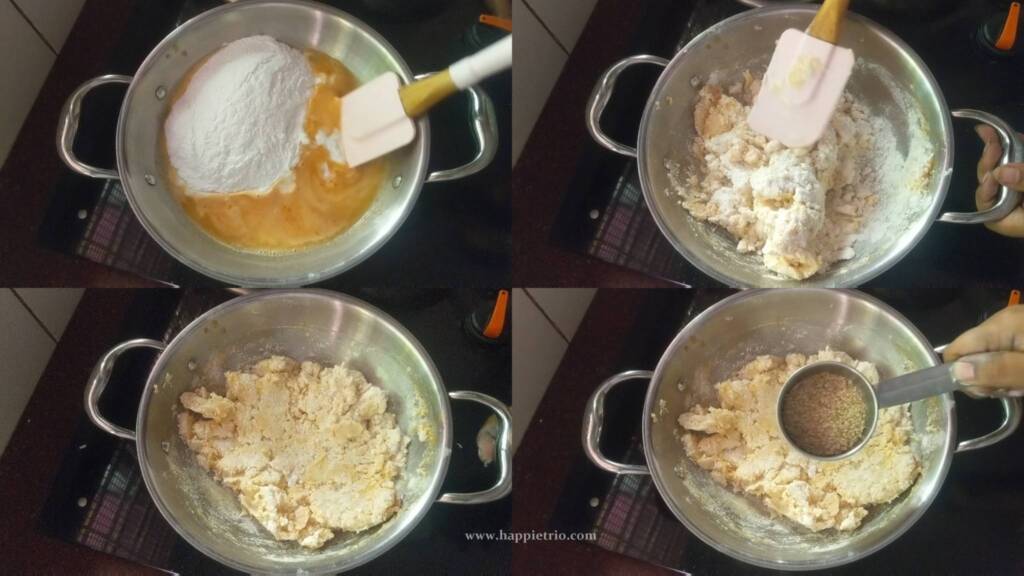
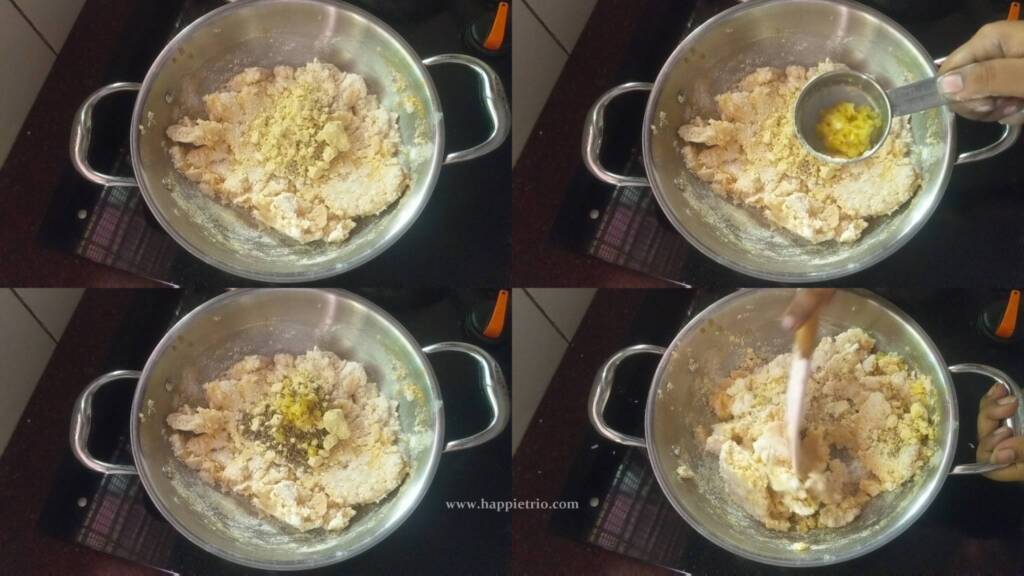
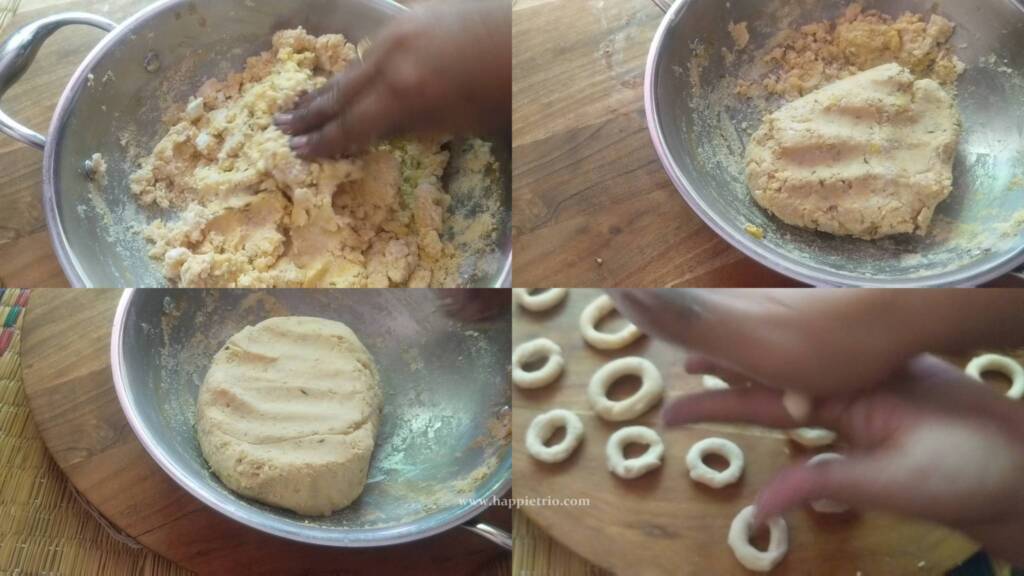
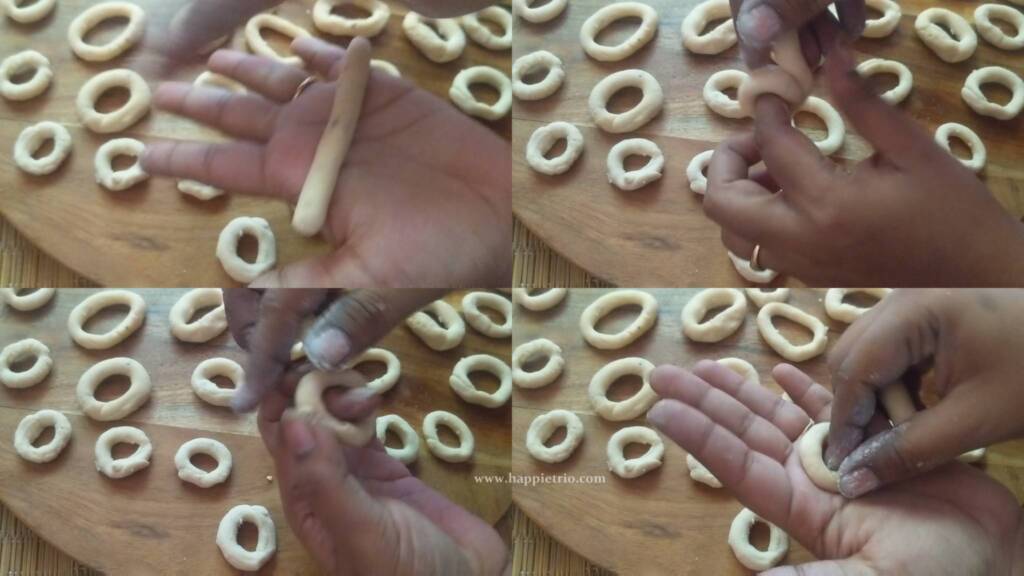
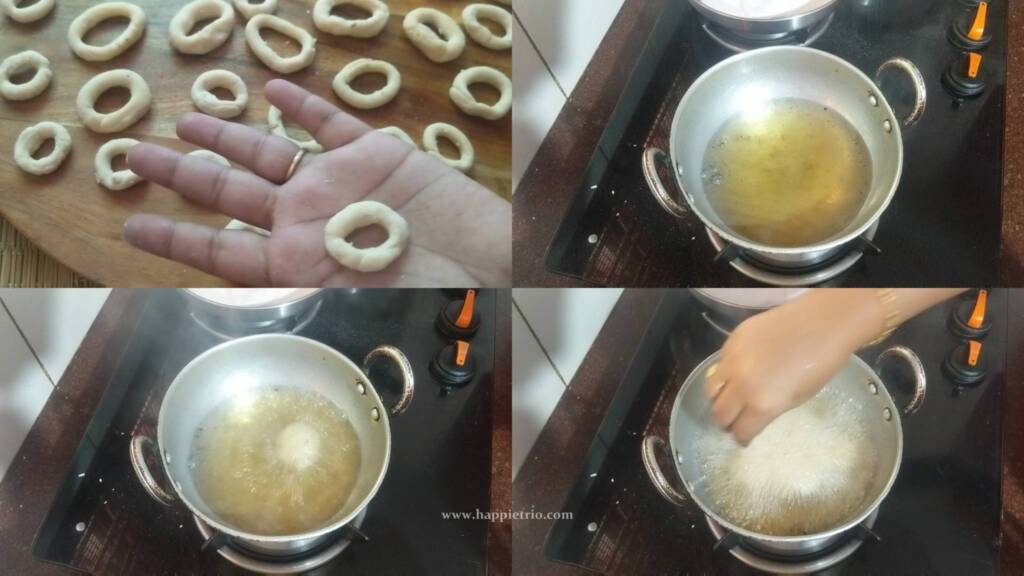
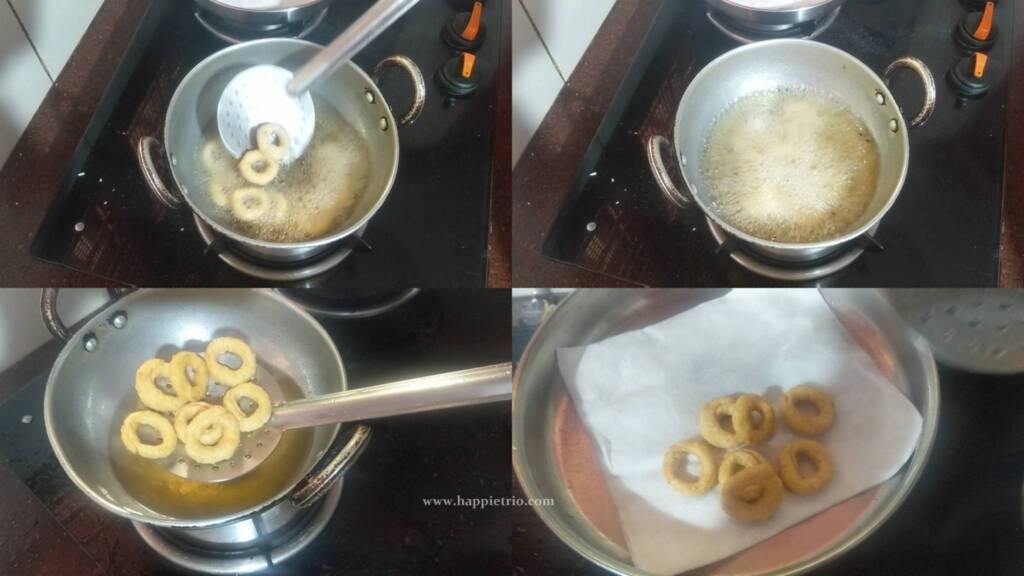
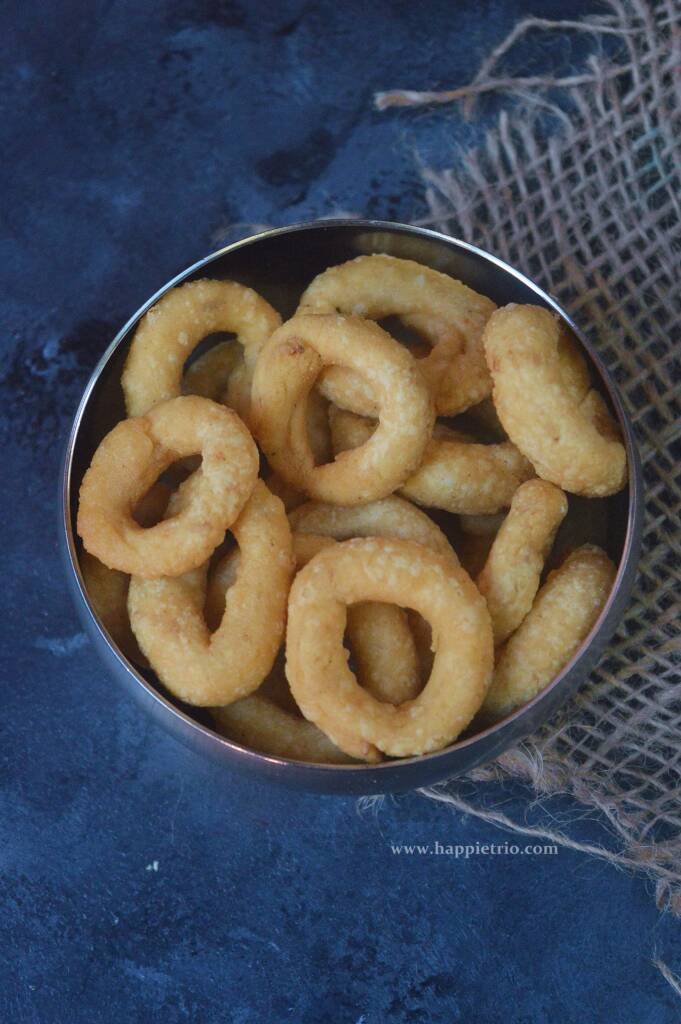
How to Prepare Rasgulla
Bring Milk to the boil and curdle it. Knead well to prepare the Chenna. Shape them into balls and pressure cook in sugary water till the rasgullas fluff up. Flavour the sugar water with Rose water, Saffron, Cardamom for the best flavor.
Check the Rasgulla blog post for the detailed recipe with tips and tricks. I used Store bought Rasgulla for saving Time. But if you plan everything in advance homemade works well.
How to Prepare Rasgulla Cake, Pictorial
For Sponge Cake Preparation
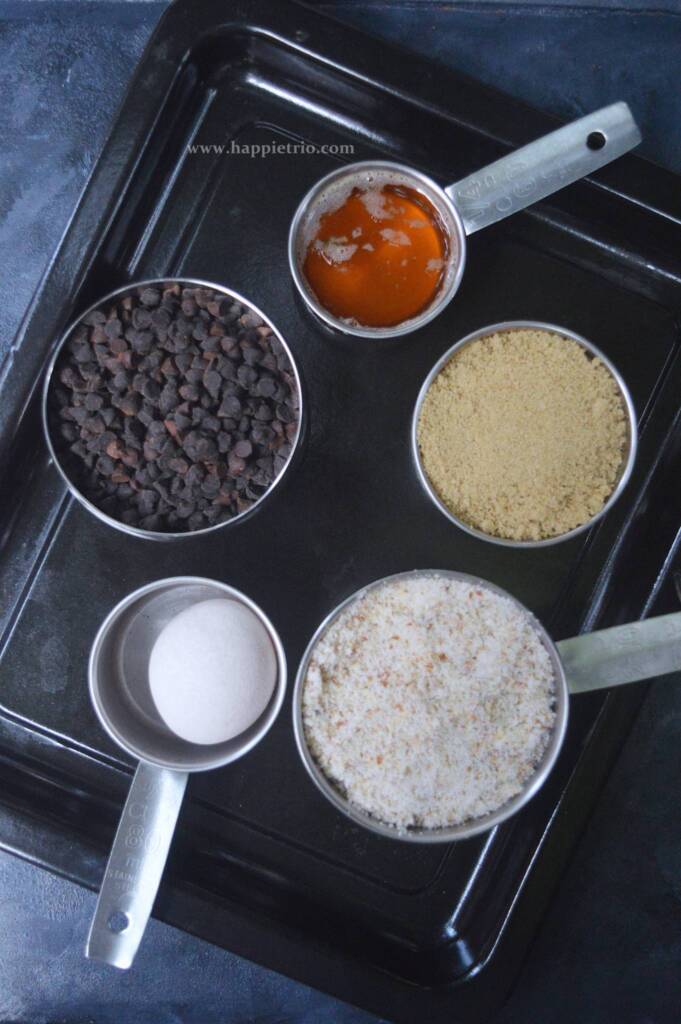
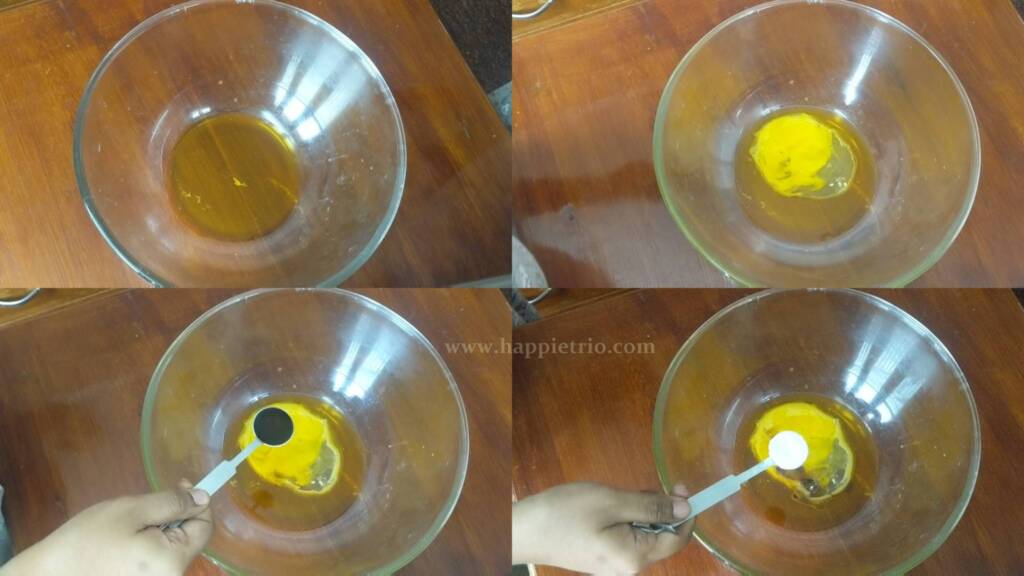
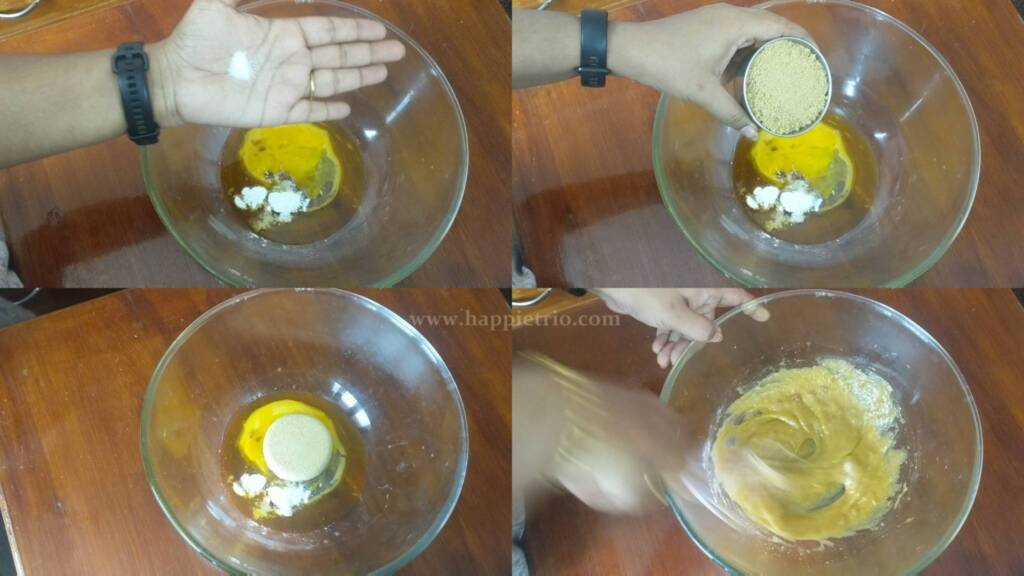
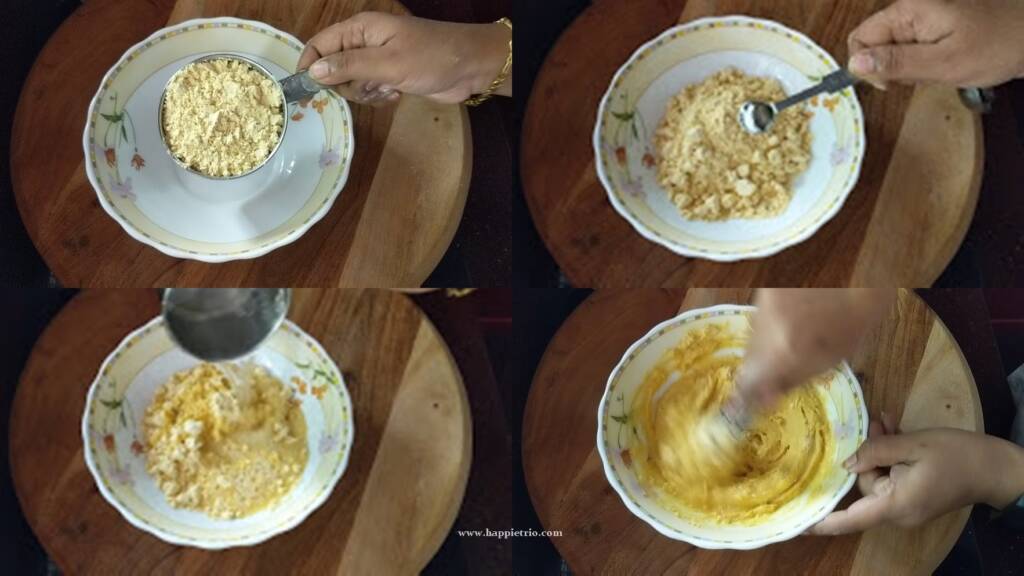
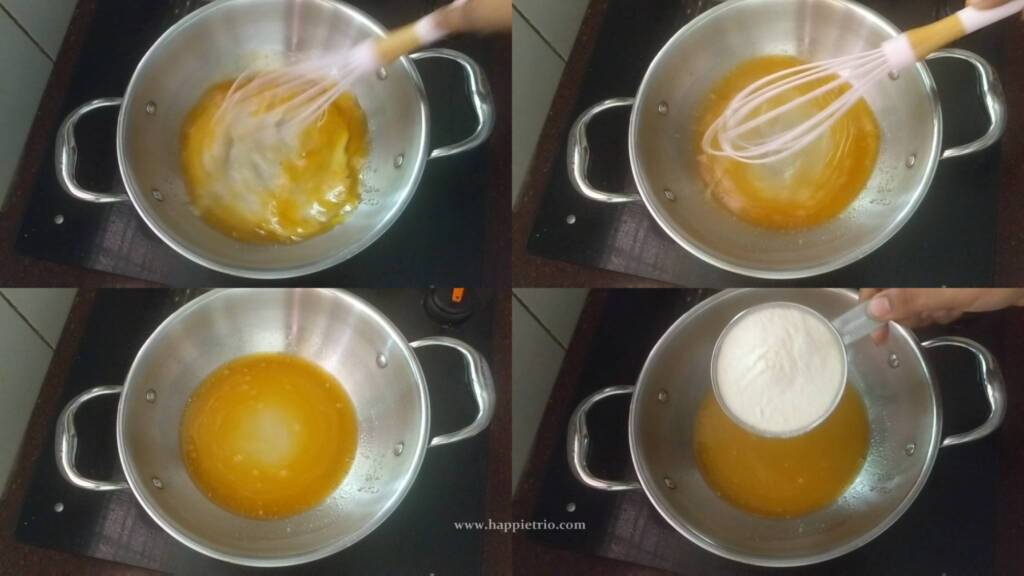
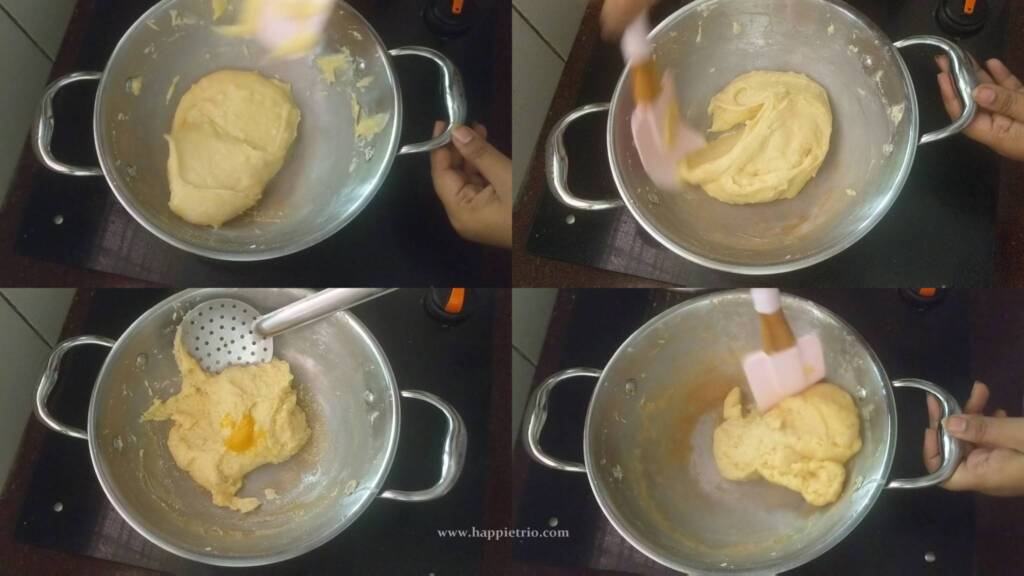
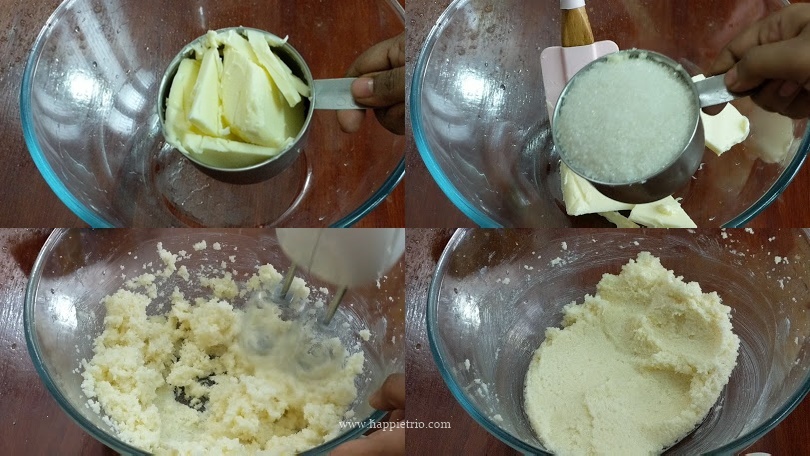
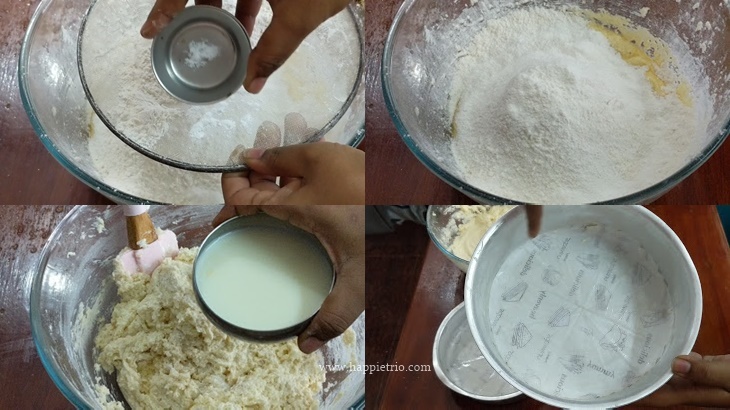
1) In a mixing bowl add in 200 grams of butter, To this add in 1 cup of refined sugar.
2) Using a hand blender cream the butter and sugar together until creamy
3) Break open 2 eggs and beat until it's combined well. Next break open another 2 eggs and cream everything once again until it's well blended.
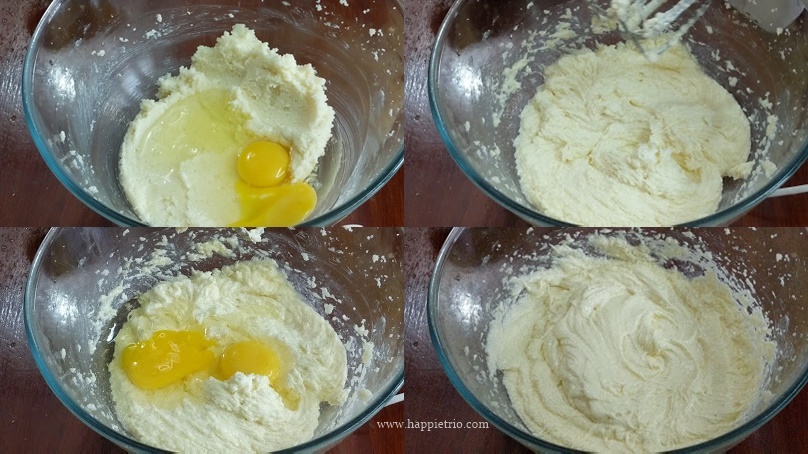
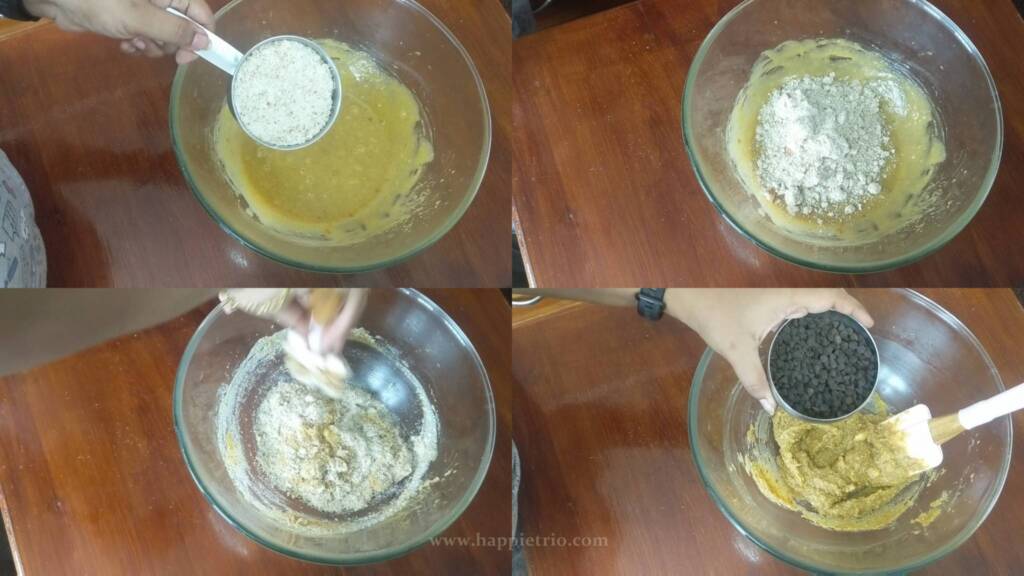
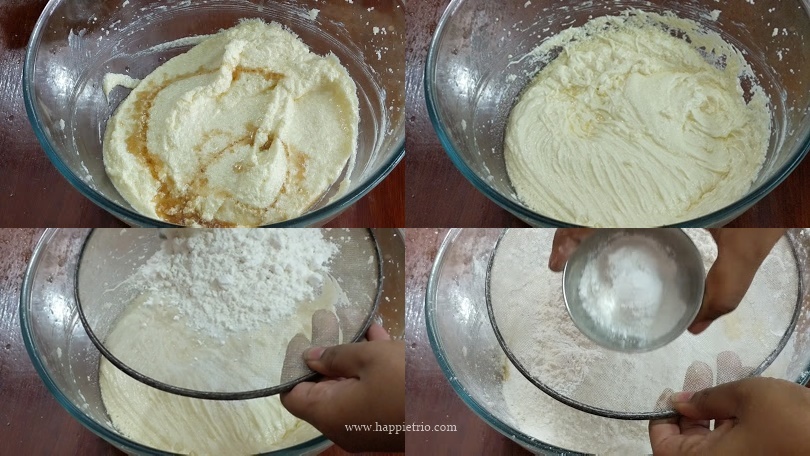
4) Now add in 2 teaspoon of Vanilla essence and beat everything once again. Next, we are going to add in the dry ingredients.
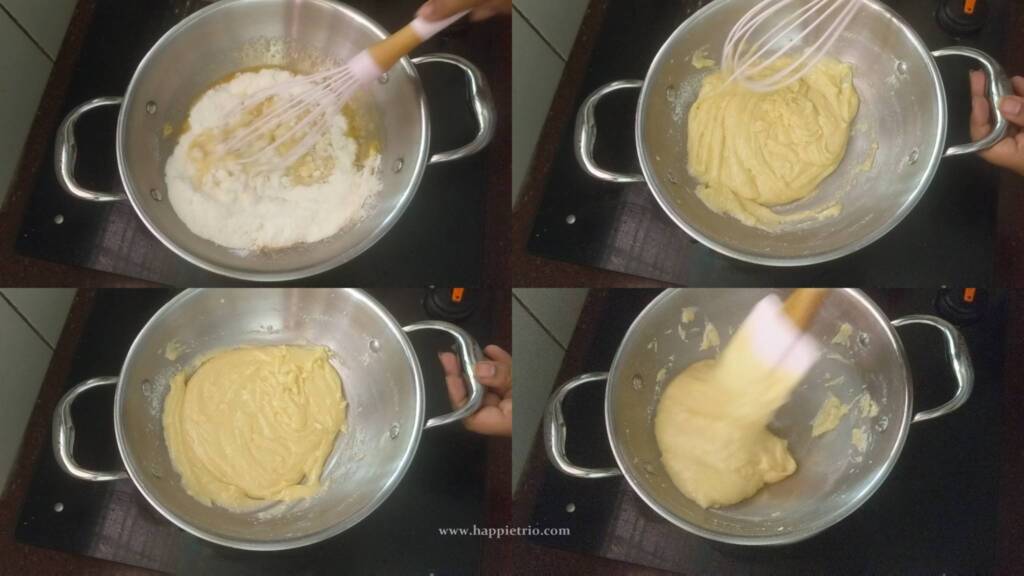
5) Sieve in 2 cups of All-purpose flour, 3 teaspoon of Baking powder, and ⅛th teaspoon of salt together.
6) Now using a spatula fold everything gently well combined
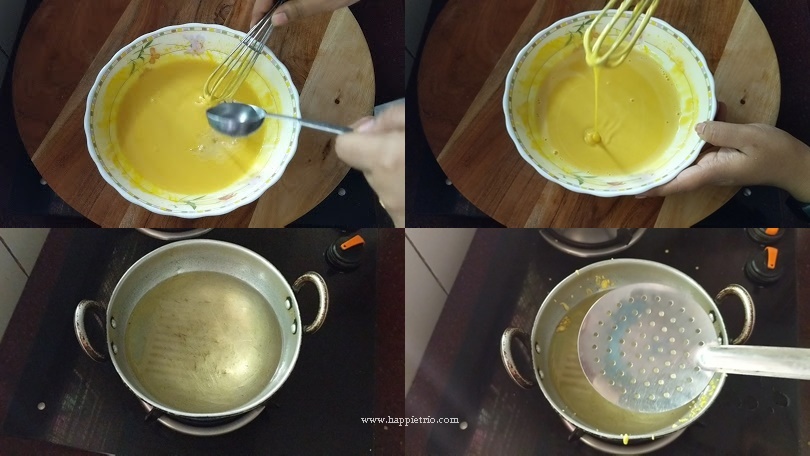
7) Add in 6 tablespoon of Milk and keep folding the batter until combined.
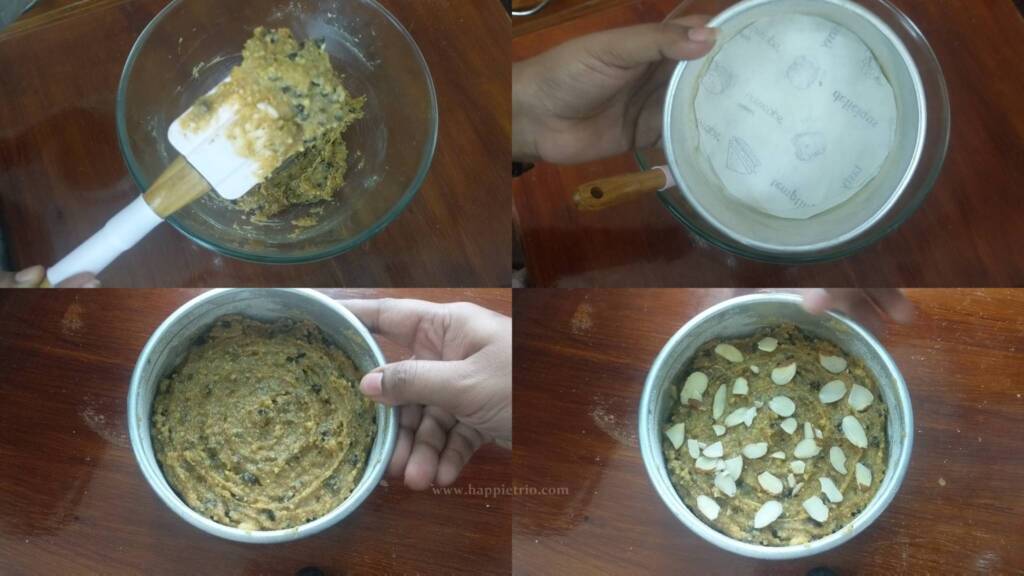
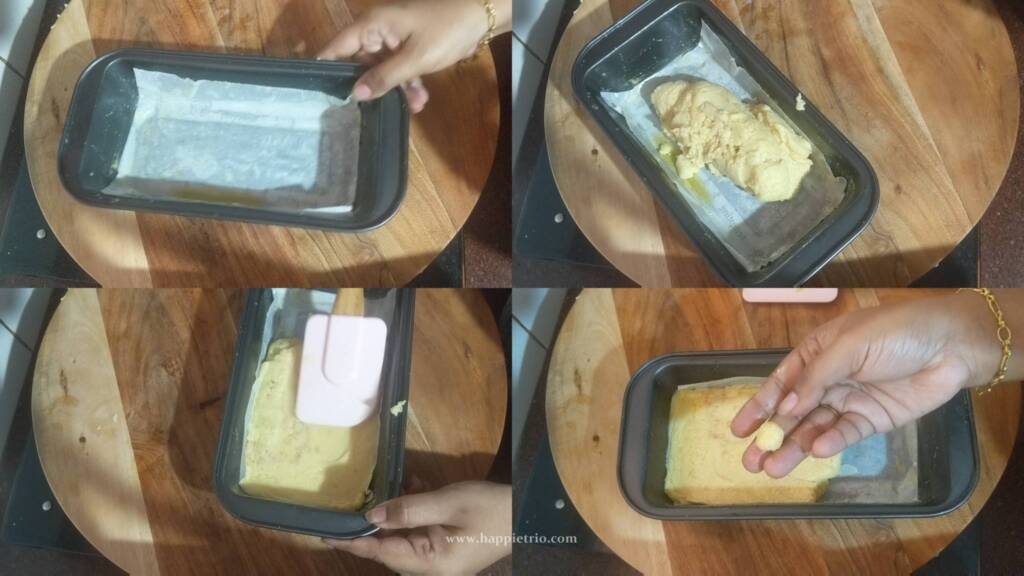
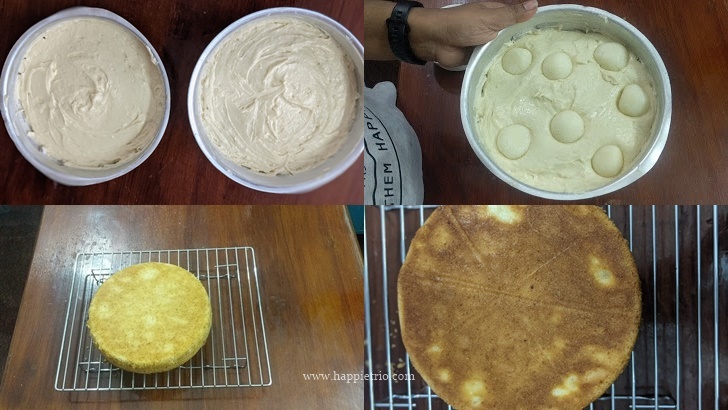
8) Take two equal size 7 inch round cake pans. Divide the batter into two equal portions and put on the baking pans.
9) For lining the baking pans. I have applied a layer of butter to the baking pan and then dusted it with flour. Tap and remove the excess flour. Place a parchment paper above that and apply little butter in that. By doing this the cake will not stick to the pan.
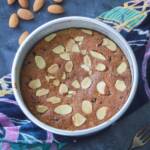
10) In one of the cake pan I added a few rasgullas randomly. Squeeze out the excess jeera on the rasgulla and add it inside the cake pan.
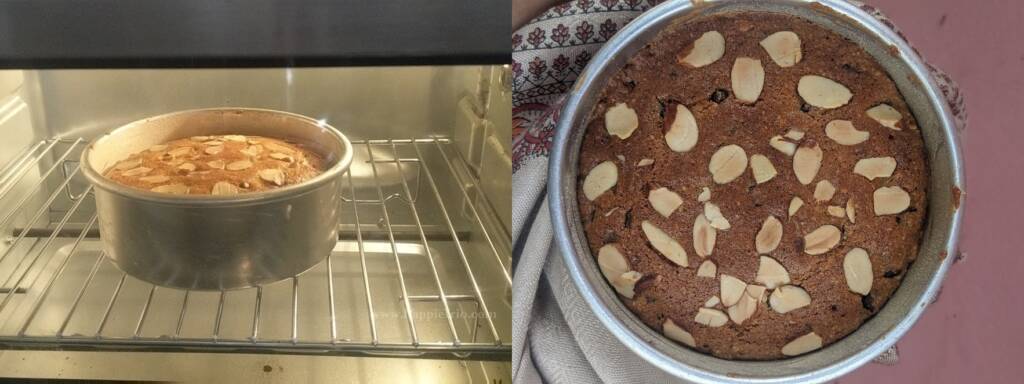
11) Preheat the oven at 180 Deg C for about 10 mins and then bake the cake at 180 Deg C for about 30 to 35 mins or until the toothpick when inserted comes out clean.
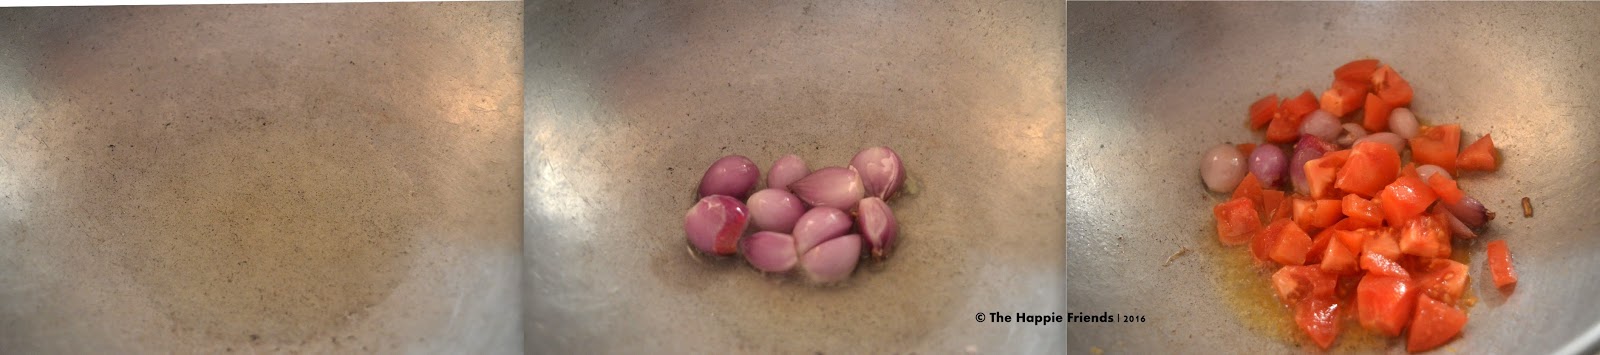
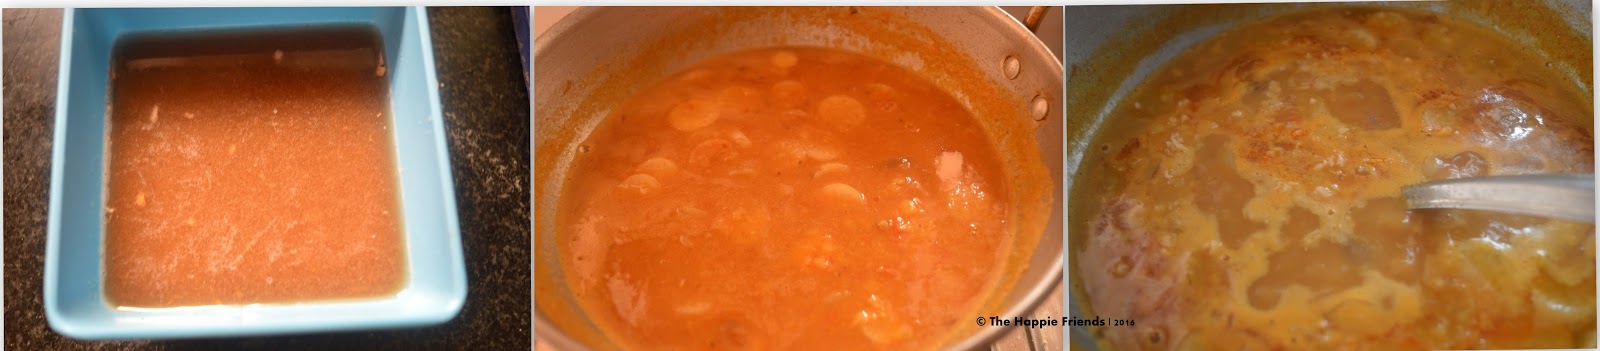
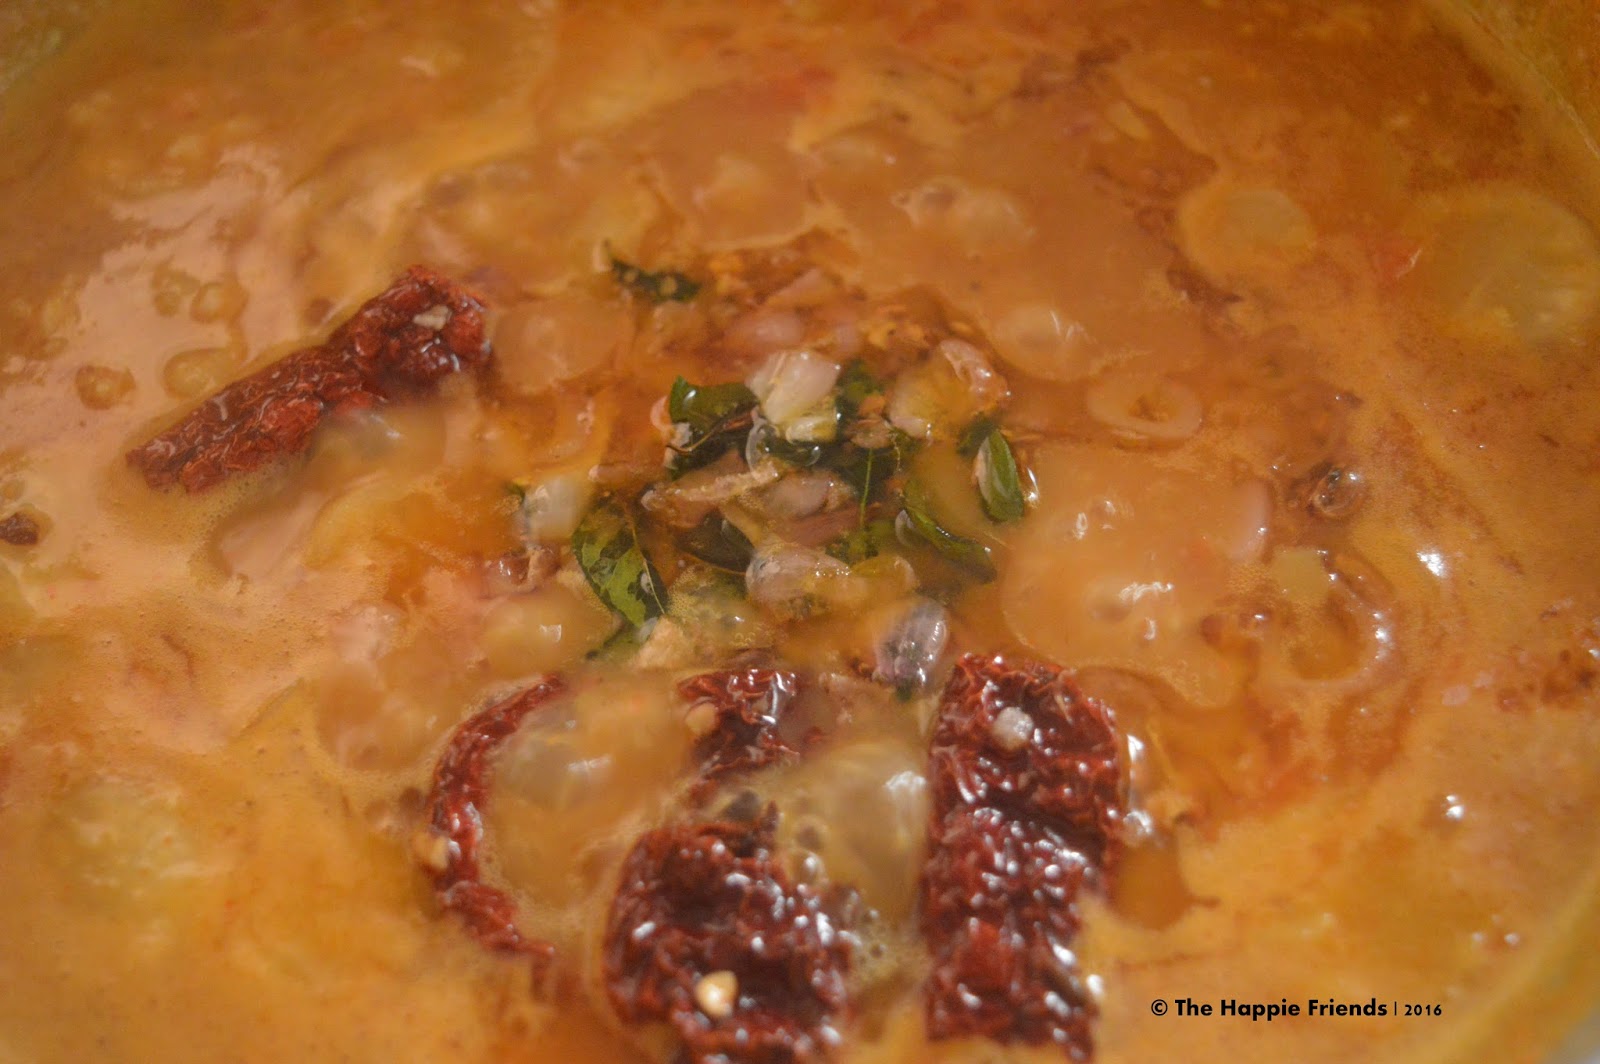
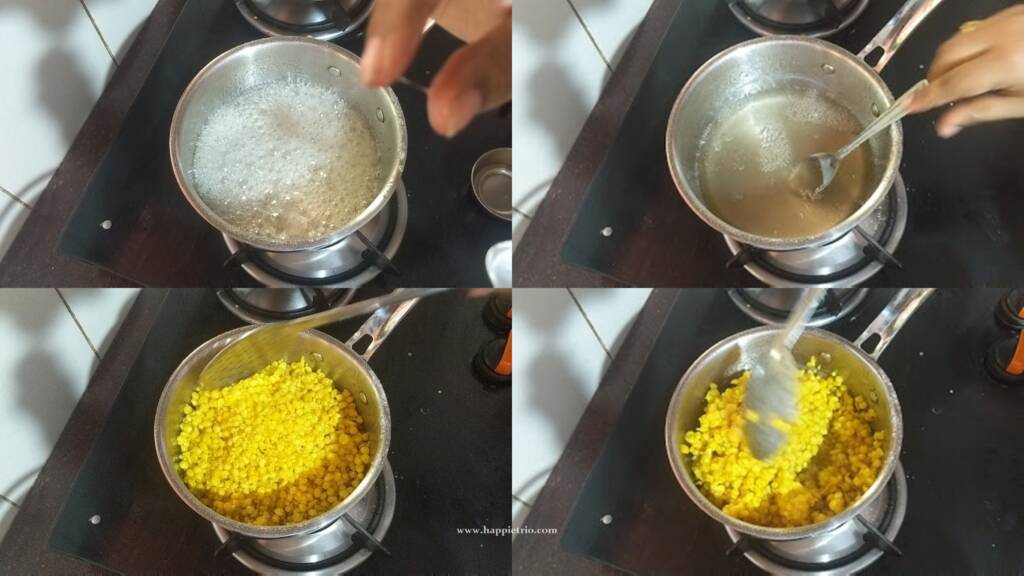
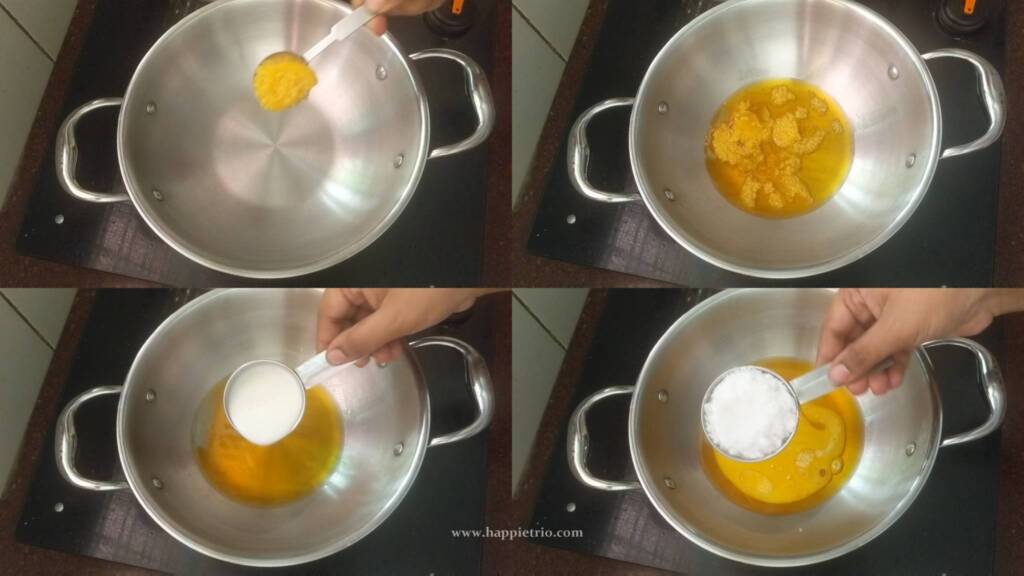
For the Sugar Syrup preparation:
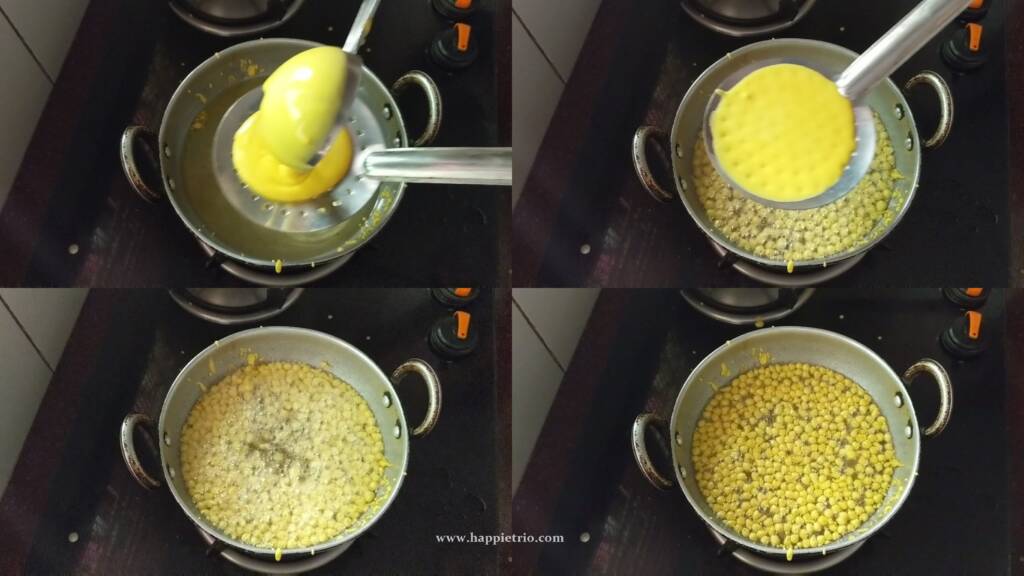
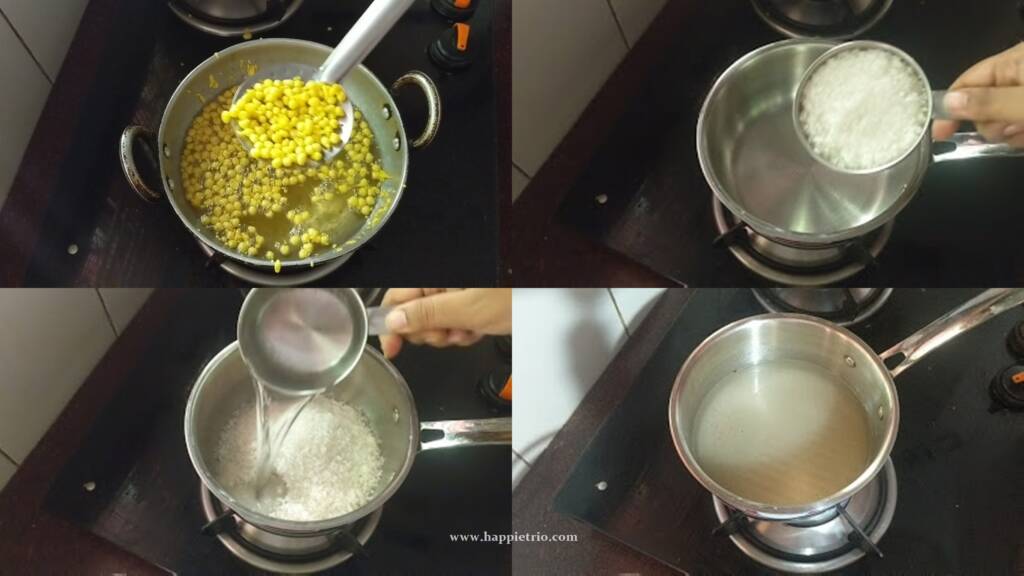
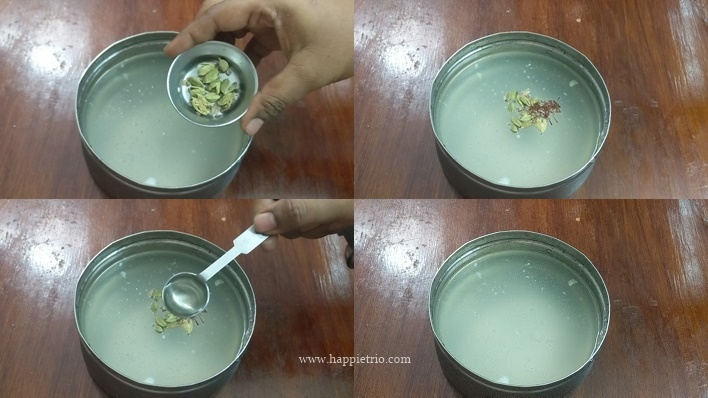
1) I have used the ras or sugar syrup from the rasgulla. Crush 5 to 6 cardamom pods and add them to the sugar syrup. Next, add in a generous pinch of saffron.
2) Also add in 1 teaspoon of Rosewater, Mix well, and then set it aside for about 1 hour for the flavors to infuse.
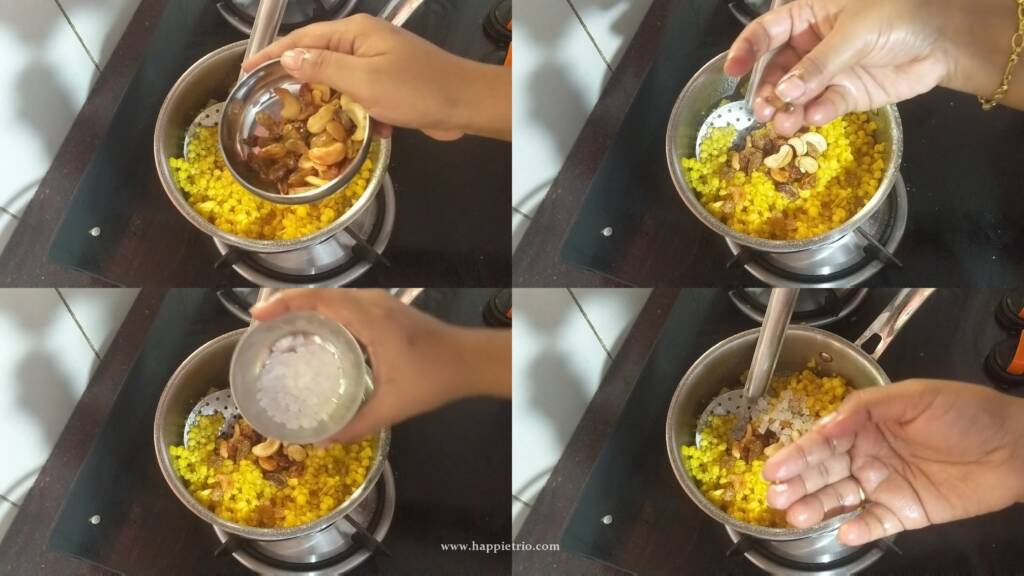
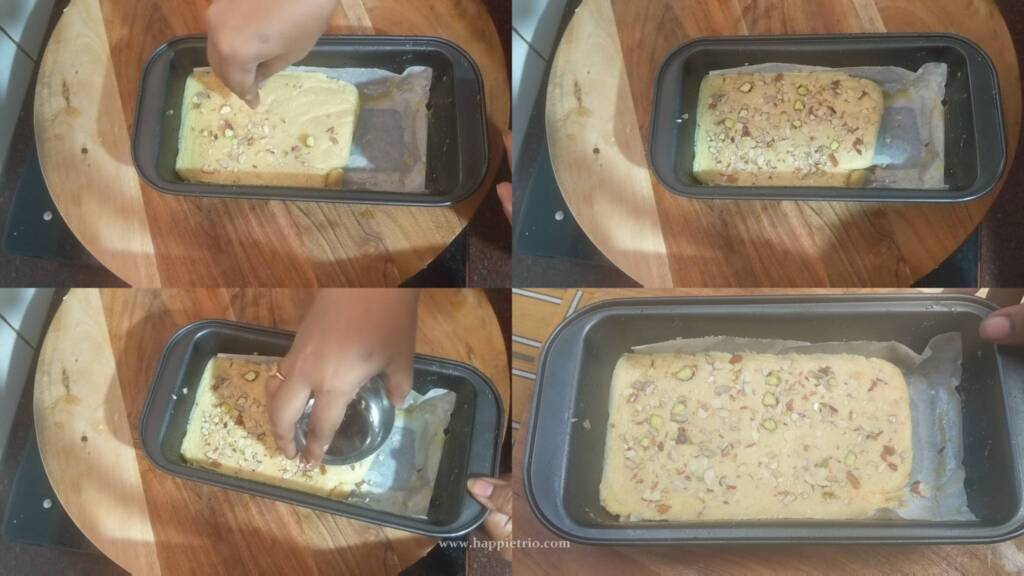
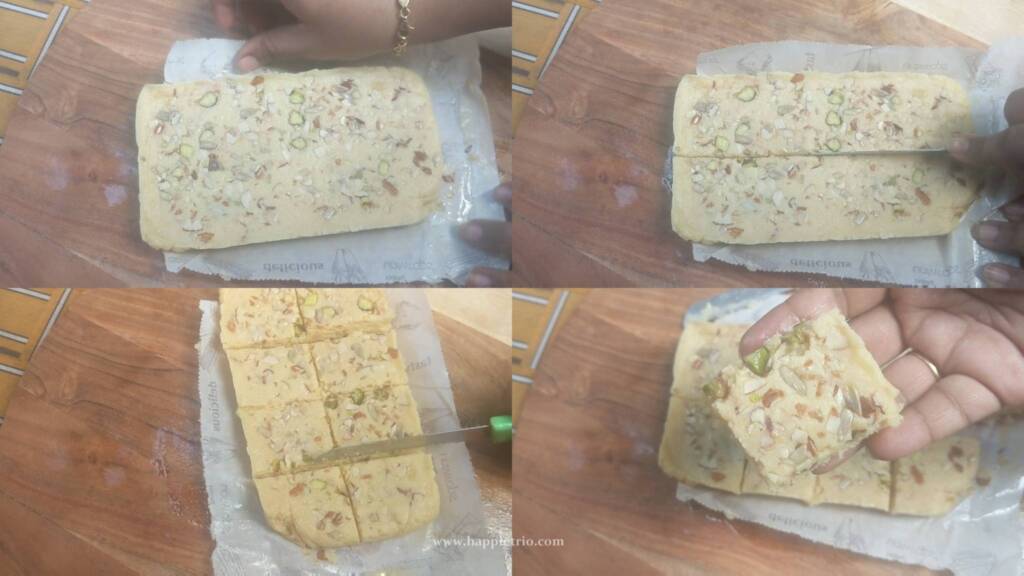
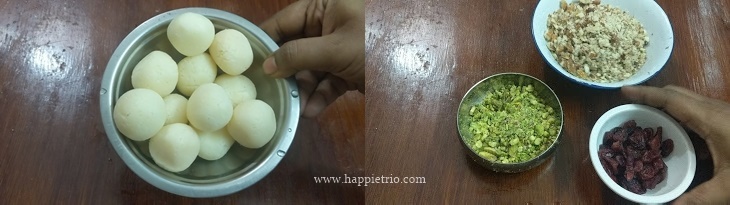
3) Sqeeze the rasgulla softly and remove the excess water and set it aside. Crush the Almond and Pistachios for decorating the cake.
4) You can also use any sprinkles or edible flowers for decorating. I used dried cranberries.
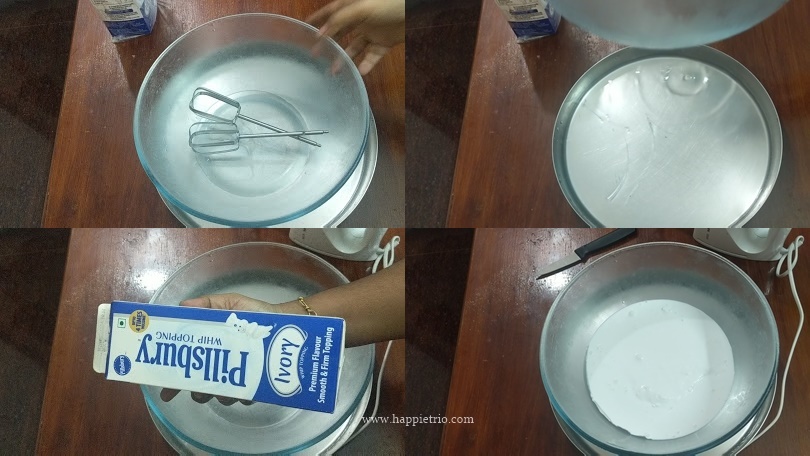
For preparing the Whipped cream
1) Always store the whipped cream in the freezer. Before 24 hours of whipping the cream transfer them to the refrigerator section.
2) Keep the blades of the blender and the bowl which you will be using for whipping the cream in the freezer for about 4 hours.
3) Also keep some ice cubes or ice-cold water ready. We need to Whip the cream at a temperature of 2 Deg C, So it's better to work in the Air conditioner Room.
4) Shake the whipped cream well before use.
5) Keep the Bowl in a bowl full of ice water or ice cubes and pour the Whipped cream into it the bowl.
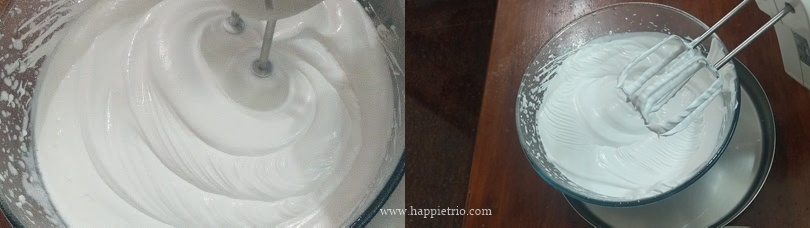
6) Using a hand blender beat the cream until stiff peaks. It will take close to 4 to 5 mins to reach this stage. If you touch the cream whip a spatula it should be stiff and not fall that is the correct
Assemble the Rasgulla Cake.
1) Take a cake stand and place one of the sponge cakes on it. If the cake has any dooms or uneven shape, scrape and remove and shape them evenly.
2) You can also keep the bottom part on as it has an even flat shape. Now add in the sugar syrup on top of the sponge cake. Next, sprinkle in some Crushed Almonds or Pistachios. You can also sprinkle in some crushed rasgullas.
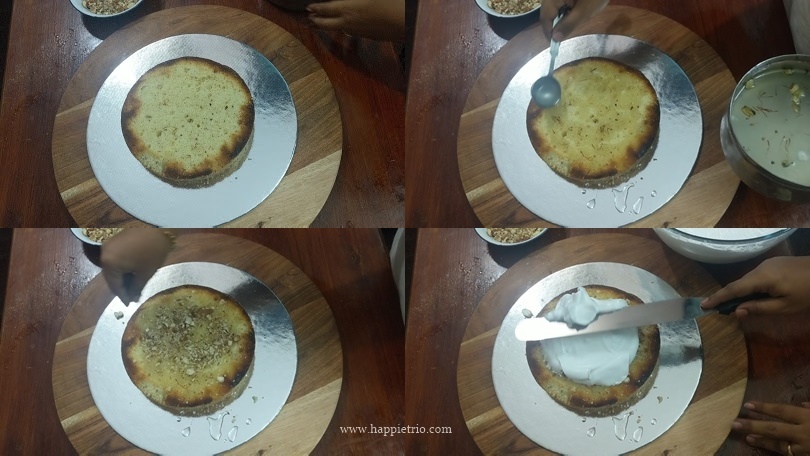
3) Take a big dollop of the whipped cream and spread it on the top and sides of the cake. Use a turntable for frosting the cake. It will be comfortable.
4)Now place the next sponge cake. I kept it inverted for the flat top.
5) Again repeast the same process. Add the sugar syrup and then frost the whole cake with whipped cream. Spread the cream such that it is evenly spread on the cake
6) Some imperfections in the frosting is okay, as the taste matters ultimately. Now decorate the cake to the heart content. Feel free to show your creativity.
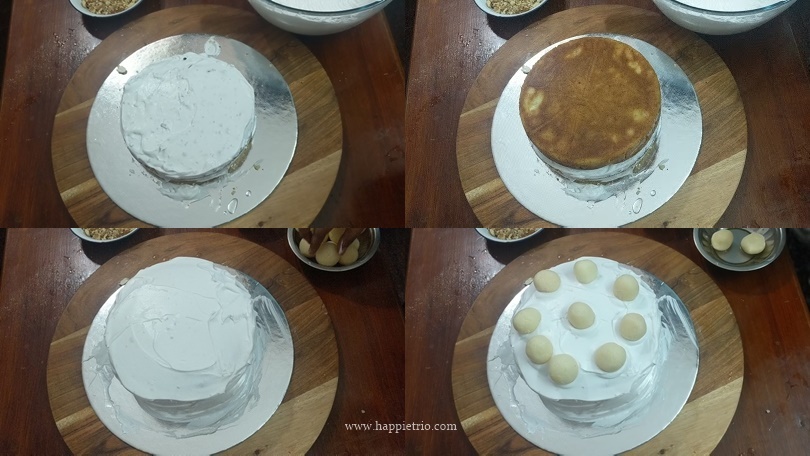
7) I decorated with some rasgullas on the top and then sprinkled pistachios and almonds all over the cake. Finally added some dried cranberry.
8) Place the cake in the fridge till you use it. Just 30 mins before cutting the cake take it outside the fridge

📖 Recipe
Rasgulla cake | Indian Fusion Cake
Standard 1 cup measures 240 ml
Equipment
- OTG Oven
- Hand Blender
- OTG Oven
- Hand Blender
Ingredients
For Sponge Cake
- 200 gms Butter
- 1 cup Sugar
- 4 Eggs
- 2 teaspoon Vanilla Essence
- 2 cup All Purpose Flour
- 3 teaspoon Baking Powder
- ⅛ teaspoon Salt
- 6 tablespoon Milk
For Sugar Syrup
- 1 cup Jeera from Rasgulla or Sugar Syrup
- 5 Cardamom pods
- Saffron a big pinch
- 1 teaspoon Rose Water
For Whipping Cream
- 1 Whipping Cream tetra pack
- Ice Water or IceCubes
For Rasgulla Cake
- ¼ cup Almonds crushed
- ¼ cup Pistachios Crushed
- 2 tablespoon Dried Cranberry
- 15 Rasgulla
Instructions
For Sponge Cake Preparation
- In a mixing bowl add in 200 grams of butter, To this add in 1 cup of refined sugar.
- Using a hand blender cream the butter and sugar together until creamy
- Break open 2 eggs and beat until it's combined well. Next break open another 2 eggs and cream everything once again until it's well blended.
- Now add in 2 teaspoon of Vanilla essence and beat everything once again. Next, we are going to add in the dry ingredients
- Sive in 2 cup s of All-purpose flour, 3 teaspoon of Baking powder, and ⅛th teaspoon of salt together.
- Now using a spatula fold everything gently well combined
- Add in 6 tablespoon of Milk and keep folding the batter until combined.
- Take two equal size 7 inch round cake pans. Divide the batter into two equal portions and put on the baking pans.
- For lining the baking pans. I have applied a layer of butter to the baking pan and then dusted it with flour. Tap and remove the excess flour. Place a parchment paper above that and apply little butter in that. By doing this the cake will not stick to the pan.
- In one of the cake pan I added a few rasgullas randomly. Squeeze out the excess jeera on the rasgulla and add it inside the cake pan.
- Preheat the oven at 180 Deg C for about 10 mins and then bake the cake at 180 Deg C for about 30 to 35 mins or until the toothpick when inserted comes out clean.
For the Sugar Syrup
- I have used the ras or sugar syrup from the rasgulla. Crush 5 to 6 cardamom pods and add them to the sugar syrup. Next, add in a generous pinch of saffron.
- Also add in 1 teaspoon of Rosewater, Mix well, and then set it aside for about 1 hour for the flavors to infuse.
- Squeeze the rasgulla softly and remove the excess water and set it aside. Crush the Almond and Pistachios for decorating the cake.
- You can also use any sprinkles or edible flowers for decorating. I used dried cranberries.
For preparing the Whipped cream
- Always store the whipped cream in the freezer. Before 24 hours of whipping the cream transfer them to the refrigerator section.
- Keep the blades of the blender and the bowl which you will be using for whipping the cream in the freezer for about 4 hours.
- Also keep some ice cubes or ice-cold water ready. We need to Whip the cream at a temperature of 2 Deg C, So it's better to work in the Air conditioner Room.
- Shake the whipped cream well before use. Keep the Bowl in a bowl full of ice water or ice cubes and pour the Whipped cream into it the bowl.
- Using a hand blender beat the cream until stiff peaks. It will take close to 4 to 5 mins to reach this stage. If you touch the cream whip a spatula it should be stiff and not fall that is the correct consistency.
Assemble the Rasgulla Cake.
- Take a cake stand and place one of the sponge cakes on it. If the cake has any dooms or uneven shape, scrape and remove and shape them evenly.
- You can also keep the bottom part on as it has an even flat shape. Now add in the sugar syrup on top of the sponge cake. Next, sprinkle in some Crushed Almonds or Pistachios. You can also sprinkle in some crushed rasgullas.
- Take a big dollop of the whipped cream and spread it on the top and sides of the cake. Use a turntable for frosting the cake. It will be comfortable.
- Now place the next sponge cake. I kept it inverted for the flat top.
- Again repeat the same process. Add the sugar syrup and then frost the whole cake with whipped cream. Spread the cream such that it is evenly spread on the cake
- Some imperfections in the frosting are okay, as the taste matters ultimately. Now decorate the cake to the heart content. Feel free to show your creativity.
- I decorated with some rasgullas on the top and then sprinkled pistachios and almonds all over the cake. Finally added some dried cranberry.
- Place the cake in the fridge till you use it. Just 30 mins before cutting the cake take it outside the fridge.
Video
Notes
- Perfect for a birthday party or any other function.
- You can make the cake ahead and store it in the fridge.
Nutrition
Disclaimer: I am not a nutritionist , the nutrition value provided here is an estimate.It will vary based on the quantity and brands of the products used.