Cook with Sharmila

  • Home
  • About Me
    • Video Recipes
    • Media Mentions
    • Privacy Policy
  • Recipe Index
    • Recipes
  • Nanjilnad Recipes
  • Shop
menu icon
go to homepage
  • Home
  • Recipe Index
  • Air Fryer
  • About Me
  • Subscribe
    • Facebook
    • Instagram
    • Pinterest
    • Twitter
    • YouTube
  • subscribe
    search icon
    Homepage link
    • Home
    • Recipe Index
    • Air Fryer
    • About Me
    • Subscribe
    • Facebook
    • Instagram
    • Pinterest
    • Twitter
    • YouTube
  • ×
    Home » Recipe Index

    How to make Urad Dal Flour in Home

    October 22, 2016 By Sharmila Kingsly Leave a Comment

    How to make Urad Dal Flour
    How to make Urad Dal Flour in Home | Kitchen Basics

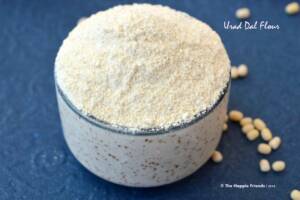
    Urad Dal flour is required to prepare many Indian snacks .As Diwali is near in every house they prepare lots of sweets and snacks prepared to distribute to friend and family.Now let’s see how to prepare urad dal flour.

    How to make Urad Dal Flour in Home
    Recipe Cuisine: Indian |  Recipe Category : Basis
    Prep Time: 10 mins | Cook Time : 10 mins |Author :Sharmila
    Ingredients
    Urad Dal – 1 cup
    Method:
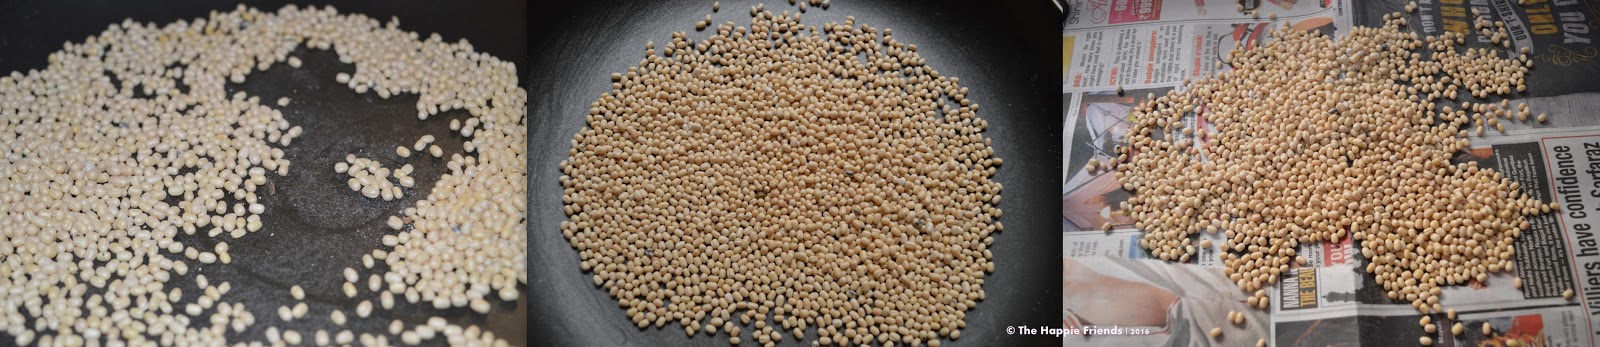
        1.      In a pan dry roast the urad dal in medium flame. Roast till a nice aroma comes and the colour changes to a light golden brown, Switch off the flame and allow it to cool down completely.
        2.       Once it is completely cooled collect them to a blender and grind it to a fine powder .Sieve it and collect the big pieces.

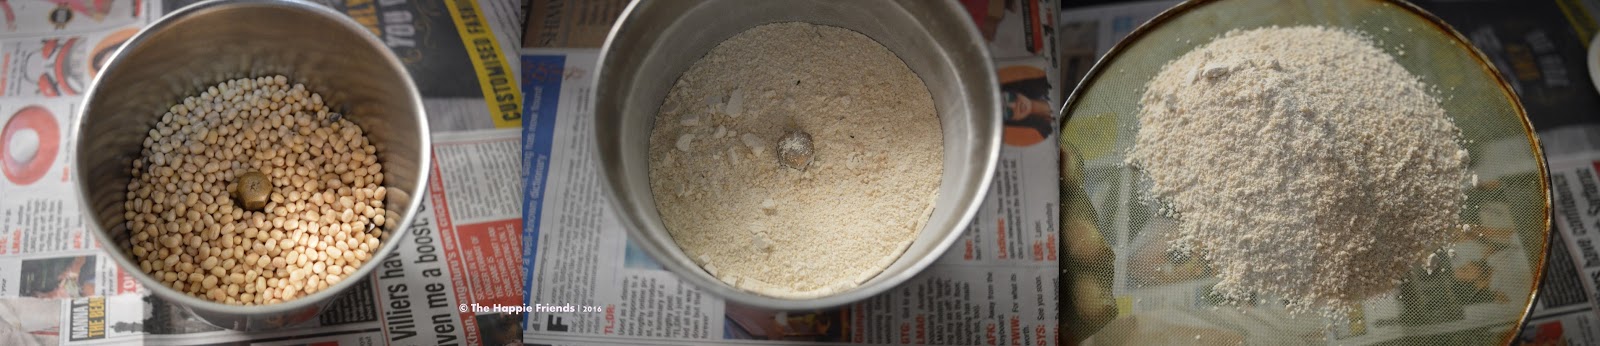
    3.      Grind the coarse pieces once again and sieve completely such that there is no lumps remaining. Store it in an air tight container.

    Notes:
    • Carry out the entire process in a medium flame.
    • If you are preparing in a larger quantity the flour can be ground in a mill.
    • Urad Dal flour is used in many Indian Snacks. Especially in the festival seasons it will be there in every households.
    • Before using in any snack preparation roast the urad dal flour once again in medium flame till a nice aroma comes.
    How to make Urad Dal Flour in Home | Kitchen Basics

    Crispy Vazhaipoo Vadai

    October 17, 2016 By Sharmila Kingsly Leave a Comment

    Vazhaipoo Vadai.

    Vazhaipoo vadai is a crispy evening snack. Banana flowers are added to make these fritters. They have a unique taste which makes them special. It has so many health benefits too. Enjoy your evening with this vada and a cup of chai.

    Vazhaipoo Vadai.

    Banana flowers fritters /Vazhaipoo vadai is my favourite snack .Just love to have it with a cup of Adrak chai. In fact the banana flowers added give this vadai a unique taste. It has so many health benefits too. Enjoy your evening with this vadai and a cup of chai.

    In fact cleaning banana flower is bit time consuming so it is better to clean it and refrigerate when we get time. 

    [feast_advanced_jump_to]

    Why You will love this Recipe ?

    Easy Snack - They are easy to make snack. Even beginner's can cook the fritters perfectly.

    Pantry Staples - Made with the basic pantry staples.

    Health Benefits - Vazhaipoo or Banana flower has plenty of health benefits. They are also rich in fiber and other minerals.

    Party appetizer - Perfect to serve during parties or potlucks or any functions. Goes well as a evening snack too with some hot tea and chutney.

    Ingredients

    Banana Flower - This is the main ingredient. We have to carefully clean the banana flower and chop as needed. Better to use it immediately. If not soak the chopped flowers in buttermilk to prevent blackening. Refer this tutorial for detailed steps on how to clean banana flowers.

    Channa Dal - In India most of the fritters will have soaked channa dal. It gives a rich protein kick and adds volume to the vadai.

    Rice Flour - This helps in binding and make sure the fritters holds its shape.

    Onions and Cilantro - Finely added cilantro and chopped onions adds a lovely flavor to vadai.

    Oil - We deep fry the fritters in oil. We can use any oil of our choice. My preference is groundnut oil.

    The fritters has few other basic flavoring ingredients. Please refer the Recipe card for a detailed ingredients list along with the measurements.

    How to make Vazhaipoo Vadai

    1. In a bowl add channa dal and soak in water for at least 2 hours. After soaking the dal drain the excess water and add the soaked channa dal to a blender.

    Soak Channa Dal for 4 hours and after soaking drain water and add dal to a blender.

    2.Along with the channa dal add dry red chilli and fennel seeds. Now coarsely pulse everything once.

    Add Dry red chilli and fennel seeds along with channa dal.

    3.Clean the banana flowers and chop roughly. Add the chopped banana flowers to the blender along with the pulsed channa dal. once again pulse everything coarsely. Make sure not to blend to a fine paste.

    add chopped banana flowers to a blender.

    4. Blend everything into a coarse mixture. I usually keep 1 or 2 tbsp of soaked channa dal without adding it to the blender and then as a whole while shaping the vada. This gives a beautiful texture to the vadai.

    pulse the dal and vazhaipoo coarsely.

    5. Now transfer everything to a mixing bowl. Also, add finely chopped onions, coriander leaves curry leaves, rice flour, and the required salt.

    Transfer pulsed dal to a blender and add chopped onion, rice flour and other seasonings.

    6. Combine everything and start shaping the vadai. If you feel the mixture is loose and not able to shape properly add another tbsp of rice flour. Shape the vadai and keep it in the freezer for 10 mins. This helps in keeping the vadai firm without breaking as you fry.

    Combine and shape the vadai.

    7. Heat a pan with oil for deep frying. I usually prefer ground oil for frying. You can also use sunflower oil or coconut oil. Once the oil is hot drop the shaped vadai. Make sure not to overcrowd the pan while frying.

    Deep fry the shaped vada in hot oil.

    8. Fry the vadai in medium flame for 3-4 mins on both sides. Once the vadai is crispy, golden, and cooked on all sides. Remove the vadai from the pan. Remove the excess oil with paper towels and serve hot.

    Remove the vada from oil once its cooked.

    Crispy and Perfect vazhaipoo vadai is now ready.

    Vazhaipoo Masala Vadai.

    Expert Tips

    Make sure you soak the channa dal 2-3 hours before preparing the fritters.

    Always drain the water completely from the dal before adding them to the blender.

    If not drained properly the water content will prevent the fritters from holding its shape. These fritters will easily dis-integrate of dropped in hot oil for frying.

    You may also add finely chopped green chilies if you prefer a spicier vada.

    Make sure to not shape the vadai not too thick or thick. If the fritters are too thick the inside portions may not get cooked. If they are too thin , it may resemble thin papad.

    We can also store the shaped vadai in the freezer for at least 30 mins. This helps in holding the vada firm.

    Storing Options

    I recommend storing the uncooked shaped vada in freezer. Do not recommend storing the cooked vada. Cooked vada looses its crispiness if not served immediately.

    Instead we can store the shaped vada in freezer for up to 2 weeks. We can fry thaw them for few mins before frying and then fry as needed.

    Serving Suggestions

    Serve hot with some coconut chutney and Masala Chai.

    FAQ's

    Can we make vazhaipoo vadai without dal ?

    Yes there is another version to this vazhaipoo vadai , where they do not use any dal. The channa dal here is replaced with grated coconut along with potukadalai or fried gram. If you have not soaked the dal and make the vadai instantly you can very well try this version.

    How to preserve banana flowers for preparing vadai ?

    The thing with the banana flowers is that they get blackened easily it left for something after chopping them. They have to be used immediately for cooking. Banana flowers are rich in iron and hence they gets oxidized quickly and blackened. To prevent the blackening we should use them immediately or soak them in buttermilk or vinegar solution.

    Can we make vazhaipoo vadai in air fryer ?

    If you do not want to deep fry the vadai. We can definitely use air fryer for cooking the vadai. After shaping the fritters freeze them for 30 mins . Preheat the air fryer at 356 F/ 180 C for 5 mins and air fry at 356 F / 180 C for 12 mins. Make sure you flip them halfway and brush with oil as needed. Also make sure you consume the air fried vadai's immediately. Else they will lose the crispiness.

    How to clean the banana flowers for vazhaipoo vadai ?

    Remove the outer thick cover and take the banana flower. Each single flower has to be cleaned individually. Remove the transparent layer on top of the flower and also remove the single single bud. Refer this post for detailed steps on how to clean vazhaipoo. We can either chop and add the banana flowers for vadai or grind and add,. Tastes good either way.

    More Fritters Recipes

    • Masala Vada
      Masala Vada| Paruppu Vadai | Channa Dal Vada
    • prawn vada
      Prawn Fritters | Prawn Vadai | Eral vadai
    • Medu vada
      Medu Vadai | Ulundu Vadai | Urad Dal Fritters
    • Green Peas Cutlet
      Green Peas Cutlet

    ★ Did you enjoy this recipe? If you happen to try it out, I would love to hear from you! I’d appreciate it if you could rate and leave a review below in the comments. Your reviews help others know the recipe better too. Thanks for your time. You can also follow me on Facebook, Pinterest, Instagram, Youtube and Twitter for more updates

    📖 Recipe

    Vazhaipoo Vadai.
    Print Recipe Pin Recipe
    5 from 1 vote

    Vazhaipoo Vadai

    Vazhai poo vadai is a crispy evening snack. Banana flowers added make these fritters a unique taste. It has so many health benefits too. Enjoy your evening with this vadai and a cup of chai.
    Prep Time15 minutes mins
    Cook Time15 minutes mins
    Resting Time2 hours hrs
    Total Time2 hours hrs 30 minutes mins
    Course: Appetizer
    Cuisine: Indian
    Servings: 10 fritters
    Calories: 103kcal
    Author: Sharmila Kingsly
    Prevent your screen from going dark

    Standard 1 cup measures 240 ml

    Ingredients

    • 2 cup Banana flower ( Vazhaipoo ) chopped
    • ½ cup Channa Dal
    • 1 Onion finely chopped
    • 3 Dry Red chilli
    • 1 tsp Fennel Seeds
    • 2 tbsp Coriander leaves
    • 1 sprig Curry Leaves
    • 1 tbsp Rice Flour
    • Salt to taste
    • Oil for deep frying

    Instructions 

    • In a bowl add channa dal and soak in water for at least 2 hours. After soaking the dal drain the excess water and add the soaked channa dal to a blender.
    • Along with the channa dal add dry red chilli and fennel seeds. Now coarsely pulse everything once.
    • Clean the banana flowers and chop roughly. Add the chopped banana flowers to the blender along with the pulsed channa dal. once again pulse everything coarsely. Make sure not to blend to a fine paste.
    • Blend everything into a coarse mixture. I usually keep 1 or 2 tbsp of soaked channa dal without adding it to the blender and then as a whole while shaping the vada. This gives a beautiful texture to the vadai.
    • Now transfer everything to a mixing bowl. Also, add finely chopped onions, coriander leaves curry leaves, rice flour, and the required salt.
    • Combine everything and start shaping the vadai. If you feel the mixture is loose and not able to shape properly add another tbsp of rice flour. Shape the vadai and keep it in the freezer for 10 mins. This helps in keeping the vadai firm without breaking as you fry.
    • Heat a pan with oil for deep frying. I usually prefer ground oil for frying. You can also use sunflower oil or coconut oil. Once the oil is hot drop the shaped vadai. Make sure not to overcrowd the pan while frying.
    • Fry the vadai in medium flame for 3-4 mins on both sides. Once the vadai is crispy, golden, and cooked on all sides. Remove the vadai from the pan. Remove the excess oil with paper towels and serve hot.

    Notes

    • Always use fresh banana flower in cooking.
    • While selecting banana flower in shop also if it is too much dark on the edges avoid buying that as it is old and will be bitter. It is my personal experience.
    • Soaking the chopped flowers in butter milk allow it to stay fresh and prevent it from getting bitter.
    • Add onions only before preparing vadai otherwise it might leave water and vadai will drink more oil.
    • Cook in medium flame, if cooked in high flame the outer part will get crisp soon but the inner part will remain un-cooked.

    Nutrition

    Calories: 103kcal | Carbohydrates: 12.6g | Protein: 2.6g | Fat: 5.3g | Saturated Fat: 0.8g | Sodium: 3mg | Potassium: 89mg | Fiber: 1.9g | Sugar: 3.6g | Calcium: 22mg
    Tried this recipe?Mention @happietrio or tag #happietrio
    Subscribe to my Channelclick for more videos

    Disclaimer: I am not a nutritionist , the nutrition value provided here is an estimate. It will vary based on the quantity and brands of the products used.

    Note: This post is originally from 2016. I have now updated it with a new Recipe card, Pictures, and video.

    How to clean Banana Flower

    October 16, 2016 By Sharmila Kingsly Leave a Comment

    How to clean Banana Flower
    Banana flowers are loaded with fibre, protein, potassium, calcium, copper, phosphorus, iron, magnesium and Vitamin E. The flowers can be cooked in a numerous ways. It can be used in Salads, Soups, curry, Gravy and many more. However when it comes to cleaning the flower it is pretty time consuming, we will have to sit patiently and clean it J So today let me take you through how to clean banana flowers with step by step pictorial representation.

    How to clean banana flower
    Recipe Cuisine: Indian |  Recipe Category : Kitchen Basis
    Prep Time: 30 mins |Author :Sharmila
    Ingredients
    Banana Flower – 1
    Gingelly oil – to grease hands
    Water – 2 cups
    Butter milk – 1 cup
    Method:
        1.      Spread a mat or use a newspaper as the banana might cause stains and grease your hands with oil before you start to clean in order to avoid blackening in the hands, Take a Banana flower and remove the Petals. Inside each petal there will be the edible florets collect everything .Continue to do this by removing all the banana petals.
        2.       Take one floret and as shown in the image remove the transparent skin and the long part with a bud in the top and save the remaining .continue this process and collect the edible part.
          3.      If you are not going to cook the same day then you can save the edible part in a zip lock bag and refrigerate otherwise in a large bowl add in 2 cups of water and 1 cup of butter milk and whisk well.
         4.      Chop the edible part of the banana flower finely and keep them immersed in the buttermilk keep it refrigerated and use it when needed this avoids blackening of the flower.
    Notes:
    • Always use a newspaper while cleaning the banana flower to prevent from banana stains.
    • Grease your hands with oil to avoid the blackening in hands.
    • Never keep the Banana flower in Fridge for more than 3 days as it might tend to get bitter.
    • Always use fresh banana flower in cooking.
    • While selecting banana flower in shop also if it is too much dark on the edges avoid buying that as it is old and will be bitter. It is my personal experience.
    • Soaking the chopped flowers in butter milk allow it to stay fresh.
    • You can clean the Banana flower the previous night and use it for cooking in the next day.
    • While cleaning the banana flower the innermost part will be while bulb/cone alike part, you can consume it raw as it has high medicinal values and good for stomach.

    Fish Fry in Oven ( Baked Fish Crisp )

    September 20, 2016 By Sharmila Kingsly Leave a Comment

    Fish Fry in Oven
    Fish fry is an awesome appetizer which is loved by all the sea food eaters. But at point everyone will have a gut feeling that is deep fried and we tend to restrict ourselves in spite of our taste buds inducing to taste even more. One healthy or tasty alternative is to do that in the oven  
    With very minimal oil or almost negligible amount of oil added we can get the taste and crispness of the fish fry made in oven. So what is stopping you.. Give a try 
    Similar Recipes:
    Vanjaram Fry
    Grilled Fish Recipe
    Method:
        1.      Clean the fish and in a large vessel add in the ingredients mentioned in the “To Marinate” table and make a fine paste and add the fish to it and mix well. Allow it to marinate for half an hour. Meanwhile line your baking tray with Parchment paper. Preheat the oven at 180 Deg c for about 10 mins. Arranged the marinated fish pieces in the lined baking tray and using grill mode grill it for 7 mins. 
       2.      After 7 mins flip the fish and then grill for another 7 mins. Now that the colour of the fish would have slightly turned dark. Flip the side of the fish once again and brush it with oil if required. And grill for another 5 mins.
        3.      Once done flip the fish once gain and brush with little oil or sprinkle little oil and grill for another 5 mins. Fish would have cooked by now and it is ready to be served. If you feel the fish is not yet cooked grill for another 4 mins by flipping the fish sides after 2 mins. Serve hot as an appetizer/starter.
    Notes:
     
    • Baking time may vary from oven to oven so keep a check.
    • If you require to add more oil you can brush with more oil.
    • Serve as a started or just like that as a snack.

    📖 Recipe

    Fish Fry in Oven
    Print Recipe Pin Recipe
    No ratings yet

    Fish fry in oven

    Fish fry in oven is an awesome appetizer which is loved by all the sea food eaters. It is so guiltfree when baked in oven .
    Prep Time10 minutes mins
    Bake Time30 minutes mins
    Total Time40 minutes mins
    Course: Appetizer
    Cuisine: Indian
    Servings: 5
    Calories: 126kcal
    Author: Sharmila Kingsly
    Prevent your screen from going dark

    Standard 1 cup measures 240 ml

    Ingredients

    • 500 gm Fish
    • 1 tsp Oil optional

    To Marinate:

    • 3 tsp Chilli Powder
    • ½ tsp Turmeric Powder
    • Salt as needed
    • 1 tbsp Water
    • ½ tsp Pepper Powder

    Instructions 

    • Clean the fish and in a large vessel add in the ingredients mentioned in the “To Marinate” table and make a fine paste and add the fish to it and mix well. Allow it to marinate for half an hour. Meanwhile line your baking tray with Parchment paper. Preheat the oven at 180 Deg c for about 10 mins. Arranged the marinated fish pieces in the lined baking tray and using grill mode grill it for 7 mins.
    • After 7 mins flip the fish and then grill for another 7 mins. Now that the colour of the fish would have slightly turned dark. Flip the side of the fish once again and brush it with oil if required. And grill for another 5 mins.
    • Once done flip the fish once gain and brush with little oil or sprinkle little oil and grill for another 5 mins. Fish would have cooked by now and it is ready to be served. If you feel the fish is not yet cooked grill for another 4 mins by flipping the fish sides after 2 mins. Serve hot as an appetizer/starter.

    Notes

    • Baking time may vary from oven to oven so keep a check.
    • If you require to add more oil you can brush with more oil.
    • Serve as a started or just like that as a snack.

    Nutrition

    Calories: 126kcal | Carbohydrates: 1.4g | Protein: 20.2g | Fat: 3.9g | Saturated Fat: 0.6g | Cholesterol: 38mg | Sodium: 74mg | Potassium: 385mg | Fiber: 0.9g | Calcium: 19mg | Iron: 1mg
    Tried this recipe?Mention @happietrio or tag #happietrio
    Subscribe to my Channelclick for more videos

    Beans Mezhukkupuratti

    September 13, 2016 By Sharmila Kingsly Leave a Comment

    beans mezhukkupuratti in a bowl

    Beans Mezhukkupuratti is one of the tastiest dish prepared during the Onam Sadhya. It's usually prepared with vegetables like kaya ,Yam.

    beans mezhukkupuratti in a bowl

    Mezhukkupuratti is one of the tastiest dish from the Kerala Cuisine prepared during the Onam Sadhya. It can be prepared with many vegetables like Raw Banana (Kaya), Yam (Chena), Carrot, Potato. Today I have prepared with Beans.

    It is such an easy recipe and anybody especially bachelors and working women can cook it easily on a busy working day. If we have the chopped veggies ready it can be prepared in around 10 mins times.

    Ingredients

    beans mezhukkupuratti spread over for display.

    How to make Beans Mezhukkupuratti

    1.Wash the Beans well and chop them into small pieces. Take a pan and add coconut oil. Once it's hot add mustard seeds let it splutter and then add curry leaves. Saute for a few seconds.

    In a cooking pot add coconut oil and temper with mustard and curry leaves.

    2. Next, add the chopped beans. Combine everything once. Add a little water and cook the beans in a medium flame.

    Add Chopped beans and cook in a medium flame

    3. While the beans are cooking let's prepare the spice paste. In a blender, add small onions, garlic, dry red chili, and turmeric powder.

    Add Small onions, Garlic, dry red chili and turmeric powder to a blender.

    4. Grind everything to a coarse paste.

    Grind ingredients in blender to a coarse paste.

    5. When the beans are almost cooked. Add the required salt and give a good mix.

    When the beans is almost cooked add required Salt.

    6. Finally, add the ground paste and combine well. Cook for another two minutes and switch off the flame.

    Finally add ground spice paste , combine and cook for 2 minutes.

    7. Beans mezhukkupuratti is now ready.

    Kerala Style Beans mezhukkupuratti is now ready.

    Top Tips

    • Do not skip adding coconut oil, it is a must for this recipe.
    • It is usually served in the Onam Sadhaya.
    • Mezhukkupuratti be prepared with Raw Banana, Potato or Yam.
    • Do not overcook the beans.
    • I used Indian Beans variety, French beans can also be used.

    📖 Recipe

    beans mezhukkupuratti in a bowl
    Print Recipe Pin Recipe
    No ratings yet

    Beans Mezhukkupuratti

    Beans Mezhukkupuratti is one of the tastiest dish prepared during the Onam Sadhya. It's usually prepared with vegetables like kaya ,Yam.
    Prep Time10 minutes mins
    Cook Time15 minutes mins
    Total Time25 minutes mins
    Course: Side Dish
    Cuisine: Kerala
    Servings: 2
    Calories: 77kcal
    Author: Sharmila Kingsly
    Prevent your screen from going dark

    Standard 1 cup measures 240 ml

    Ingredients

    • 200 gms Beans
    • Salt as needed
    • Water as needed

    To Grind :

    • 6 Shallots
    • 1 Dry Red Chilli
    • 5 clove Garlic
    • ⅛ tsp Turmeric powder

    To Temper:

    • 1 tsp Coconut Oil
    • 1 tsp Mustard seeds
    • 1 sprig Curry Leaves

    Instructions 

    • Wash the Beans well and chop them into small pieces. Take a pan and add coconut oil. Once it's hot add mustard seeds let it splutter and then add curry leaves. Saute for a few seconds.
    • Next, add the chopped beans. Combine everything once. Add a little water and cook the beans in a medium flame.
    • While the beans are cooking let's prepare the spice paste. In a blender, add small onions, garlic, dry red chili, and turmeric powder.
    • Grind everything to a coarse paste.
    • When the beans are almost cooked. Add the required salt and give a good mix.
    • Finally, add the ground paste and combine well. Cook for another two minutes and switch off the flame.
    • Beans mezhukkupuratti is now ready.

    Notes

    • Do not skip adding coconut oil, it is a must for this recipe.
    • It is usually served in the Onam Sadhaya.
    • Mezhukkupuratti be prepared with Raw Banana, Potato or Yam.
    • Do not overcook the beans.
    • I used Indian Beans variety, French beans can also be used.

    Nutrition

    Calories: 77kcal | Carbohydrates: 12.8g | Protein: 3.2g | Fat: 2g | Saturated Fat: 1.3g | Sodium: 6mg | Potassium: 215mg | Fiber: 3.9g | Sugar: 2.1g | Calcium: 47mg | Iron: 1mg
    Tried this recipe?Mention @happietrio or tag #happietrio
    Subscribe to my Channelclick for more videos

    Vegetable Kheer | Vegetable Payasam

    September 12, 2016 By Sharmila Kingsly Leave a Comment

    Vegetable Kheer

    Vegetable Kheer is an interesting kheer prepared with vegetables like beans, carrot, and Potato. It is slow cooked in milk, flavored with saffron

    Follow us on Pinterest for delicious pins. Join our Facebook group for more Instant Pot and Air Fryer recipes.

    Vegetable Kheer

    We are in the festival season now and hence starting this season with an interesting Kheer recipe.

    Usually, we don't add vegetables in kheer, It is either rice, lentils, fruits, or nuts. So this is different and you can definitely give this a shot.

    [feast_advanced_jump_to]

    Ingredients

    Vegetable Kheer Ingredients

    Milk - My top recommendation for preparing kheer is always a full cream milk. It is the base ingredient and it has to be creamier. Only full-fat milk does justice.y

    Sugar - Add granulated sugar or condensed milk as you prefer for the kheer.

    Vegetables - Use beans, carrots, Potato. Chop all the vegetables into even-sized and smaller pieces for even cooking of the vegetables.

    Saffron - Adds richness and a light golden tint to the kheer.

    Cardamom powder - Cardamom flavor goes really well to the kheer. You can also skip cardamom and add rose water if you prefer rose-flavored kheer.

    Nuts - Gives a lovely bite to the kheer.

    FAQ's

    What does Kheer mean?

    The word kheer is derived from the Sanskrit word kshira meaning milk. Kheer is type of Indian sweet Pudding. It its traditionally made with milk , rice and sugar.

    What are the main ingredients on kheer ?

    The main ingredients in this vegetable kheer is full fat milk and vegetables along with a sweetener.

    Can we make vegetable kheer vegan ?

    We have the ingredients that are not vegan in vegetable kheer recipe. You can simply replace full fat milk with any vegan milk and skip adding khoya for a vegan kheer.
    kheer with coconut milk is also a yummy alternate for Dairy. It tastes so good with coconut milk.

    How to make Vegetable Kheer

    Chop Carrots, Beans, and potatoes into very small cubes. In a saucepan add Water.

    Next add milk and let it boil.

    Next add the chopped vegetables. Make sure to chop the vegetables smaller and in even size. So it gets cooked uniformly.

    The vegetables will get cooked in the milk and it will take some time hence we are adding water as well.

    Next, add the chopped Vegetables in milk give it a quick start, and let it cook. Add a silver coin to the saucepan it will prevent the milk from overflowing. Keep on stirring at regular intervals to avoid getting burnt and scrape the malai (milk solids )from the edges too.

    Once the veggies are cooked add sugar.

    Also, add Cardamom powder and saffron milk.

    Next, add unsweetened or grated khoya.

    Combine everything and cook for another 2 minutes. Keep on stirring to ensure all the ingredients are evenly mixed. Now the milk would have become slightly thick. Switch off at this stage.

    Garnish with sliced Almonds and Pistachios. Vegetable Kheer is ready

    Vegetable Kheer

    Tips & Variations

    • I have used unsweetened Khoya for this recipe. If using sweetened khoya adjust the sugar level accordingly.
    • Khoya or Mawa adds richness to the kheer. If you have no access to khoya you can add ¼ cup reduced milk or condensed milk instead.
    • You can also add cauliflower to the kheer along with the other vegetables.
    • Make sure you blanch the cauliflower in hot water and dissect or chop it into small-sized pieces like other vegetables.
    • You can also double or triple the same recipe if preparing for a larger group.

    Serving Options

    Kheer makes an perfect dessert after a hearty meal. It goes when when served hot or cold.

    You can also make them for any festivals or potlucks

    Storage Options

    You can store the vegetable kheer in an air tight container for up to 3 days in the fridge.

    Do not suggest freezing as it has milk.

    Similar Recipes

    • Poppy Seeds Kheer
      Poppy Seeds Kheer
    • Apple Kheer
      Apple Kheer Recipe | Apple Payasam
    • Badam Kheer
      Badam Kheer | Almond Payasam | Badam Payasam
    • Millet Rose Kheer
      Little Millet Rose Kheer

    ★ Did you enjoy this recipe? If you happen to try it out, I would love to hear from you! I’d appreciate it if you could rate and leave a review below in the comments. Your reviews help others know the recipe better too. Thanks for your time. You can also follow me on Facebook, Pinterest, Instagram, Youtube and Twitter for more updates

    📖 Recipe

    Vegetable Kheer
    Print Recipe Pin Recipe
    5 from 1 vote

    Vegetable Kheer | Vegetable Payasam

    Vegetable Kheer is an interesting kheer vegetable like made with beans ,carrot , Potato , cooked in milk and khoya and made as a kheer.
    Prep Time15 minutes mins
    Cook Time20 minutes mins
    Total Time35 minutes mins
    Course: Dessert
    Cuisine: Indian
    Servings: 4
    Calories: 252kcal
    Author: Sharmila Kingsly
    Prevent your screen from going dark

    Standard 1 cup measures 240 ml

    Ingredients

    • 4 cup Milk
    • 1 cup Water
    • ¼ cup Carrot
    • ¼ cup Beans
    • ¼ cup Potato
    • ½ cup Sugar
    • Salt a pinch
    • Saffron few strands
    • 2 tbsp Pistachios + Almonds Sliced or chopped
    • 2 tbsp Un sweetened Khoya crumbled

    Instructions 

    • Chop Carrots, Beans, and potatoes into very small cubes. In a saucepan add milk and water and start boiling. Make sure to chop the vegetables smaller and in even size. So it gets cooked uniformly.
    • The vegetables will get cooked in the milk and it will take some time hence we are adding water as well.
    • Next, add the chopped Vegetables in milk give it a quick start, and let it cook. Add a silver coin to the saucepan it will prevent the milk from overflowing. Keep on stirring at regular intervals to avoid getting burnt and scrape the malai (milk solids )from the edges too.
    • Once the veggies are cooked add sugar.
    • Also, add Cardamom powder and saffron milk.
    • Next, add unsweetened or grated khoya.
    • Combine everything and cook for another 2 minutes.
    • Keep on stirring to ensure all the ingredients are evenly mixed.
    • Now the milk would have become slightly thick. Switch off at this stage.
    • Garnish with sliced Almonds and Pistachios. Vegetable Kheer is ready

    Video

    Notes

    • I have used unsweetened Khoya for this recipe. If using sweetened khoya adjust the sugar level accordingly.
    • Khoya or Mawa adds richness to the kheer. If you have no access to khoya you can add ¼ cup reduced milk or condensed milk instead.
    • You can also add cauliflower to the kheer along with the other vegetables.
    • Make sure you blanch the cauliflower in hot water and dissect or chop it into small-sized pieces like other vegetables.
    • You can also double or triple the same recipe if preparing for a larger group.

    Nutrition

    Calories: 252kcal | Carbohydrates: 40.1g | Protein: 9.3g | Fat: 7.4g | Saturated Fat: 3.2g | Cholesterol: 20mg | Sodium: 132mg | Potassium: 238mg | Fiber: 1.1g | Sugar: 36.7g | Calcium: 308mg
    Tried this recipe?Mention @happietrio or tag #happietrio
    Subscribe to my Channelclick for more videos

    Disclaimer: I am not a nutritionist, the nutrition value provided here is an estimate. It will vary based on the quantity and brands of the products used.

    Note: This post is originally from 2016. I have updated it with a new Recipe card, Pictures, and video now.

    Sambaram(Spiced Butter Milk )

    September 11, 2016 By Sharmila Kingsly Leave a Comment

    Sambaram

    Sambaram | Pacha Moru with step by step pictures. Sambaram is a famous drink from Kerala. It is not only served during Onam Sadhya but also can be had in the hot summer. It is otherwise called Spiced Buttermilk or Pacha Moru. This drink is a must in the Onam Sadhya. After a heavy meal this is usually had for a good digestion. 

    Ingredients:

    How to Prepare Sambaram

    1.In a large bowl take the thick curd and add in the water, Whisk it well such that the water and curd mix together and forms a buttermilk consistency.

    2.In a Mortar and Pestle add the chopped Green Chilli, Shallots, and Ginger. Crush everything lightly.

    3.Now add the crushed green chili, ginger, and shallots to the buttermilk. Whisk and add in chopped curry leave and Salt

    4.Whisk everything once again and now it is ready to serve along with the Grand Onam Sadhya.

    Sambaram

    Tips:

    • The Ginger and Green Chilli can be added to curd without crushing also.
    • However crushing bring out the whole flavor of it.
    • We can also sieve the Sambaram and serve the flavor will still be retained.
    • Serve as an after meal drink in the Onam Sadhya for a good digestion.

    Similar Recipes:

    • Ragi Buttermilk
      Ragi Buttermilk ( Ragi Ambli )

    ★ Did you enjoy this recipe? If you happen to try it out, I would love to hear from you! I’d appreciate it if you could rate and leave a review below in the comments. Your reviews help others know the recipe better too. Thanks for your time ? You can also follow me on Facebook, Pinterest, Instagram, Youtube and Twitter for more updates from me.

    📖 Recipe

    Print Recipe Pin Recipe
    5 from 1 vote

    Sambaram | Pacha Moru

    Sambaram or Pacha Moru is the spiced buttermilk. Sambaram is a famous drink from Kerala. It is mainly served during Onam Sadhya
    Prep Time10 minutes mins
    Cook Time0 minutes mins
    Total Time10 minutes mins
    Course: Drinks
    Cuisine: Kerala
    Servings: 2
    Calories: 62kcal
    Author: Sharmila Kingsly
    Prevent your screen from going dark

    Standard 1 cup measures 240 ml

    Ingredients

    • 1 cup Thick Curd
    • 1 cup Water
    • 1 Green Chilli
    • 1 inch Ginger
    • 3 Shallots or Small onions
    • 1 tbsp Curry Leaves -1 tbsp chopped
    • Salt as needed

    Instructions 

    • In a large bowl take the thick curd and add in the water, Whisk it well such that the water and curd mix together and forms a buttermilk consistency.
    • In a Mortar and Pestle add the chopped Green Chilli, Shallots, and Ginger. Crush everything lightly.
    • Now add the crushed green chili, ginger, and shallots to the buttermilk. Whisk and add in chopped curry leave and Salt
    • Whisk everything once again and now it is ready to serve along with the Grand Onam Sadhya.

    Video

    Notes

    • The Ginger and Green Chilli can be added to curd without crushing also.
    • However crushing bring out the whole flavor of it.
    • We can also sieve the Sambaram and serve the flavor will still be retained.
    • Serve as an after meal drink in the Onam Sadhya for a good digestion.

    Nutrition

    Calories: 62kcal | Carbohydrates: 11.1g | Protein: 2.7g | Fat: 0.1g | Cholesterol: 3mg | Sodium: 46mg | Potassium: 33mg | Fiber: 0.1g | Sugar: 7.1g | Calcium: 15mg
    Tried this recipe?Mention @happietrio or tag #happietrio
    Subscribe to my Channelclick for more videos

    Kerala Kalan Curry

    September 10, 2016 By Sharmila Kingsly Leave a Comment

    Kerala Kalan Curry
    Kerala Kalan Curry

    Onam is round the corner so I am posting more Onam Sadhya recipes these days. Kalan is an important dish in the Onam Sadhya Menu .It is prepared with Elephant Yam and Coconut and cooked in a coconut and Yogurt based Gravy. Similar Recipe  

    • Beetroot pachadi
    • Kozhikoodu Kootu curry
    • Kerala Aviyal
    • Cucumber pachadi
    • Olan
    Kerala Kalan Curry

    How to make Kerala Kalan Curry

     
        1.     Chop the Yam and Raw Banana in to cubes and keep immersed in water. In a large vessel and bring in water to boil, add the yam ,Turmeric powder and little salt and start cooking once its half cooked add in the Raw banana and cook till booth the veggies are done. Raw Banana tends to cook fast hence we need to add it to the Yam once its half cooked. Once cooked drain the veggies and set aside.
        2.       In a blender add in the freshly grated coconut, green chilli and Cumin Seeds, Add in little water if required and grind it to a course mixture.
        3.   Take a pan and add in the cooked vegetable in a low flame. Add in Chilli powder, Turmeric powder, Salt and Pepper powder and the ground coconut mixture and mix everything well. Take care not the break the vegetables.
        4.  Take Curd in a bowl and whisk well by adding little water .Now pour the beaten curd to the vegetables and mix well check for Salt and once it is about to start bowling switch off the flame.
         5.      In another pan add in the Ingredients under “To Temper” table and then pour it to the Curry .Kalan Curry is ready. Serve hot with Rice.

    Notes:

    • Feel free to increase or decrease the coconut as per your taste.
    • Don’t skip adding coconut oil. 
    • Tastes beset when served with Steam Based and any coconut based Thoran.
    • Kalan can be had as a curry or Side Dish .In that case the Yogurt amount should be decreased for Side dish and increased for Curry.
     

    📖 Recipe

    Kerala Kalan Curry
    Print Recipe Pin Recipe
    5 from 1 vote

    Kerala Kalan Curry

    Kerala Kalan Curry is an important dish in the Onam Sadhya .It is prepared with Yam and Coconut cooked in a coconut and Yogurt based Gravy.
    Prep Time10 minutes mins
    Cook Time20 minutes mins
    Total Time30 minutes mins
    Course: Side Dish
    Cuisine: Kerala
    Servings: 4
    Calories: 114kcal
    Author: Sharmila Kingsly
    Prevent your screen from going dark

    Standard 1 cup measures 240 ml

    Equipment

    • Kadai
    • Kadai

    Ingredients

    • ½ cup Raw Banana cut into cubes
    • ½ cup Elephant yam cut into cubes
    • 2 cups Yogurt /curd
    • Water as needed
    • ¾ tsp Turmeric powder
    • ½ tsp Chilli powder
    • ¼ tsp Pepper Powder
    • Salt as needed

    To Temper:

    • 1 tbsp Coconut oil
    • 1 tsp Mustard Seeds
    • 2 springs Curry Leaves

    To Grind:

    • ½ cup Coconut
    • 1 tsp Cumin Seeds/Jeera
    • 2 Green Chilli adjust as per your preference

    Instructions 

    • Chop the Yam and Raw Banana in to cubes and keep immersed in water. In a large vessel and bring in water to boil, add the yam ,Turmeric powder and little salt and start cooking once its half cooked add in the Raw banana and cook till booth the veggies are done. Raw Banana tends to cook fast hence we need to add it to the Yam once its half cooked. Once cooked drain the veggies and set aside.
    • In a blender add in the freshly grated coconut, green chilli and Cumin Seeds, Add in little water if required and grind it to a course mixture.
    • Take a pan and add in the cooked vegetable in a low flame. Add in Chilli powder, Turmeric powder, Salt and Pepper powder and the ground coconut mixture and mix everything well. Take care not the break the vegetables.
    • Take Curd in a bowl and whisk well by adding little water .Now pour the beaten curd to the vegetables and mix well check for Salt and once it is about to start bowling switch off the flame.
    • In another pan add in the Ingredients under “To Temper” table and then pour it to the Curry .Kalan Curry is ready. Serve hot with Rice.

    Video

    Notes

    • Feel free to increase or decrease the coconut as per your taste.
    • Don’t skip adding coconut oil. 
    • Tastes beset when served with Steam Based and any coconut based Thoran.
    • Kalan can be had as a curry or Side Dish .In that case the Yogurt amount should be decreased for Side dish and increased for Curry.

    Nutrition

    Calories: 114kcal | Carbohydrates: 10.4g | Protein: 3.9g | Fat: 6.5g | Saturated Fat: 5.2g | Cholesterol: 3mg | Sodium: 39mg | Potassium: 248mg | Fiber: 2g | Sugar: 6.5g | Calcium: 103mg | Iron: 2mg
    Tried this recipe?Mention @happietrio or tag #happietrio
    Subscribe to my Channelclick for more videos
    kurukku kalan

    Sago Kheer | Sabudana Kheer | Javvarisi Payasam

    September 4, 2016 By Sharmila Kingsly Leave a Comment

    Sago Kheer

    Sabudana Kheer is a very popular festival dessert in India. It is often prepared during special occasions. It is creamy rich and easy to prepare.

    Follow us on Pinterest for delicious pins. Join our Facebook group for more Instant Pot and Air Fryer recipes.

    Sago Kheer

    Kheer plays a vital role in any festival. Whenever there is some special occasion at home or any festival in Indian households preparing kheer is a tradition. There are so many varieties of Kheer.

    Sago/Sabudana/Tapioca Pearls/Javvarisi is one ingredient primarily used to prepare kheer. It is so easy to prepare, now let’s get started.

    How to make Sabudana Kheer

    1.Take 1 cup of sago or sabudana or tapioca pearls.

    2. Soak 1 cup of Sabudana/Tapioca in warm water for 30 mins.

    3. After soaking drain and remove the excess water and set it aside.

    4. Bring 1.5 cups of water to boil. To this add in the soaked Sabudana and cook till they are done. If you feel water is less you may add another ½ cup or as needed.

    5. Once the sago is cooked add in 2 cups of full cream milk. Cook in a medium flame and let it simmer for 20 mins.

    6. Next, add ¾ cup condensed milk. You may also add 1 cup of sugar instead of condensed milk.

    7. And then add 1 tsp cardamom powder or crush 4 cardamoms and add.

    8. The Kheer is now thick and creamy. Switch off the flame. Heat a pan with 1 tbsp ghee and roast 5-10 cashews and raisins until golden and plump and add to the kheer.

    Sabudana kheer is now ready.

    Tips & Variations

    • Alternatively, instead of soaking the Sago in water, we can also fry them in a tsp of Ghee and then start cooking in water.
    • Coconut pieces can also be used for garnishing.
    • Serve as a dessert after meals or during festivals.

    More Kheer Recipes

    • Moong Dhal Kheer
      Moong Dal Kheer | Paruppu Payasam
    • Sheer Khurma
      Eid Special Sheer Khurma
    • Beetroot Kheer
      Beetroot Vermicelli Kheer
    • Instant Pot Kheer
      Instant pot Kheer | Vermicelli Kheer

    ★ Did you enjoy this recipe? If you happen to try it out, I would love to hear from you! I’d appreciate it if you could rate and leave a review below in the comments. Your reviews help others know the recipe better too. Thanks for your time. You can also follow me on Facebook, Pinterest, Instagram,Youtube and Twitter for more updates

    📖 Recipe

    Sago Kheer
    Print Recipe Pin Recipe
    5 from 1 vote

    Sago Kheer | Sabudana Kheer | Javvarisi Payasam

    Sabudana Kheer is a very popular festival dessert in India. It is often prepared during special occasions. It is creamy rich and easy to prepare.
    Prep Time10 minutes mins
    Cook Time20 minutes mins
    Total Time30 minutes mins
    Course: Dessert
    Cuisine: Indian
    Servings: 4
    Calories: 350kcal
    Author: Sharmila Kingsly
    Prevent your screen from going dark

    Standard 1 cup measures 240 ml

    Ingredients

    • 1 cup Sago | Tapoicoa pearls | Sabudana
    • 1.5 cups Water
    • 2 cups Milk
    • 1 cup Sugar or ¾ cup condensed milk
    • ½ tsp Cardamom powder
    • 10 Cashew nuts
    • 5 Raisins
    • 1 tbsp Ghee

    Instructions 

    • Soak 1 cup Sabudana/Tapioca in warm water for 30 mins.
    • After soaking drain and remove the excess water and set it aside.
    • Bring 1.5 cups of water to boil. To this add in the soaked Sabudana and cook till they are done. If you feel water is less you may add another ½ cup or as needed
    • Once the sago is cooked add in 2 cups of full cream milk. Cook in a medium flame and let it simmer for 20 mins.
    • Next, add ¾ cup condensed milk. You may also add 1 cup of sugar instead of condensed milk.
    • And then add 1 tsp cardamom powder or crush 4 cardamoms and add.
    • The Kheer is now thick and creamy. Switch off the flame.
    • Heat a pan with 1 tbsp ghee and roast 5-10 cashews and raisins until golden and plump and add to the kheer.

    Notes

    • Alternatively instead of soaking the Sago in water we can also fry them in a tsp of Ghee and then start cooking in water.
    • Coconut pieces can also be used for garnishing.
    • Serve as a dessert after meal or during festivals.

    Nutrition

    Calories: 350kcal | Carbohydrates: 73g | Protein: 3.8g | Fat: 6.2g | Saturated Fat: 3.1g | Cholesterol: 15mg | Sodium: 49mg | Potassium: 82mg | Fiber: 0.4g | Sugar: 45.6g | Calcium: 127mg | Iron: 1mg
    Tried this recipe?Mention @happietrio or tag #happietrio
    Subscribe to my Channelclick for more videos

    Disclaimer: I am not a nutritionist, the nutrition value provided here is an estimate. It will vary based on the quantity and brands of the products used.

    Note: This post is originally from 2016. I have updated with new Recipe card, Pictures and video now.

    Aloo Paratha

    August 21, 2016 By Sharmila Kingsly Leave a Comment

    Aloo Paratha

    Aloo paratha is favourite north Indian breakfast .It is prepared by stuffing a spiced mixture of mashed potato inside the paratha

    Follow us on Pinterest for delicious pins. Join our Facebook group for more Instant Pot and Air Fryer recipes.

    Aloo Paratha

    Aloo paratha is our favorite north Indian breakfast. I love to make stuffed parathas in home and Aloo paratha is always first on the list. We love it with some spiced yogurt and pickle. It is like our comfort food.

    At my Initial days of cooking of cooking preparing Aloo paratha is always a task for me . Now with practice over the years i make it really well and it is a staple food in home.

    We also make Masala Paratha , Palak Paratha , Rajma Paratha, Phulka. These are few other types of Indian style paratha

    [feast_advanced_jump_to]

    Ingredients

    Potato - Use fresh golden potatoes

    Spice Powders - I am using minimal spice powders to the stiffing. They give a yummy taste to the potato stuffing.

    Coriander Leaves - Use finely chopped coriander leave to the stuffing.

    Wheat Flour - Use Whole wheat flour for preparing the paratha dough.

    Water as needed to knead the dough.

    Salt - to taste as per your taste.

    Ghee - Cooking paratha in ghee adds a lovely taste rather than oil. Highly recommend using ghee here.

    Aloo Paratha

    How to make Aloo Paratha

    Prepare Stuffing:

    Wash potatoes , remove dirt and then chop them roughly into 2 or 3 pieces. Add chopped potatoes to pressure cooker along with water. Cook for 4 whistles.

    Wait till the pressure releases on its own and then peel the skin of potatoes. Mash them really well without any lumps. You may use a potato masher or mash with hands as you prefer.

    Transfer the mashed potato to a mixing bowl. To this add red chili powder, Turmeric powder , Cumin powder and Salt. Also add finely chopped coriander leaves.

    Combine everything evenly and shape them into even sized balls and set aside.

    Prepare Dough

    In a mixing bowl add Wheat Flour and salt.

    Rub everything first and then slowly add water. Knead well to a soft dough.

    Cover with a kitchen towel and let it rest for 30 minutes.

    Aloo Paratha

    After 30 mins knead the dough once again for 2 mins. Now divide the dough into equal sized balls.

    Using a rolling pin roll the dough to a small circle. Place one of the prepared potato ball.

    Gently close the stuffing with the flattened roti.

    Press and flatten with hands.

    Now dust some excess flour and roll the paratha gently by applying equal pressure on all the sides.

    Heat a iron skillet once it’s hot add aloo paratha cook for 20 sec and then flip and cook for another 20 secs.

    Apply ghee on both sides of the paratha and cook till it turns golden brown in color.

    Delicious ghee laden Aloo Paratha is now ready.Serve hot.

    Aloo Paratha

    Tips & Variations

    • The perfect stuffed paratha always comes by practice. So i suggest keep trying no matter what.
    • Seal the dough completely while adding the stiffing. So that the stuffing do not comes out while rolling paratha.
    • Take care while rolling the paratha if you give too much pressure the stuffing’s might come out. Always roll gently with equal pressure over the entire paratha.
    • Dust the surface with flour while rolling the paratha.
    • If the stuffing’s comes out a little it is absolutely ok. If too much comes out you will not be able to roll the paratha properly and end up redoing.
    • Tastes good when served with Curd or any Raita
    • You can try the same paratha with different stuffing. In this case you may also replace Potato with sweet potato.

    Serving Suggestions

    The Perfect side dish for Aloo Paratha is spiced yogurt and Pickle. Add salt and cumin powder to yogurt / curd and whisk until combined. It makes the best accompaniment.

    Similar Stuffed Paratha

    • Rajma Paratha
      Stuffed Rajma Paratha

    ★ Did you enjoy this recipe? If you happen to try it out, I would love to hear from you! I’d appreciate it if you could rate and leave a review below in the comments. Your reviews help others know the recipe better too. Thanks for your time. You can also follow me on Facebook, Pinterest, Instagram, Youtube and Twitter for more updates from me.

    📖 Recipe

    Aloo Paratha
    Print Recipe Pin Recipe
    5 from 1 vote

    Aloo Paratha

    Aloo paratha is favourite north Indian breakfast .It is prepared by stuffing a spiced mixture of mashed potato inside the paratha
    Prep Time20 minutes mins
    Cook Time10 minutes mins
    Total Time30 minutes mins
    Course: Main Course
    Cuisine: Punjabi
    Servings: 8 paratha
    Calories: 203kcal
    Author: Sharmila Kingsly
    Prevent your screen from going dark

    Standard 1 cup measures 240 ml

    Ingredients

    • 2 cups Wheat Flour
    • Water as needed
    • ¼ tsp Salt
    • Ghee as needed

    Potato Stuffing

    • 4 Potato medium sized
    • 2 tbsp Coriander leaves finely chopped
    • ¼ tsp Turmeric Powder
    • 1 tsp Red Chilli powder
    • ½ tsp Cumin Powder

    Instructions 

    Prepare Stuffing:

    • Wash potatoes , remove dirt and then chop them roughly into 2 or 3 pieces. Add chopped potatoes to pressure cooker along with water. Cook for 4 whistles.
    • Wait till the pressure releases on its own and then peel the skin of potatoes. Mash them really well without any lumps. You may use a potato masher or mash with hands as you prefer.
    • Transfer the mashed potato to a mixing bowl. To this add red chili powder, Turmeric powder , Cumin powder and Salt. Also add finely chopped coriander leaves.
    • Combine everything evenly and shape them into even sized balls and set aside.

    Prepare Dough

    • In a mixing bowl add Wheat Flour and salt. .Rub everything first and then slowly add water. Knead well to a soft dough.
    • Cover with a kitchen towel and let it rest for 30 minutes.

    Aloo Paratha

    • After 30 mins knead the dough once again for 2 mins. Now divide the dough into equal sized balls.
    • Using a rolling pin roll the dough to a small circle. Place one of the prepared potato ball.
    • Gently close the stuffing with the flattened roti. Press and flatten with hands.
    • Now dust some excess flour and roll the paratha gently by applying equal pressure on all the sides.
    • Heat a iron skillet once it’s hot add aloo paratha cook for 20 sec and then flip and cook for another 20 secs.
    • Apply ghee on both sides of the paratha and cook till it turns golden brown in color. Serve hot.

    Video

    Notes

    Tips & Variations
    • The perfect stuffed paratha always comes by practice. So i suggest keep trying no matter what.
    • Seal the dough completely while adding the stiffing. So that the stuffing do not comes out while rolling paratha.
    • Take care while rolling the paratha if you give too much pressure the stuffing’s might come out. Always roll gently with equal pressure over the entire paratha.
    • Dust the surface with flour while rolling the paratha.
    • If the stuffing’s comes out a little it is absolutely ok. If too much comes out you will not be able to roll the paratha properly and end up redoing.
    • Tastes good when served with Curd or any Raita
    • You can try the same paratha with different stuffing. In this case you may also replace Potato with sweet potato.
    Serving Suggestions
    The Perfect side dish for Aloo Paratha is spiced yogurt and Pickle. Add salt and cumin powder to yogurt / curd and whisk until combined. It makes the best accompanimen
    •  

    Nutrition

    Serving: 1paratha | Calories: 203kcal | Carbohydrates: 42.7g | Protein: 7.1g | Fat: 1.7g | Saturated Fat: 0.6g | Cholesterol: 2mg | Sodium: 123mg | Potassium: 710mg | Fiber: 7.1g | Sugar: 1.2g | Calcium: 42mg | Iron: 3mg
    Tried this recipe?Mention @happietrio or tag #happietrio
    Subscribe to my Channelclick for more videos
    • « Previous Page
    • 1
    • …
    • 58
    • 59
    • 60
    • 61
    • 62
    • …
    • 67
    • Next Page »
    Sharmila Kingsly

    Hi, I'm Joshie!

    Food Blogger, Biryani Lover , Software Engineer .. In no particular order.I love to cook and that is why I am here!! Welcome to my space!!. 

    Read more about me!

    • Instagram
    • Facebook
    • YouTube
    • Pinterest
    • X

    Vegan Recipes

    • Masala Paratha
      Masala Paratha
    • Tomato basil pasta
      Tomato Basil Pasta
    • Chickpea Spinach Curry
      Chickpea Spinach Curry
    • Vegan Chickpea Soup
      Vegan Chickpea Soup
    • Instant Pot Pumpkin Pasta
      Instant Pot Pumpkin Pasta
    • Basil Fried Rice
      Thai Basil Fried Rice

    Popular Posts

    • Nandu Rasam
      Nandu Rasam
    • Indian Dinner Party Menu Ideas, Sample Menus + Recipes
    • Nandu Kulambu
      Nandu Kuzhambu |Crab Curry |Nandu Kulambu
    • Instant Pot Peas Curry
      Instant Pot Peas Curry | Green Peas Curry
    • Payaru Kanji
      Payaru Kanji | Green Gram Porridge
    • Mushroom Egg Bhurji
      Mushroom Egg Burji

    Footer

    ↑ back to top

    As an Amazon Associate I earn from qualifying purchases.

    Copyright ©  2025 COOK WITH SHARMILA

    Rate This Recipe

    Your vote:


    A rating is required
    A name is required
    An email is required