Cook with Sharmila

  • Home
  • About Me
    • Video Recipes
    • Media Mentions
    • Privacy Policy
  • Recipe Index
    • Recipes
  • Nanjilnad Recipes
  • Shop
menu icon
go to homepage
  • Home
  • Recipe Index
  • Air Fryer
  • About Me
  • Subscribe
    • Facebook
    • Instagram
    • Pinterest
    • Twitter
    • YouTube
  • subscribe
    search icon
    Homepage link
    • Home
    • Recipe Index
    • Air Fryer
    • About Me
    • Subscribe
    • Facebook
    • Instagram
    • Pinterest
    • Twitter
    • YouTube
  • ×
    Home » Recipe Index

    Vegan Mango Coconut Milk Popsicle

    May 25, 2017 By Sharmila Kingsly Leave a Comment

    Mango Coconut Milk Popsicle

    Popsicles with Fresh fruits are always in demand that too with the seasonal fruits... It is summer soon and sharing one of my favorite popsicles!!

    Vegan Mango CoconutMilk Popsicle

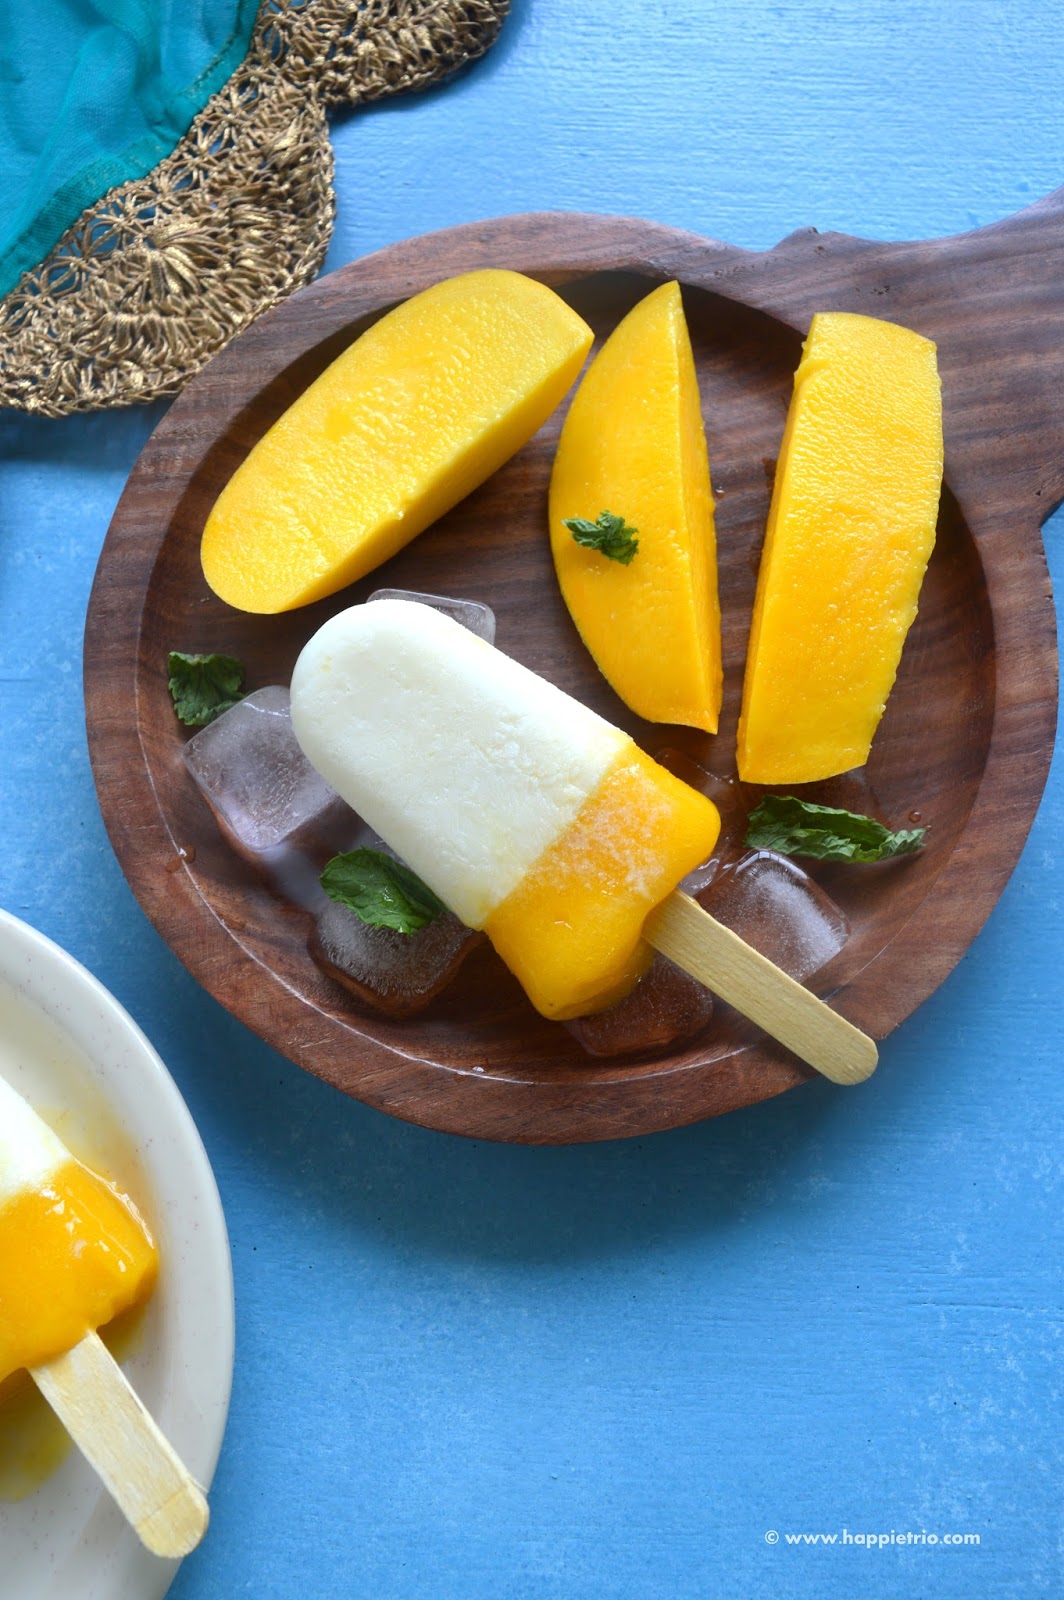
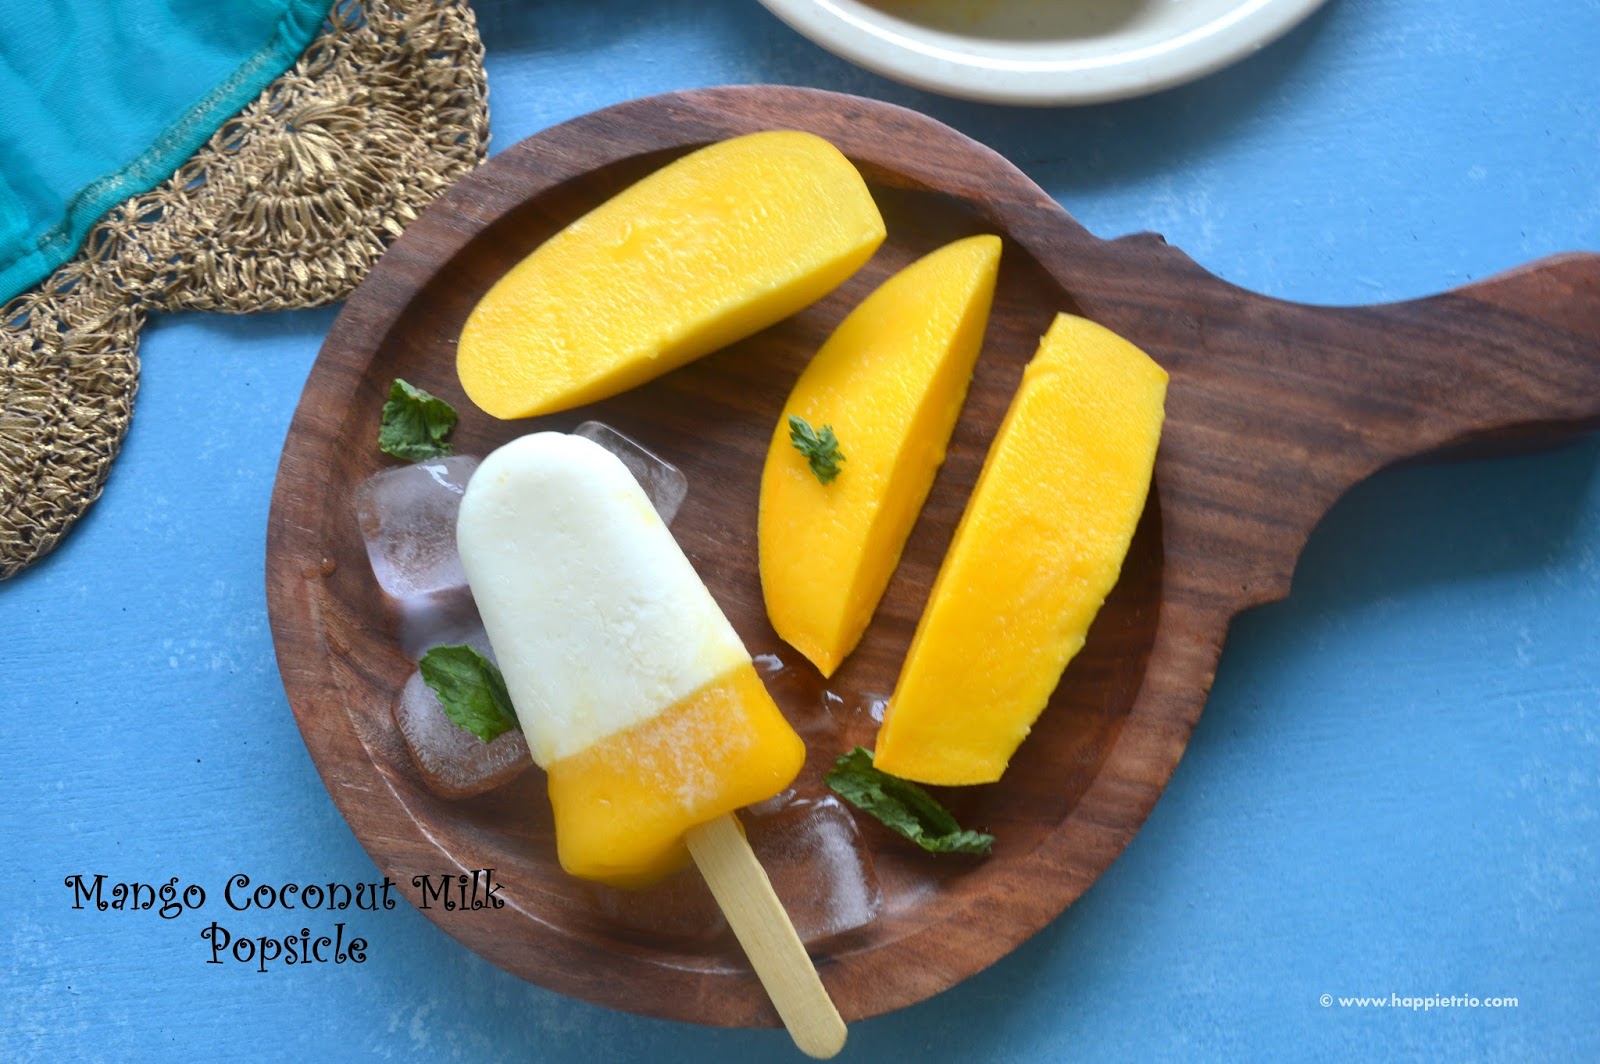
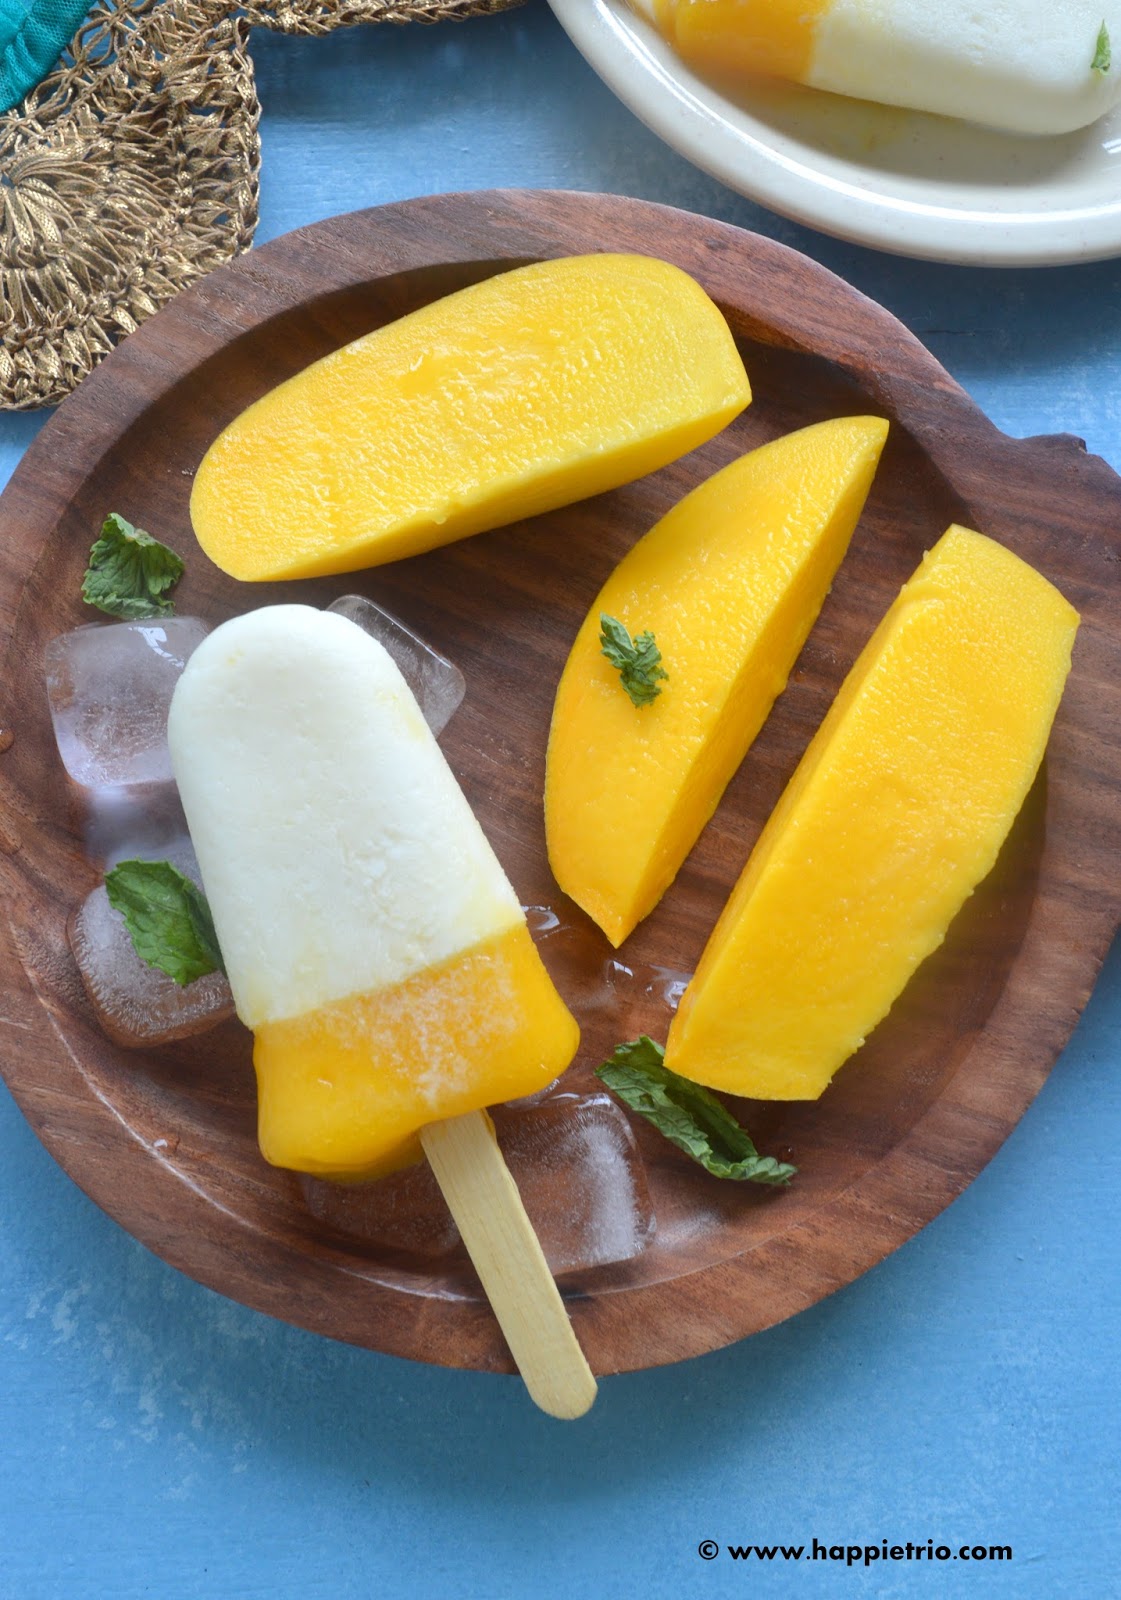
    Vegan Mango Coconut Milk Popsicle Recipe with step by step pics. Another wonderful share for this season is this delicious Vegan Mango Coconut Milk Popsicle, It is totally yummy and addictive!! I made use of the seasonal Juicy Mangoes. I wanted to try a vegan Popsicle for a long time so finally gave a try It is so yummy as Coconut Milk has its own richness. Now let’s move on to the recipe and see how to prepare Vegan Mango Coconut Milk Popsicle

    Vegan Mango CoconutMilk Popsicle

    How to prepare Vegan Mango coconut Popsicles

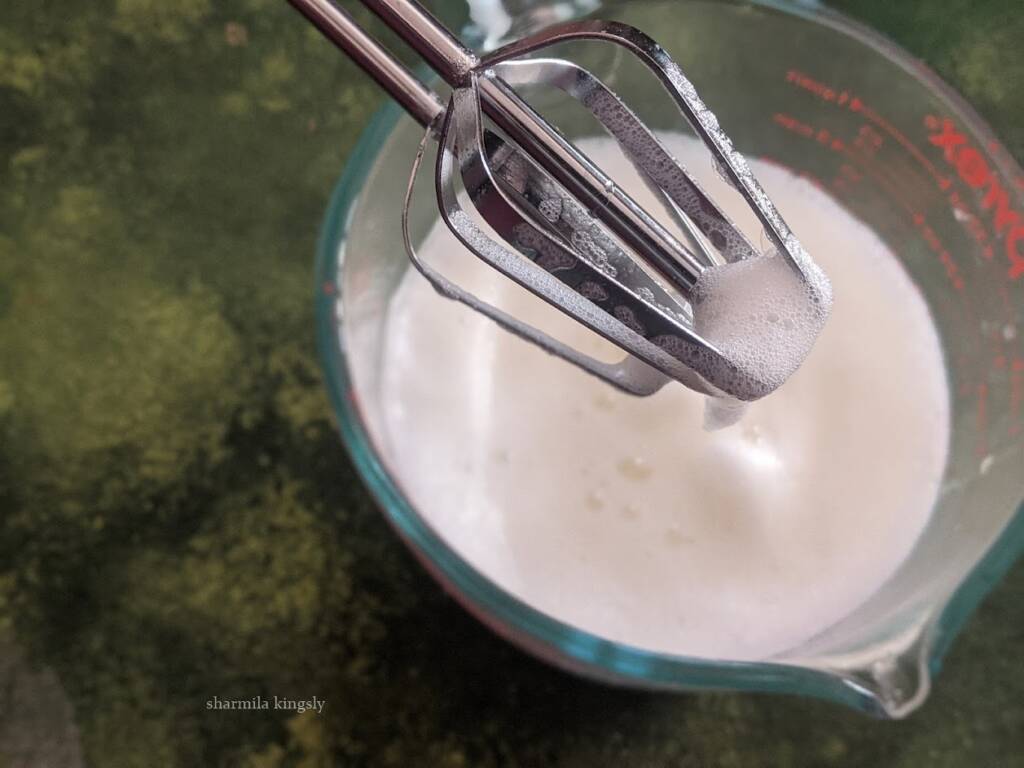
    1.     In a mixing bowl add in Coconut Milk to this Sugar and Vanilla Essence and mix well. Pour this to the Popsicle mould till ¾ of its level now close the lid but don’t insert the Popsicles stick. Let it freeze for 2 hours.

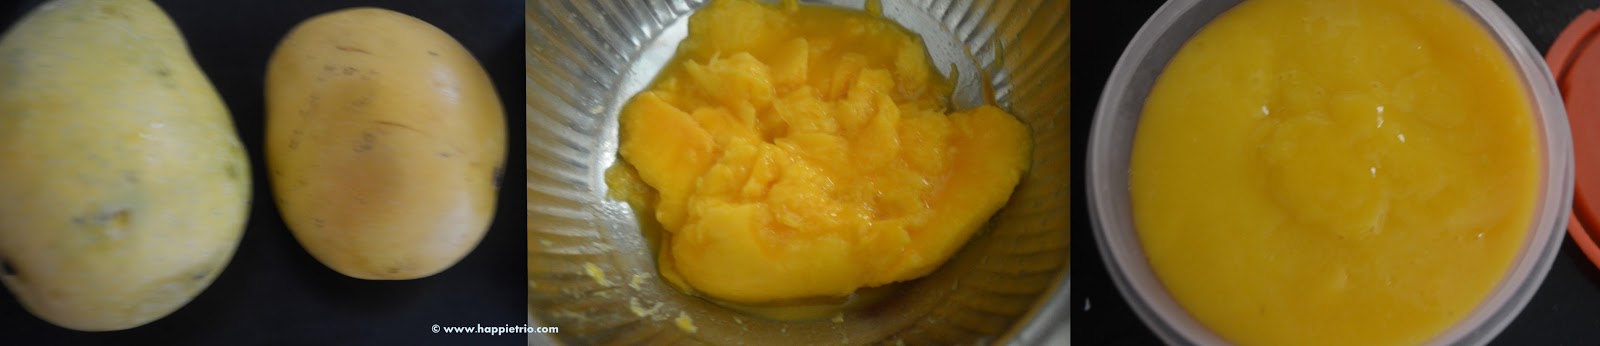
    2.     After 2 hours chop the Mangoes scoop out the flesh and grind it to a fine puree. Use Sugar if the sweetness of your mango is less .Mine was sweeter so I dint add any sweetener.

    Vegan Mango CoconutMilk Popsicle

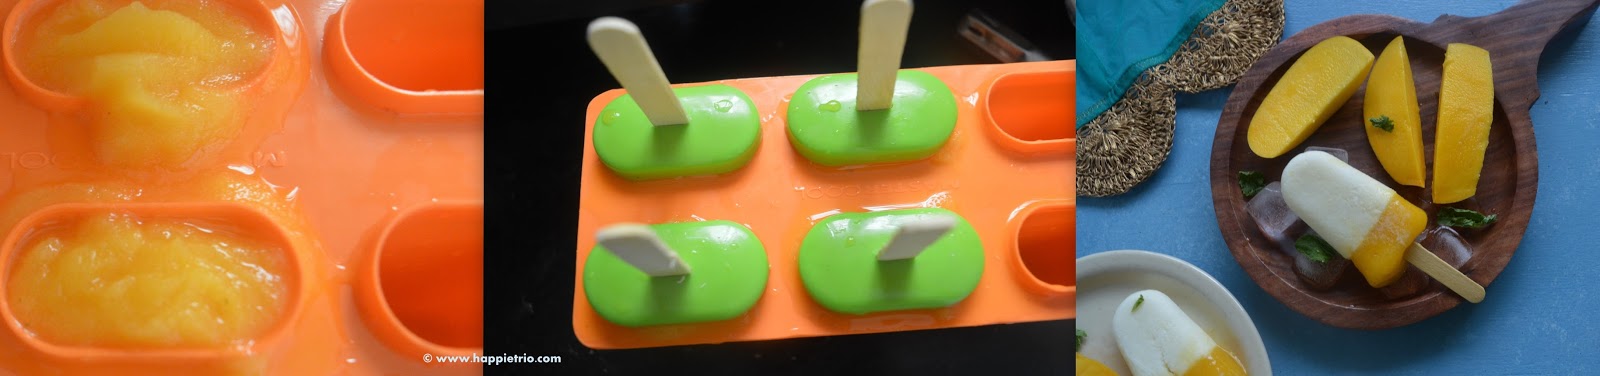
     3.     Now fill the popsicles mould with the Mango Puree and then close with the lid and insert the Popsicles stick. Freeze it for 8 hours or overnight. To release the Popsicle from the mould show them in running tap water and gently release the popsicle form the moulds by holding the lids it will come easily. Serve immediately.

    Serve immediately once it is out of the Fridge .

    Vegan Mango CoconutMilk Popsicle

     Did you enjoy this recipe? If you happen to try it out, I would love to hear from you! I’d appreciate it if you could rate and leave a review below in the comments. Your reviews help others know the recipe better too. Thanks for your time. You can also follow me on Facebook, Pinterest, Instagram, Youtube and Twitter for more updates from me.

    • Semiya Paal Ice
      Semiya Paal Ice (Vermicelli Popsicles)
    • Milk Popsicles
      Milk Popsicles Recipe | Paal Ice Recipe
    • Mango Coconut Milk Popsicle
      Vegan Mango Coconut Milk Popsicle
    • Mango and WaterMelon Popsicles
      Mango and WaterMelon Popsicles

    📖 Recipe

    Mango Coconut Milk Popsicle
    Print Recipe Pin Recipe
    5 from 1 vote

    Vegan Mango CoconutMilk Popsicle

    Vegan Mango CoconutMilk Popsicle is a best for the Mango season, It is totally yummy and addictive. made use of the seasonal Juicy Mangoes.
    Prep Time10 minutes mins
    Cook Time0 minutes mins
    Freezing Time8 hours hrs
    Total Time8 hours hrs 10 minutes mins
    Course: Icecream
    Cuisine: International
    Servings: 5
    Calories: 144kcal
    Author: Sharmila Kingsly
    Prevent your screen from going dark

    Standard 1 cup measures 240 ml

    Ingredients

    • 2 cups Coconut milk
    • ½ cup Sugar
    • 1 tsp Vanilla Extract
    • 1 cup Mango Puree

    Instructions 

    • In a mixing bowl add in Coconut Milk to this Sugar and Vanilla Essence and mix well. Pour this to the Popsicle mould till ¾ of its level now close the lid but don’t insert the Popsicles stick. Let it freeze for 2 hours.
    • After 2 hours chop the Mangoes scoop out the flesh and grind it to a fine puree. Use Sugar if the sweetness of your mango is less .Mine was sweeter so I dint add any sweetener.
    • Now fill the popsicles mould with the Mango Puree and then close with the lid and insert the Popsicles stick. Freeze it for 8 hours or overnight. To release the Popsicle from the mould show them in running tap water and gently release the popsicle form the moulds by holding the lids it will come easily. Serve immediately.

    Notes

    • If you don’t have Popsicle mould any paper cups can be used to prepare them.
    •  Adjust the amount of sugar as per your preference.
    •  I use Banganapalli mangoes. So the colour depends on the variety of mangoes used.
    •  No .Of Popsicle depend upon the size of the mould which you use to prepare.

    Nutrition

    Calories: 144kcal | Carbohydrates: 15.3g | Protein: 1.1g | Fat: 9.6g | Saturated Fat: 8.5g | Sodium: 6mg | Potassium: 140mg | Fiber: 1.2g | Sugar: 14.3g | Calcium: 9mg | Iron: 1mg
    Tried this recipe?Mention @happietrio or tag #happietrio
    Subscribe to my Channelclick for more videos

    Traditional Kerala Style Palada Payasam

    May 15, 2017 By Sharmila Kingsly Leave a Comment

    Traditional Kerala palada PRadhaman served in a bowl garnished with cashews.

    Palada Payasam or Palada Pradhaman is a popular Onam Sadhya dessert. It is an easy to make traditional dessert with just 3 ingredients. It is prepared with Rice Flakes or Ada, Milk, and Sugar.

    Traditional Kerala Palada Pradhaman served in a bowl garnished with cashews.

    Rice Ada is a very popular ingredient in Kerala .It is used to prepare Kheer predominantly. Especially during the Onam Sadhya Kheer Made with Ada never fails to take place in the menu. The Rice ada comes in different sizes I have used a very small variety ada if you are using the bigger one chop them and then use, otherwise it might take little more time than usual. Today I am sharing a much simpler version with Milk, It is easy and can be prepared in just. Now let’s get started!!

    [feast_advanced_jump_to]

    Why You ll Love This Recipe

    Easy to make - The recipe does not involve any complex steps. Anyone can make it, Easy and beginner-friendly. We need some patience and some time to make this goodness.

    Minimal Ingredients - This traditional pink palada payasam as they call it in Kerala requires only 3 main ingredients. I am using cardamom for extra flavor and garnish with ghee. Otherwise, all it needs are Milk, Sugar, and Rice ada.

    Perfect for Festivals - This is creamy, delicious, and tastes so good, Making it perfect for any festival. Onam Sadhya is incomplete without this pink payasam.

    Ingredients

    Ingredients for palada pradhaman.

    Milk - Use Full fat milk for a creamy kheer.

    Rice Ada - Rice ada is prepared with rice flour. We can also prepare rice ada in come they follow a method of cooking a thin paste of rice flour in a banana leaf. This may be time consuming and tricky for many. Store-bought rice ada is easily accessible these days and they are also perfect to make. So choose any one as per your preference.

    Sugar - We use sugar for sweetening the kheer. Also, the beautiful pink hue comes from the sugar caramel we prepared. We don't usually replace jaggery for sugar while preparing palada pradhman. In Ada Pradhman we use jaggery both are different traditional recipes.

    Cardamom - I'm using it for flavor. This is optional you can skip it if you don't prefer it.

    Ghee - We can roast the cashew nuts in ghee and add them to the pradhaman for added taste and flavor. This is also and optional step.

    Cashew - Cashews or any other nuts are added as a garnish for the payasam.

    Palada Pradhaman

    How to make Palada Pradhaman

    Prepare the Rice Flakes ( Ada )

    1.Bring water to boil in a saucepan and switch off.

    2. Add rice flakes to the hot boiling water.

    3. Let the rice flakes rest in hot water for 5 mins.

    4. Drain the ada and wash them once. This prevents the ada from further cooking

    Add Rice ada to boiling water. Strain and set aside.

    Prepare Caramel for the payasam

    5. In a saucepan add sugar. Start cooking on a medium flame. Slowly the sugar starts to melt.

    6. In a few minutes, the melted sugar starts to change color. The sugar turns into a brown color.

    7. At this stage add 3 tbsp of water and combine everything with a whisk. Once the sugar melts completely. Switch off the flame the caramel is now ready.

    Prepare Palada Pradhaman ( Rice flakes Kheer )

    8. In a pan add full-fat milk and bring it to a boil. Once the milk boils simmer the flame and keep cooking the milk in a low flame. Cook until the milk is reduced to ¾ of its quantity.

    Prepare the caramel with sugar and water.

    9. Now add the measured sugar and mix well. Let it melt.

    Add Sugar to Milk.

    10. Next, add the Rice Ada and combine everything. Cook in a low flame until the ada is cooked. It takes 5-7 mins.

    add the palada soaked in hot water to milk and cook until its done.

    11. Now add the crushed cardamom or cardamom powder and give a mix.

    Add Cardamom Powder to payasam.

    12. Add the prepared sugar caramel and combine everything. Mix and cook for 2 minutes and switch off the stove.

    add the prepared caramel to payasam.

    13. Heat another pan with ghee and once it's hot add cashew nuts. Roast until the cashews are golden and switch off.

    Roast cashew in ghee untill golden.

    14. Finally, add the roasted cashew nuts along with ghee to the payasam.

    Add Roasted Cashew to the payasam.

    Kerala Style palada payasam is ready.

    Kerala Style Palada Pradhaman.

    Expert Tips

    Serving Suggestions

    Related Kheer Recipes

    • Rice Ada Payasam
      Kerala Ada Pradhaman
    • Chakka payasam
      Jackfruit Kheer with Jaggery (Chakka Pradhaman)
    • chakka varatti payasam
      Chakka Varatti Payasam | Chakka Varatti Pradhaman
    • Pazham Pradhaman
      Banana Kheer | Pazham Payasam | Pazham Pradhaman

    ★ Did you enjoy this recipe? If you happen to try it out, I would love to hear from you! I’d appreciate it if you could rate and leave a review below in the comments. Your reviews help others know the recipe better too. Thanks for your time. You can also follow me on Facebook, Pinterest, Instagram, Youtube and Twitter for more updates

    📖 Recipe

    Traditional Kerala palada PRadhaman served in a bowl garnished with cashews.
    Print Recipe Pin Recipe
    5 from 1 vote

    Palada Payasam | Palada Pradhaman

    Palada Payasam or Palada Pradhaman is a popular Onam Sadhya dessert. It is an easy to make traditional dessert with just 3 ingredients. It is prepared with Rice Flakes or Ada, Milk, and Sugar.
    Prep Time15 minutes mins
    Cook Time15 minutes mins
    Total Time30 minutes mins
    Course: Dessert
    Cuisine: Kerala
    Servings: 3
    Calories: 106kcal
    Author: Sharmila Kingsly
    Prevent your screen from going dark

    Standard 1 cup measures 240 ml

    Ingredients

    • ¼ cup Rice Ada
    • ⅓ cup Sugar
    • 2 cups Milk
    • ¼ tsp Cardamom powder
    • ½ tbsp Ghee
    • 8 Cashew nuts

    Instructions 

    Prepare the Rice Flakes ( Ada )

    • Bring water to boil in a saucepan and switch off.
    • Add rice flakes to the hot boiling water.
    • Let the rice flakes rest in hot water for 5 mins.
    • Drain the ada and wash them once. This prevents the ada from further cooking

    Prepare Caramel for the payasam

    • In a saucepan add sugar. Start cooking on a medium flame. Slowly the sugar starts to melt.
    • In a few minutes, the melted sugar starts to change color. The sugar turns into a brown color.
    • At this stage add 3 tbsp of water and combine everything with a whisk. Once the sugar melts completely. Switch off the flame the caramel is now ready.

    Prepare Palada Pradhaman ( Rice flakes Kheer )

    • In a pan add full-fat milk and bring it to a boil. Once the milk boils simmer the flame and keep cooking the milk in a low flame. Cook until the milk is reduced to ¾ of its quantity.
    • Now add the measured sugar and mix well. Let it melt.
    • Next, add the Rice Ada and combine everything. Cook in a low flame until the ada is cooked. It takes 5-7 mins.
    • Now add the crushed cardamom or cardamom powder and give a mix.
    • Add the prepared sugar caramel and combine everything. Mix and cook for 2 minutes and switch off the stove.
    • Heat another pan with ghee and once it's hot add cashew nuts. Roast until the cashews are golden and switch off.
    • Finally, add the roasted cashew nuts along with ghee to the payasam. Kerala Style palada payasam is ready.

    Notes

    · The Payasam gets thicker by time .So add more milk if required.
    · Add Condensed milk and skip sugar if you prefer a creamier version.
    · Add in Raisins also if you prefer.

    Nutrition

    Calories: 106kcal | Carbohydrates: 17g | Protein: 2.8g | Fat: 3.5g | Saturated Fat: 1.2g | Cholesterol: 5mg | Sodium: 24mg | Potassium: 54mg | Fiber: 94g | Sugar: 10.4g | Calcium: 62mg
    Tried this recipe?Mention @happietrio or tag #happietrio
    Subscribe to my Channelclick for more videos

    Disclaimer: I am not a nutritionist, the nutrition value provided here is an estimate. It will vary based on the quantity and brands of the products used.

    This post is originally from 2017. It is now updated with new pictures, details, and recipe cards.

    Prawn Fritters | Prawn Vadai | Eral vadai

    May 14, 2017 By Sharmila Kingsly Leave a Comment

    prawn vada

    Prawn fritters or Iral vadai is a deep fried fritter made with shrimp and other aromatics. It is an easy to make kids friendly snack.

    Follow us on Pinterest for delicious pins. Join our Facebook group for more Instant Pot and Air Fryer recipes.

    prawn vada

    Prawn Vadai | Prawn Fritters | Eral vadai is an easy to make snack. If you have already cleaned the prawn and then you get this easy snack in just 10 mins.

    All you need is prawn, coconut, onions, and a few other aromatics. You can also prepare the patties and freeze them. Fry as and when required. No need to thaw the frozen patties as well. You can fry them as it is.

    [feast_advanced_jump_to]

    Ingredients

    Prawn - Any variety of prawns or shrimp works well. Make sure to wash and clean the shrimp well with water and turmeric powder. Also, devein them before cooking.

    Coconut - Use freshly grated coconut if you have access to the best taste. It adds a unique taste to the fritters.

    Spice Powders - In goes the basic red chili, Tuemric powder for flavor

    Ginger - good for digestion and a main ingredient for any nonveg food.

    Rice Flour - This is the binding agent. It keeps the fritters in shape and prevents them from disintegrating while deep frying.

    Fennel Seeds, Curry Leaves, cilantro - We add all these aromatics for flavor.

    Oil - Use any cooking oil for deep frying the fritters. I prefer coconut oil. Groundnut oil also works well.

    FAQ's

    Which type of prawns taste best for fritters?

    Small variety of pink prawns are the tastiest. However, you may also use tiger prawns or any other variety.

    Can we avoid deep frying?

    Instead of deep frying you can either bake or airfrye the fritters. Shallow frying also works well. Prawn gets cooked easily and hence you can try different approaches.

    How to clean prawns?

    This is a very common question I get for any prawn recipe. It is quite simple, just that it requires some practice and patience. First, cut the shell and remove them along with the head. Next, you can remove the tail if you prefer. Next, draw a slit on the back of the shrimp and remove the black vein and you are done. Repeat these steps and then wash the shrimp well to remove any dirt particles with water and turmeric powder.

    How to make Prawn Vadai

    1.Clean and de-vein the prawn and set it ready. In a blender add the prawns

    Next add garlic , ginger , shallots and grated coconut.

    Also add the spice powders.

    Blend everything to a coarse paste.

    2. Now take the ground mix to a big bowl and add in the Rice flour, Chopped onions, Coriander leaves, Curry Leaves, and Fennel Seeds.

    Finally add rice flour and Combine all the ingredients evenly.

    3. Divide the dough into equal sized small shaped balls and flatten them.

    Heat oil for deep frying. Once the oil is hot drop in 4-5 Vada’s per batch and start frying.

    4. Fry until the fritters are crisp and golden brown. Remove them from oil and drain them in paper towels to absorb excess oil. Yummy shrimp vadai is now ready.

     Tastes good with Rice or as a Snack!!

    Tips & Variations

    • Do not flip the prawn fritters immediately after dropping them in the oil they might get crumbled. Hence give some time to set and then flip and cook.
    • Freeze the shaped fritters for 20-30 mins.
    • Freezing helps the fritters to hold their shape well and prevent them from getting disintegrated while frying.
    • Never overcrowd while frying it might again break the vadai.
    • Always clean and devein the shrimp before cooking.
    • Make sure you wipe the shrimp clean without moisture before adding them to the blender.
    • If it has more moisture, it will be difficult to shape the fritters.
    • I have shown the stovetop method in this recipe. However, you can also prepare the baked Prawn Fritters or even air-fry them for a less calorie variation and guilt-free version.

    Serving Suggestion

    Goes well as a snack with some tomato sauce or Mayonaise. You can also serve them as an appetizer for any potluck or party.

    Similar Recipes

    • Fish Cutlet
      Fish Cutlet | Fish Fritters | Tuna Cutlets
    • Vazhaipoo Vadai.
      Crispy Vazhaipoo Vadai
    • Medu vada
      Medu Vadai | Ulundu Vadai | Urad Dal Fritters
    • Chicken cutlet
      Chicken cutlet

    ★ Did you enjoy this recipe? If you happen to try it out, I would love to hear from you! I’d appreciate it if you could rate and leave a review below in the comments. Your reviews help others know the recipe better too. Thanks for your time. You can also follow me on Facebook, Pinterest, Instagram, Youtube and Twitter for more updates from me.

    📖 Recipe

    prawn vada
    Print Recipe Pin Recipe
    5 from 1 vote

    Prawn Fritters | Prawn Vadai Recipe | Eral vadai

    Prawn Vadai is a deep fried fritters made with prawn and few other spices.
    Prep Time15 minutes mins
    Cook Time10 minutes mins
    Total Time25 minutes mins
    Course: Appetizer
    Cuisine: Indian
    Servings: 10 vada
    Calories: 153kcal
    Author: Sharmila Kingsly
    Prevent your screen from going dark

    Standard 1 cup measures 240 ml

    Equipment

    • Mixing Bowl
    • Blender
    • Frying Pan
    • Mixing Bowl
    • Blender
    • Frying Pan

    Ingredients

    To Grind

    • ¼ kg Prawn
    • ¼ cup Freshly grated Coconut
    • 10 Shallots
    • 1 inch piece Ginger
    • 5 Garlic pods
    • 1 tsp Chilli powder
    • ¼ tsp Turmeric powder
    • Salt as needed

    Other Ingredients

    • 1 Onion
    • 1 tsp Fennel seeds
    • ¼ cup Coriander Leaves
    • 2 sprig curry leaves
    • 3 tbsp Rice flour
    • Oil for deep frying

    Instructions 

    • Clean and de-vein the prawn and set it ready. In a blender add the prawns, and coconut along with all the ingredients mentioned in the “To grind” table.
    • Now take the ground mix to a big bowl and add in the Rice flour, Chopped onions, Coriander leaves, Curry Leaves, and Fennel Seeds. Combine all the ingredients evenly.
    • Divide the dough into equal sized small shaped balls and flatten them. Heat oil for deep frying. Once the oil is hot drop in 4-5 Vada’s per batch and start frying.
    • Fry until the fritters are crisp and golden brown. Remove them from oil and drain them in paper towels to absorb excess oil. Yummy shrimp vadai is now ready.

    Video

    Notes

    •  The cooking time may depend on the size of vada you make.
    •  Mine was very small bite sized vada’s as my little one prefers it this way. So  Adjust the shape as per your preference.
    •  Frying the vada in coconut oil makes it more delicious.
    •  Add in few curry leaves and Red Chilli in the oil while frying it brings in a   nice flavour.

    Nutrition

    Serving: 1vada | Calories: 153kcal | Carbohydrates: 5g | Protein: 6.2g | Fat: 12.1g | Saturated Fat: 2.1g | Cholesterol: 53mg | Sodium: 63mg | Potassium: 85mg | Fiber: 0.7g | Sugar: 0.6g | Calcium: 29mg | Iron: 1mg
    Tried this recipe?Mention @happietrio or tag #happietrio
    Subscribe to my Channelclick for more videos

    Disclaimer: I am not a nutritionist, the nutrition value provided here is an estimate. It will vary based on the quantity and brands of the products used

    Note: This post is originally from 2017. I have now updated it with a new Recipe card, Pictures, and video now.

    Coconut Burfi

    May 11, 2017 By Sharmila Kingsly 1 Comment

    Coconut Burfi

    Coconut Burfi or Fudge is an Indian Sweet Prepared with grated coconut, Sugar along with the flavors of your choice.

    Coconut Burfi

    Coconut Burfi is one my favorite sweets, whenever I have some good stock of coconut in home I just prepare it. Hubby and my daughter also loves it .It stays good for a week and hence it is one recipe which we can pack for any picnics and trips. So when I decided Picnic Hamper as the theme in BM is badly wanted to post Coconut Burfi as it one recipe which is was waiting to blog. Somehow I dint for these many days. So without any delay now let’s get started with the recipe.

    Nariyal burfi

    How to make Coconut Burfi

         1.     Fry the nuts and ghee for garnishing till golden brown and set aside. Grate the coconut without any browns and set it ready, Grease a tray with ghee and keep that aside.

     2.     In a pan add in the Grated Coconut and start roasting in a low flame. Add in the Sugar too.

     3.     Sprinkle the water. Now the sugar will start to melt and the mixture will resemble gooey. Continue to stir until the mixture thickens and start leaving the sides of the pan.Now add in the ghee fried nuts and Cardamom powder and mix well. Transfer the mixture to the greased tray and level it so that it resembles in the same size.

      4.     While the mixture is still hot cut into desired shapes.Once it is completely cooled removed from the tray and store in air tight containers.


    coconut Fudge

    ★ Did you enjoy this recipe? If you happen to try it out, I would love to hear from you! I’d appreciate it if you could rate and leave a review below in the comments. Your reviews help others know the recipe better too. Thanks for your time. You can also follow me on Facebook, Pinterest, Instagram, Youtube and Twitter for more updates

    📖 Recipe

    Coconut Burfi
    Print Recipe Pin Recipe
    5 from 1 vote

    Coconut Burfi

    Coconut Burfi or Fudge is an Indian SWeet Prepared with grated coconut ,Sugar along with the flavours of your choice.
    Prep Time15 minutes mins
    Cook Time10 minutes mins
    Total Time25 minutes mins
    Course: Dessert
    Cuisine: Indian
    Servings: 4
    Calories: 95kcal
    Author: Sharmila Kingsly
    Prevent your screen from going dark

    Standard 1 cup measures 240 ml

    Ingredients

    • 1 cup Freshly Grated Coconut
    • 1 cup Sugar
    • 2 tbsp Water
    • 1 tsp Cardamom powder
    • 1 tsp Ghee
    • Nuts to garnish

    Instructions 

    • Fry the nuts and ghee for garnishing till golden brown and set aside. Grate the coconut without any browns and set it ready, Grease a tray with ghee and keep that aside.
    • In a pan add in the Grated Coconut and start roasting in a low flame. Add in the Sugar too.
    • Sprinkle the water. Now the sugar will start to melt and the mixture will resemble gooey. Continue to stir until the mixture thickens and starts leaving the sides of the pan.
    • Now add in the ghee fried nuts and Cardamom powder and mix well. Transfer the mixture to the greased tray and level it so that it resembles the same size.
    • While the mixture is still hot cut into desired shapes. Once it is completely cooled remove from the tray and store in airtight containers.

    Notes

    · Make sure you cut into pieces while the mixture is still hot once it is cooled down it will be difficult to cut.
    · Never compromise the amount of sugar used as it gives the burfi consistency.
    · If the amount of sugar is reduced it might become halwa.
    · Checkout this Carrot Burfi for detailed step-by-step pics which is almost the same for Coconut Burfi. I shall be updating the step by step pics for Coconut Burfi Soon.
    · It stays good until a week.

    Nutrition

    Serving: 1square | Calories: 95kcal | Carbohydrates: 13g | Protein: 0.4g | Fat: 5.2g | Saturated Fat: 4.3g | Cholesterol: 4mg | Sodium: 3mg | Potassium: 42mg | Fiber: 1.1g | Sugar: 11.8g | Calcium: 2mg | Iron: 2mg
    Tried this recipe?Mention @happietrio or tag #happietrio
    Subscribe to my Channelclick for more videos

    Matar pulao ( Green Peas Pulao )

    May 10, 2017 By Sharmila Kingsly Leave a Comment

    Peas pulao recipe

    Matar pulao or Green Peas pulao is quick fix for lunch when we were left out with less time to cook any food. Use fresh green peas for the best taste.

    matar pulao

    Green Peas pulao is a quick to fix for lunch in less time. The entire process will hardly take around 40 mins from scratch to prepare. It tastes good with just Raita and Chips. It also makes a delicious Lunch box dish. Now let’s get started.

    This also makes great food for a picnic if we need to prepare in bulk for many people. In that case, use water instead of coconut milk so that it has a longer shelf life. During the last Green Peas season, I was lucky enough to freeze some peas so it came in handy for me.

    [feast_advanced_jump_to]

    Peas Pulao

    Green peas is a fresh winter produce in India. Pulao with the season's best green peas is the best ever food. It tastes so good and it gets done easily with minimal ingredients. This is like an easy to go one pot meal.

    You can cook the pulao easily with your Instant Pot or Pressure cooker or even on the stovetop. I have tried all three ways and the pulao never failed to taste at its best.

    Green Peas

    Ingredients

    Whole Spices - The spices add an amazing flavor to the Pulao. When we temper the spices in oil they become fragrant and it makes the pilaf aromatic.

    Green Peas - Use fresh or frozen peas. If using dried green peas, soak them overnight, pressure cook for 3 whistles, and then use.

    Onion - They form the base of the pilaf. Saute the onions till they are soft and pink.

    Ginger garlic paste - Another mandatory ingredient for pilaf. It adds so much flavor to the dish.

    Green Chilli - It is for the spice element. Increase or decrease as you like.

    Lemon juice and Yogurt - It balances the flavors and enhances the tastes.

    Mint + Cilantro - It gives a rich aroma to the pulao.

    Basmati Rice - Use good quality long grained rice.

    Liquid - You can use either water or coconut milk.

    How to prepare Peas Pulao in Instant Pot

    1.Turn on the Instant Pot in saute mode. Once it shows ON, wait for 30 secs and then add in 2 tbsp of Oil. Let it get hot. To this add in the Whole spices and green chilli saute for a few secs.

    2. Next, add in 1 cup of sliced Onion. Saute till they are soft and pink.

    3. And then add in 1.5 tbsp of ginger garlic paste. Saute till the raw smell leaves. If the Instant Pot is very hot or, if the ginger garlic paste sticks to the inner pot, you can add in 2 tbsp of Water and deglaze. Or you can press the cancel button and continue cooking in the residual heat. and then press the saute button back after a few mins.

    4. Now add in the Mint and Cilantro. Saute for a few secs.

    5. Next, add in 1 cup of fresh or frozen green peas. Combine everything.

    6. Wash the Basmati Rice 3 or 4 times and keep them soaked in water for 30 mins. Now drain the water and add the Basmati Rice to the Instant Pox. Mix everything.

    7. Add in 3 cups of water. Also, add 1 tbsp of Lemon Juice and the required Salt.

    8. Close the Instant Pot and turn the pressure valve to the sealing position. Select the pressure cook mode and set 5 mins in high pressure.

    9. Do a quick release and open the Instant Pot after 5 mins. Gently fluff the Rice and switch off the Instant Pot.

    10. Now close the Instant Pot once again and leave the rice undisturbed for another 30 mins. After 30 mins open the Instant Pot and fluff the Rice once again. Fluffy perfect Instant Pot Peas Pulao is ready.

    Matar Pulao in Pressure Cooker

    • Follow all the instructions same as the Instant Pot. But add 1.25 cups of water for every 1 cup of rice while cooking in the pressure cooker.
    • After adding the liquid, Salt and lemon juice close the pressure cooker.
    • When the pressure starts coming put the whistle and cook for about 3 minutes on high flame.
    • Wait till the pressure gets released by itself and then open the cooker. Carefully fluff the rice without breaking.

    Matar pulao is now ready.

    matar pulao

    Serving Suggestion

    Serve hot with any Raita or Chips. Tastes good with Chicken Kurma or Potato Kurma too!!

    ★ Did you enjoy this recipe? If you happen to try it out, I would love to hear from you! I’d appreciate it if you could rate and leave a review below in the comments. Your reviews help others know the recipe better too. Thanks for your time ? You can also follow me on Facebook, Pinterest, Instagram, Youtube and Twitter for more updates from me.

    📖 Recipe

    Peas pulao recipe
    Print Recipe Pin Recipe
    5 from 2 votes

    Green Peas Pulao

    Green Peas pulao is quick fix for lunch when we were left out with less time to cook any food. Use fresh green peas for the best taste.
    Prep Time20 minutes mins
    Cook Time30 minutes mins
    Total Time50 minutes mins
    Course: Main Course
    Cuisine: Indian
    Servings: 5
    Calories: 380kcal
    Author: Sharmila Kingsly
    Prevent your screen from going dark

    Standard 1 cup measures 240 ml

    Equipment

    • Instant Pot
    • Instant Pot

    Ingredients

    • 2 tbsp Oil
    • 5 Cashew Nuts
    • 1 tsp Fennel Seeds
    • 1 Bay Leaf
    • 3 Cardamom Pods
    • 1 inch Cinnamon Stick
    • 3 Clove
    • 1 Star Anise
    • 3 Green Chilli
    • 3 Onion medium sized approximately 1 cup sliced onions
    • 1.5 tbsp Ginger Garlic paste
    • 1 cup Green Peas Use fresh or frozen peas
    • Salt as needed
    • 2 cups Basmati Rice Wash well and soak for 30 mins
    • 3 cups Water
    • 1 tbsp Lemon Juice

    Instructions 

    Peas pulao in Instant Pot

    • Turn on the Instant Pot in saute mode. Once it shows ON, wait for 30 secs and then add in 2 tbsp of Oil. Let it get hot. To this add in the Whole spices and green chilli saute for few secs.
    • Next, add in 1 cup of sliced Onion. Saute till they are soft and pink.
    • And then add in 1.5 tbsp of ginger garlic paste. Saute till the raw smell leaves. If the Instant Pot is very hot or, if the ginger garlic paste sticks to the inner pot, you can add in 2 tbsp of Water and deglaze. Or you can press the cancel button and continue cooking in the residual heat. and then press the saute button back after a few mins.
    • Now add in the Mint and Cilantro. Saute for a few secs.
    • Next, add in 1 cup of fresh or frozen green peas. Combine everything.
    • Wash the Basmati Rice 3 or 4 times and keep them soaked in water for 30 mins. Now drain the water and add the Basmati Rice to the Instant Pox. Mix everything.
    • Add in 3 cups of water. Also, add 1 tbsp of Lemon Juice and the required Salt.
    • Close the Instant Pot and turn the pressure valve to the sealing position. Select the pressure cook mode and set 5 mins in high pressure.
    • Do a quick release and open the Instant Pot after 5 mins. Gently fluff the Rice and switch off the Instant Pot.
    • Now close the Instant Pot once again and leave the rice undisturbed for another 30 mins. After 30 mins open the Instant Pot and fluff the Rice once again. Fluffy perfect Instant Pot Paneer Peas Pulao is ready.

    Pressure Cooker Method

    • Follow all the instructions same as the Instant Pot. But add 1.25 cups of water for every 1 cup of rice while cooking in the pressure cooker.
    • After adding the liquid, Salt and lemon juice close the pressure cooker.
    • When the pressure starts coming put the whistle and cook for about 3 minutes on high flame.
    • Wait till the pressure gets released by itself and then open the cooker. Carefully fluff the rice without breaking.

    Video

    Notes

    · Using ghee to temper gives a nice aroma to the pulao.
    · I used frozen peas, Fresh peas can also be used.
    · Tastes best when served with Raita and Chips.
    · Makes an easy Lunch box dish.

    Nutrition

    Calories: 380kcal | Carbohydrates: 70.3g | Protein: 7.9g | Fat: 7g | Saturated Fat: 1g | Sodium: 44mg | Potassium: 274mg | Fiber: 4.1g | Sugar: 4.7g | Calcium: 53mg | Iron: 1mg
    Tried this recipe?Mention @happietrio or tag #happietrio
    Subscribe to my Channelclick for more videos

    Disclaimer: I am not a nutritionist, the nutrition value provided here is an estimate.It will vary based on the quantity and brands of the products used.

    Egg Shawarma Roll

    May 4, 2017 By Sharmila Kingsly Leave a Comment

    Egg Shawarma Roll

    Egg Shawarma Roll is the copycat version of the famous chicken shawarma. I replaced the chicken filling with scrambled eggs.

    Egg Shawarma Roll

    Shawarma is one of my favorite delight .When we were in Bangalore there used to be a Chicken shawarma shop and we get to taste the shawarma’s served there at least once a week .So many a times I have watched how the person makes shawarma .It is actually quite easy ,there use to be a grill kinda machine where they will stack chicken and cook in direct flame.

    As and when we order for a Shawarma he used to cut the chicken using big knifes heat the pita bread and then stuff it with Chicken Mayo filling .They used serve it with Salted Carrot and Cucumber yummy combo indeed. My daughter loves anything with Mayonnaise and she loves eggs too so I used to make these Egg shawarma rolls for her and she likes it a lot JSo whenever I have some Pita bread with me I used to make this for her. It is one of our family’s fav dish .Now let’s get started!!

    Egg Shawarma Roll

    How to make Egg Shawarma Roll

    1.     In a pan crack open eggs add in a pinch of salt and pepper and scramble well till it is fully done. Add a very little salt as we will be mixing this with Mayonnaise. Next slice the Carrots and Capsicum and keep it ready.
    2.     Add in a generous scoop of Mayo over the sliced veggies and generous a good mix.

     3.     Now switch on the stove and with a wire mesh show the pita bread in direct flame and flip on both the slice and cook for 30 secs in both the sides each.


     4.     Now take the pita bread and spread it with Mayonnaise add in the scrambled eggs and the sliced vegetables.


     5.     Roll it up and cover with a tissue a paper and serve immediately.


     Enjoy with Cut Lemon Wedges J


    ★ Did you enjoy this recipe? If you happen to try it out, I would love to hear from you! I’d appreciate it if you could rate and leave a review below in the comments. Your reviews help others know the recipe better too. Thanks for your time. You can also follow me on Facebook, Pinterest, Instagram, Youtube and Twitter for more updates from me.

    📖 Recipe

    Egg Shawarma Roll
    Print Recipe Pin Recipe
    No ratings yet

    Egg Shawarma Roll

    Egg Shawarma Roll is the copycat version of the famous chicken shawarma. I replaced the chicken filling with scrambled eggs.
    Prep Time20 minutes mins
    Cook Time15 minutes mins
    Total Time35 minutes mins
    Course: Main Course
    Cuisine: Mediterranean
    Servings: 3
    Calories: 246kcal
    Author: Sharmila Kingsly
    Prevent your screen from going dark

    Standard 1 cup measures 240 ml

    Ingredients

    • 3 Pita Bread
    • 3 Eggs
    • 2 Carrots
    • 1 Capsicum
    • 4 tbsp Mayonnaise
    • Salt as needed
    • 1 tsp Pepper powder

    Instructions 

    • In a pan crack open eggs add in a pinch of salt and pepper and scramble well till it is fully done. Add a very little salt as we will be mixing this with Mayonnaise. Next slice the Carrots and Capsicum and keep it ready.
    • Add in a generous scoop of Mayo over the sliced veggies and generous a good mix.
    • Now switch on the stove and with a wire mesh show the pita bread in direct flame and flip on both the slice and cook for 30 secs in both the sides each.
    • Now take the pita bread and spread it with Mayonnaise add in the scrambled eggs and the sliced vegetables.
    • Roll it up and cover with a tissue a paper and serve immediately.

    Notes

    You can make changes to the filling as per your wish.
    I have used store-bought pita bread. The Same can be made in the home as well. I will try to share the recipe for homemade pita bread asap.
    Instead of eggs any meat or veggies can be used as a filling.
    Be careful in adding salt as the Mayonnaise already has salt in it.

    Nutrition

    Calories: 246kcal | Carbohydrates: 27.6g | Protein: 9.2g | Fat: 11.4g | Saturated Fat: 2.4g | Cholesterol: 162mg | Sodium: 382mg | Potassium: 332mg | Fiber: 2.1g | Sugar: 5.7g | Calcium: 68mg | Iron: 2mg
    Tried this recipe?Mention @happietrio or tag #happietrio
    Subscribe to my Channelclick for more videos

    Tindora Fry | Crispy Ivy Gourd Fry

    May 2, 2017 By Sharmila Kingsly Leave a Comment

    Tindora Fry

    Tindora | Ivy gourd is one wonder vegetable which I missed cooking a lot. After coming to Chennai I found this vegetable quite in abundance in marked and I loved cooking and experimenting various dishes with it. Hubby never like Tindora but when I made this delicious crispy fried Tindora he loved it and he used to pick this veggie from marked during our shopping regularly even if I forget. This has now become one of our regular lunch side dish menu. Now let’s get started !

     
    Tindora Fry | Crispy Ivy Gourd Fry
     
    Recipe Cuisine: Indian |  Recipe Category : SideDish
    Prep Time: 30 mins | Cook Time : 7-10 mins/batch| Serves: 6 |Author :Sharmila
    Ingredients                              
    ·        Tindora / Ivy gourd – ¼ kg
    ·        Red Chilli powder – 2 tsp
    ·        Coriander powder – 1 tsp
    ·        Rice flour – 1 tbsp
    ·        Corn Flour – 1 tbsp
    ·        Turmeric powder – ½ tsp
    ·        Amchur powder – ½ tsp
    ·        Garam Masala – ½ tsp
    ·        Salt as needed
    ·        Fennel Seeds  - 1 tsp – ½ tsp
    ·        Oil for deep frying
    ·        Water to sprinkle
     
     Step by step Method with pictures:
     
    1. Slice the Tindora and keep in a mixing bowl. To this add in the Chilli powder, Coriander powder, Rice flour, Corn flour, Turmeric powder, Amchur powder, Garam Masala, and Fennel Seeds. Give a nice toss such that all the masala powders are evenly coated over the sliced tindora.
    2. Now sprinkle in few drops of water to it such that the Masala gets thickly coated to the veggies. Now heat in oil for deep frying .Once the oil is hot add in the Tindora in batches and deep fry.
    3. Cook in high flame for 1 min and then in a medium flame till the Tindora is fully cooked. Flip and cook in regular intervals. Once it is fully cooked remove from oil and keep in paper towels to remove the excess oil. Serve hot with Rice.
    Notes:
     
    • Feel free to add the spice powders according to your taste buds.
    • This was mildly spicy and we loved it with Steamed Rice and Sambar.
    • Make sure the oil is very hot while frying otherwise it consumes excess oil and takes time to get cooked.
    • Don’t over crowd the pan while frying in batches.
    • Make sure you flip the Tindora after 1 min frying in high flame otherwise the Masala might tend to leave apart.
    Step by step Method with pictures:
     
    1. Slice the Tindora and keep in a mixing bowl. To this add in the Chilli powder, Coriander powder, Rice flour, Corn flour, Turmeric powder, Amchur powder, Garam Masala, and Fennel Seeds. Give a nice toss such that all the masala powders are evenly coated over the sliced tindora.
    2. Now sprinkle in few drops of water to it such that the Masala gets thickly coated to the veggies. Now heat in oil for deep frying .Once the oil is hot add in the Tindora in batches and deep fry.

    3. Cook in high flame for 1 min and then in a medium flame till the Tindora is fully cooked. Flip and cook in regular intervals. Once it is fully cooked remove from oil and keep in paper towels to remove the excess oil. Serve hot with Rice.

     
    I actually prepared this Tindora Fry long and I have shared the pic in my IG profile long back. Due to our Mega Marathon I had to wait and post now J
    Enjoy it hot and crispy J
     

    Christmas Fruit cake ( Plum cake )

    April 28, 2017 By Sharmila Kingsly Leave a Comment

    Christmas Fruit Cake

    Xmas Cake is often served during Christmas. It has candied nuts and dry fruits that are soaked in Rum or Wine for almost a month.

    Christmas Fruit Cake

    Fruit cake is often served during Christian weddings and Christmas. The preparation of this fruit cake indicates the Christmas season.

    The specialty of this cake is the addition of fruits. Usually, a combination of dry fruits is being used. Raisins, Sultanas, Tutti frutti, Candied peeled orange, Dates, Apricots, Walnuts, Almonds, Cashew nuts.

    Any nuts and dry fruits can be used. Usually, the nuts and dry fruits are soaked in Rum. The more the days they are soaked the tastier it is. I have soaked it for about 7 months.

    You can even soak 2 days or about 2 weeks. Those who don’t want to soak in Rum can replace it will orange juice. However, the authentic way of preparing the Christmas fruit cake is by soaking the dry fruits in Rum.

    Similar Recipes:

    • Eggless Christmas Fruit Cake
    • Microwave Christmas Cake
    Xmas Cake | Christams Fruit cake | Christmas Plum cake

    Ingredients

    How to Prepare Xmas Fruit Cake

    Preparing Caramel

    First start by preparing the caramel. Combine ¼ cup of sugar and ½ tbsp of water in a sauce pan.

    Heat in a low flame till the sugar melt. When the color of the sugar start changing brown . Switch off the flame.

    Remove from the stove and add ⅛ cup of water. Do this step with extreme care as adding water might splash while adding water.

    Whisk everything together and the caramel is ready. Set it aside

    Fruit Cake

    Take the soaked fruits and toss them with about 2 tbsp of flour. This will prevent the fruits from sinking into the bottom of the flour batter. Reserve 2 tbsp Rum used for soaking the fruits, which we will add to the cake batter.

    Separate the Egg yolk and Egg white and keep them in separate bowls.

    Using a hand blender beat the egg white until soft peaks and set aside.

    In a mixing bowl add in the separated Egg yolk and soft butter. Beat with a hand blender until they are combined.

    Add in the Brown Sugar and beat once again.

    Now the Egg yolk, Butter and sugar are well combined.

    In another mixing bowl sift the all purpose flour, Baking powder, Baking soda and a pinch of salt together

    To this next add in the whisked butter, egg yolk and sugar. Using a hand blender beat everything together until combined.

    Now add in the rum soaked fruits , Vanilla extract. Make a powder of cinnamon , cardamom and clove and add that too.

    Add in the prepared caramel.

    Next add in the reserved 2 tbsp of rum.

    Gently fold everything together until combined.

    Grease a round 9 inch cake pan with butter and line with a parchment paper . Transfer the cake batter to the baking pan. I topped with more nuts. This is optional.

    Preheat the oven to 356 F (180 Deg C) for about 10 mins. And bake the cake for about 45-50 mins in. Check if a toothpick comes out clean when inserted into the baked cake. Christmas fruit cake is ready. Allow the cake to cool completely and then slice.

    Christmas Fruit cake

    Similar Christmas Cakes

    • Eggless Christmas Fruit Cake
      Eggless Christmas Fruit Cake | Christmas Plum Cake
    • Chocolate Sponge Cake
      Perfect Chocolate Sponge Cake
    • Eggless Microwave Christmas fruit cake
      Eggless Microwave Christmas fruit cake
    • Instant Pot Chocolate Cake
      Instant Pot Chocolate Cake

    ★ Did you enjoy this recipe? If you happen to try it out, I would love to hear from you! I’d appreciate it if you could rate and leave a review below in the comments. Your reviews help others know the recipe better too. Thanks for your time ? You can also follow me on Facebook, Pinterest, Instagram, Youtube and Twitter for more updates

    📖 Recipe

    Christmas Fruit Cake
    Print Recipe Pin Recipe
    5 from 1 vote

    Xmas | Christams Fruit cake | Christmas Plum cake

    Xmas Cake cake is often served during Christmas or Christian weddings. It has candied nuts and dry fruits that are soaked in Rum or Wine for almost a month.
    Prep Time120 days d
    Bake Time45 minutes mins
    Total Time120 days d 45 minutes mins
    Course: Dessert
    Cuisine: American
    Servings: 9
    Calories: 252kcal
    Author: Sharmila Kingsly
    Prevent your screen from going dark

    Standard 1 cup measures 240 ml

    Ingredients

    For Soaking:

    • 1½ cup Mixed Dry Fruits
    • ½ cup Rum/Brandy

    For Caramel:

    • ¼ cup Sugar
    • ½ tbsp Water
    • ⅛ cup Warm water

    For Cake:

    • 1 cup All Purpouse flour | Maida
    • ½ tsp Baking powder
    • ¼ tsp Baking soda
    • ¾ cup Brown Sugar
    • Salt a pinch
    • 100 gms soft unsalted Butter at room temp
    • 2 Eggs
    • 1 tsp Vanilla extract

    For Spice Powder:

    • 1 Cloves
    • 1 Cardamom
    • 1 inch Cinnamon

    Instructions 

    Preparing Caramel

    • First start by preparing the caramel. Combine ¼ cup of sugar and ½ tbsp of water in a sauce pan.
    • Heat in a low flame till the sugar melt. When the color of the sugar start changing brown . Switch off the flame
    • Remove from the stove and add ⅛ cup of water. Do this step with extreme care as adding water might splash while adding water.
    • Whisk everything together and the caramel is ready. Set it aside

    Fruit Cake

    • Take the soaked fruits and toss them with about 2 tbsp of flour. This will prevent the fruits from sinking into the bottom of the flour batter. Reserve the Rum used for soaking the fruits, which we will add to the cake batter.
    • Separate the Egg yolk and Egg white and keep them in separate bowls.
    • Using a hand blender beat the egg white until soft peaks and set aside.
    • In a mixing bowl add in the separated Egg yolk and soft butter. Beat with a hand blender until they are combined.
    • Add in the Brown Sugar and beat once again.
    • Now the Egg yolk, Butter and sugar are well combined.
    • In another mixing bowl sift the all purpose flour, Baking powder, Baking soda and a pinch of salt together
    • To this next add in the whisked butter, egg yolk and sugar. Using a hand blender beat everything together until combined.
    • Now add in the rum soaked fruits , Vanilla extract. Make a powder of cinnamon , cardamom and clove and add that too.
    • Add in the prepared caramel.
    • Next add in the reserved 2 tbsp of rum.
    • Gently fold everything together until combined.
    • Grease a round 9 inch cake pan with butter and line with a parchment paper . Transfer the cake batter to the baking pan. I topped with more nuts. This is optional.
    • Preheat the oven to 356 F (180 Deg C) for about 10 mins. And bake the cake for about 45-50 mins in. Check if a toothpick comes out clean when inserted into the baked cake. Christmas fruit cake is ready. Allow the cake to cool completely and then slice.

    Video

    Notes

    • The baking time may vary from oven to oven.
    • Caramel preparation is an extremely important step in the Christmas fruit cake as it gives the golden brown color to the cake.
    • It is important to remove the caramel from the stove at the correct stage as overcooking might turn the caramel bitter. It might spoil the cake if overcooked. Hence do this with utmost care.
    • Place the parchment paper in the prepared cake tin, this help to remove the cake easily from the cake pan.
    • Run a knife around the cake to release the cake easily from the pan.

    Nutrition

    Serving: 1slice | Calories: 252kcal | Carbohydrates: 35.4g | Protein: 3.7g | Fat: 11.5g | Saturated Fat: 6.8g | Cholesterol: 63mg | Sodium: 252mg | Potassium: 247mg | Fiber: 2.3g | Sugar: 21.3g | Calcium: 41mg | Iron: 1mg
    Tried this recipe?Mention @happietrio or tag #happietrio
    Subscribe to my Channelclick for more videos

    Disclaimer: I am not a nutritionist, the nutrition value provided here is an estimate. It will vary based on the quantity and brands of the products used.

    Nankhatai | Eggless Indian Butter cookies

    April 17, 2017 By Sharmila Kingsly Leave a Comment

    Nankhatai
    Nankhatai

    Festivals are always incomplete without sweets and snacks.

    It's Diwali Season and I am sharing few recipes to try this season.

    All the recipes that I share are easy to prepare and even beginners can nail it correctly. So please go ahead and read all the tips and tricks I share.

    To talk about Nankhatai it is a famous cookie from the Indian subcontinent.

    It is crisp and buttery, you will feel the hint of cardamom in each bite. It is totally delicious.

    As much as I knew about this Indian Cookie, little did I know that it's very popular and made widely during Diwali.

    It's during one casual discussion with Anu during the food made for Diwali. Anu mentioned about nankhatai being popular during Diwali time for gifting.

    After that, I went ahead and read a few articles and spoke to a few friends.Sharing all those details in this post below.

    [feast_advanced_jump_to]

    What is Nankhatai:

    Nankhatai is an Indian cookie that was evolved during the British period in India. It was quite popular in India and Pakistan.

    Nankhatai is a recipe that is very close to the heart of the Parsis. They love to enjoy rich food and they have no boundaries, you can find their plates always fancy.

    History of Nankhatai

    The word Nankhatai is derived from the Persian word Naan which means Bread. And Khatai meaning biscuit.

    Indian food is largely influenced by the British, Middle East, and Portuguese is a known fact.

    The parsis bakery in Surat is the first one to invent the Nankhatai. It is Indianized with the addition of Sooji , Gram flour , CArdamom and other Nuts.

    Where to Get Nankhatai in your City:

    If you have a Parsi bakery in your place that is the best place to try a traditional Nankhatai . I bet the taste will just linger in your palates.It is buttery heaven, not namesake. I mean it.

    How to prepare Indian Butter Cookies:

    The traditional Nankhatai is more of an Indian, Persian mix recipe.soft butter and powdered sugar beat till creamy and to this add all the dry ingredients and flavoring agents.

    Knead well and prepare a dough. Shape the cookies of equal size and shape and bake till perfection. It gets done in just 15 mins or even less depending on the oven.

    Sharing today my version of nankhatai which is easy and perfect for beginners.

    Ingredients for Nankhatai:

    Refined Flour or All purpose Flour:

    As always we use all-purpose flour for a soft melt in mouth cookie. It can very well be replaced with whole heat flour. But I suggest using all-purpose flour for the original recipe.

    Chickpea or Besan Flour:

    Chickpea flour is something that makes the cookie an Indian Version.

    In my recipe, I have not used chickpea flour. I went with sooji and Maida.

    Traditionally along with 1 cup refined flour, you can use ¼ of besan flour.

    further modifications have to be done. Will try sharing that version soon in the blog.

    Semolina:

    Semolina / Sooji or Riva give a nice texture to the cookies.

    Butter or Ghee:

    You can either use butter or ghee. If using ghee do not melt it. Try using thick ghee.

    If using butter-soft butter at room temperature.

    Variations:

    A popular variation is the Besan Nankhatai

    Chocolate, Pista , Kesar nankhatai are also in stores these days.

    However it is best that the classics remains untouched.

    Similar Recipes:

    • Cranberry Cookies
    • Wheat Butter Cookies
    Nankhatai

    How to prepare Nankhatai with step by step pictures:

    1. In a mixing bowl add in soft unsalted butter and powdered sugar. Cream together using an electric beater or stand mixer until they are well blended.

    2. To this next add in All-purpose flour, Baking soda, Semolina, Cardamom powder.

     3. Bring everything to form a soft dough. Divide the dough into equal portions and divide everything to form a cookie shape and place it in the lined baking tray. Top it with nuts of your choice. I used pistachios. 

    4.  Preheat at 180 Deg C for about 10 mins and then bake at 180 Deg C for about 15-20 mins or till the base of the cookie turns golden brown. Allow it to cool completely and then store in airtight containers.

    Tasty Nankhatais are now ready to serve.

    Nankhatai

    📖 Recipe

    Nankhatai
    Print Recipe Pin Recipe
    5 from 1 vote

    Nankhatai | Indian Butter cookies

    Nankhatai is an Indian cookie made with Refined flour, Butter, Sugar flavored with cardamom. It is crisp, buttery, and melts in the mouth.
    Prep Time15 minutes mins
    Bake Time15 minutes mins
    Total Time30 minutes mins
    Course: Dessert
    Cuisine: Indian
    Servings: 4
    Calories: 242kcal
    Author: Sharmila Kingsly
    Prevent your screen from going dark

    Standard 1 cup measures 240 ml

    Equipment

    • Oven
    • Mixing Bowl
    • ELectric Beater or Stand Mixer
    • Oven
    • Mixing Bowl
    • ELectric Beater or Stand Mixer

    Ingredients

    • 1 cup All-purpose flour
    • ½ cup Powdered Sugar
    • ½ cup Unsalted butter
    • 1 tbsp Semolina /Sooji
    • ¼ tsp Baking soda
    • ½ tsp Cardamom powder
    • Nuts for topping

    Instructions 

    • In a mixing bowl add in soft unsalted butter and powdered sugar. Cream together using an electric beater or stand mixer until they are well blended.
    • To this next add in All-purpose flour, Baking soda, Semolina, Cardamom powder.
    • Bring everything to form a soft dough. Divide the dough into equal portions and divide everything to form a cookie shape and place it in the lined baking tray. Top it with nuts of your choice. I used pistachios.
    • Preheat at 180 Deg C for about 10 mins and then bake at 180 Deg C for about 15-20 mins or till the base of the cookie turns golden brown. Allow it to cool completely and then store in airtight containers.

    Notes

    • Cookies might be soft immediately after baking but gets crispy after it cools down.
    • The baking time may vary from oven to oven.
    • Garnish with any nuts of your choice or even saffron

    Nutrition

    Calories: 242kcal | Carbohydrates: 42g | Protein: 7.9g | Fat: 6g | Saturated Fat: 3.4g | Cholesterol: 13mg | Sodium: 3mg | Potassium: 204mg | Fiber: 6.4g | Sugar: 0.2g | Calcium: 19mg | Iron: 2mg
    Tried this recipe?Mention @happietrio or tag #happietrio
    Subscribe to my Channelclick for more videos

    Chicken Keema Egg Burji

    March 31, 2017 By Sharmila Kingsly Leave a Comment

    Chicken Keema Egg Burji

    Chicken keema egg burji pairs very well with Rice or any Indian Flat bread. It makes a quick protein rich side dish.

    Chicken Keema Egg Burji

    Chicken Keema comes handy when we are craving for chicken dishes. It gets cooked so fast and we don’t need to wait so much time. Chicken keema egg burji pairs very well with Rice or any Indian Flat bread. Now let’s get started.

    How to make Chicken Keema Egg Stir Fry

    Heat a pan with oil. Once its hot add Mustard and Urad Dal. Let it splutter. Next add Curry Leaves and Green Chili. Saute for few secs.

    Next add finely chopped onions. Sauté until the onions turn glossy.

    Now add the minced chicken/Chicken keema. Give a quick stir.

    Next add the spice powders. I am using turmeric powder ,Garam Masala, Cumin Powder Pepper powder and salt.

    Combine everything and cook in a low flame until the chicken is cooked completely. It may hardly take 5 mins. Minced chicken gets cooked in less time.

    Now move the chicken to the corner of the pan and break open 3 egg.

    Scramble gently and cook the eggs completely. Now mix everything and cook in a low flame for a min .Garnish with coriander leaves and switch off the flame.

    Chicken Keema Egg Stir Fry is now ready to serve.

    Chicken Keema Egg Burji

    Tips & Variations

    • It is just simple and a quick dish.
    • You can also add more vegetables. Carrot, Capsicum even tomatoes goes well with egg bhurji.
    • Makes a great Lunch Side dish and pair very well with any Indian Flat Bread.
    • If you do not have minced chicken. You can simply use boneless chicken. Add it to a blender and pulse twice or thrice. you are good to go.

    Similar Recipes

    • Mushroom Egg Bhurji
      Mushroom Egg Burji
    • Mutton brain Egg Burji
      Mutton brain Egg Burji
    • Cauliflower Egg Bhurji
      Cauliflower Egg Bhurji
    • Shrimp Scrambled Egg
      Shrimp Scrambled Egg (Prawn Egg Masala)

    ★ Did you enjoy this recipe? If you happen to try it out, I would love to hear from you! I’d appreciate it if you could rate and leave a review below in the comments. Your reviews help others know the recipe better too. Thanks for your time. You can also follow me on Facebook, Pinterest, Instagram, Youtube and Twitter for more updates

    📖 Recipe

    Chicken Keema Egg Burji
    Print Recipe Pin Recipe
    5 from 1 vote

    Chicken keema egg burji

    Chicken keema egg burji pairs very well with Rice or any Indian Flat bread. Chicken Keema can be prepared in less time.
    Prep Time15 minutes mins
    Cook Time15 minutes mins
    Total Time30 minutes mins
    Course: Side Dish
    Cuisine: Indian
    Servings: 3
    Calories: 117kcal
    Author: Sharmila Kingsly
    Prevent your screen from going dark

    Standard 1 cup measures 240 ml

    Ingredients

    • 200 gms Minced Chicken ( Chicken Keema )
    • 3 Eggs
    • 1 Onion
    • 2 Green Chilli
    • 1 tbsp Pepper powder
    • 1 tsp Garam Masala
    • ¼ tsp Turmeric powder
    • ¼ tsp Cumin powder
    • Coriander leaves to garnish
    • Salt as needed
    • 1 tsp Oil
    • 1 tsp Mustard seeds
    • 1 tsp Urad Dal
    • 1 sprig Curry Leaves

    Instructions 

    • Heat a pan with oil. Once its hot add Mustard and Urad Dal. Let it splutter. Next add Curry Leaves and Green Chili. Saute for few secs.
    • Next add finely chopped onions. Sauté until the onions turn glossy.
    • Now add the minced chicken/Chicken keema. Give a quick stir.
    • Next add the spice powders. I am using turmeric powder ,Garam Masala, Cumin Powder Pepper powder and salt.
    • Combine everything and cook in a low flame until the chicken is cooked completely. It may hardly take 5 mins. Minced chicken gets cooked in less time.
    • Now move the chicken to the corner of the pan and break open 3 egg.
    • Scramble gently and cook the eggs completely. Now mix everything and cook in a low flame for a min .Garnish with coriander leaves and switch off the flame.

    Video

    Notes

    • It is just simple and a quick dish.
    • Makes a great Lunch Side dish and pair very well with any Indian Flat Bread

    Nutrition

    Calories: 117kcal | Carbohydrates: 8.4g | Protein: 8.5g | Fat: 5.9g | Saturated Fat: 1.4g | Cholesterol: 28mg | Sodium: 120mg | Potassium: 152mg | Fiber: 2.4g | Sugar: 2.9g | Calcium: 37mg | Iron: 4mg
    Tried this recipe?Mention @happietrio or tag #happietrio
    Subscribe to my Channelclick for more videos

    Disclaimer: I am not a nutritionist, the nutrition value provided here is an estimate. It will vary based on the quantity and brands of the products used.

    Note: This post is originally from 2016. I have updated with new Recipe card, Pictures and video now.

    • « Previous Page
    • 1
    • …
    • 53
    • 54
    • 55
    • 56
    • 57
    • …
    • 67
    • Next Page »
    Sharmila Kingsly

    Hi, I'm Joshie!

    Food Blogger, Biryani Lover , Software Engineer .. In no particular order.I love to cook and that is why I am here!! Welcome to my space!!. 

    Read more about me!

    • Instagram
    • Facebook
    • YouTube
    • Pinterest
    • X

    Vegan Recipes

    • Masala Paratha
      Masala Paratha
    • Tomato basil pasta
      Tomato Basil Pasta
    • Chickpea Spinach Curry
      Chickpea Spinach Curry
    • Vegan Chickpea Soup
      Vegan Chickpea Soup
    • Instant Pot Pumpkin Pasta
      Instant Pot Pumpkin Pasta
    • Basil Fried Rice
      Thai Basil Fried Rice

    Popular Posts

    • Nandu Rasam
      Nandu Rasam
    • Indian Dinner Party Menu Ideas, Sample Menus + Recipes
    • Nandu Kulambu
      Nandu Kuzhambu |Crab Curry |Nandu Kulambu
    • Instant Pot Peas Curry
      Instant Pot Peas Curry | Green Peas Curry
    • Payaru Kanji
      Payaru Kanji | Green Gram Porridge
    • Mushroom Egg Bhurji
      Mushroom Egg Burji

    Footer

    ↑ back to top

    As an Amazon Associate I earn from qualifying purchases.

    Copyright ©  2025 COOK WITH SHARMILA

    Rate This Recipe

    Your vote:


    A rating is required
    A name is required
    An email is required