Cook with Sharmila

  • Home
  • About Me
    • Video Recipes
    • Media Mentions
    • Privacy Policy
  • Recipe Index
    • Recipes
  • Nanjilnad Recipes
  • Shop
menu icon
go to homepage
  • Home
  • Recipe Index
  • Air Fryer
  • About Me
  • Subscribe
    • Facebook
    • Instagram
    • Pinterest
    • Twitter
    • YouTube
  • subscribe
    search icon
    Homepage link
    • Home
    • Recipe Index
    • Air Fryer
    • About Me
    • Subscribe
    • Facebook
    • Instagram
    • Pinterest
    • Twitter
    • YouTube
  • ×
    Home » Recipe Index

    How to Freeze Peas | Homemade Frozen Peas

    February 21, 2017 By Sharmila Kingsly Leave a Comment

    How to Freeze Green Peas

    How to freeze fresh peas is a common question when you get a lot of fresh green peas.`

    Green peas are seasonal and its found in abundance during winter. Freezing is the right way to use it around the year. It is economical too.

    Follow us on Pinterest for delicious pins. Join our Facebook group for more Instant Pot and Air Fryer recipes.

    How to Freeze Green Peas | Homemade Frozen Peas

    When life gives you green peas, buy even more and store it. So that for the rest of the year we can use it in our daily cooking without any effort. Green Peas are in season during the winter, so let’s use the most of this season.

    Last week when I was ordering my vegetables in Big basket I was really shocked to see the price, it was just 10 Rs /Kg , So it was then I got this idea of freezing fresh peas.

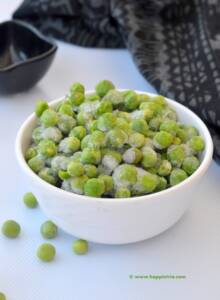
    The only time-consuming thing in freezing green peas is to remove the peas from their pod (de shelling). I had to do it for around 2 Kgs, but Hubby helped me in this which almost halved my effort. The Peas which I used for clicking pics are almost 2 weeks old after freezing. Now let’s get started.

    [feast_advanced_jump_to]

    Choosing the right Peas

    Always go for peas with an even dark green color. Do not select the pale-colored or overripe or already partially de shelled green peas.

    How to Freeze Peas

    We can divide the freezing processing into 4 steps. Will share them in detail below.

    Deshell

    The first and time-consuming part is de-shelling the peas from the pod. Do it slowly and carefully and collect the green peas. Make sure your peas are fresh. Watch a Netflix show and do this. I bet you can make the most out of it.

    Blanch

    Blanching peas for freezing is the next step. This is for a longer shelf life of the peas. Peas naturally have aging enzymes. so if we freeze without blanching the life decreases. To avoid this we are blanching the peas.

    Dry

    After blanching the peas pat dry the peas in a kitchen towel to remove the excess moisture. We will store the peas after its completely dry.

    Store

    Once the peas are dry store them in small zip-lock bags and freeze them to enjoy for the rest of the year.

    how to blanch peas for freezing

    Blanching is the process of adding the shelled peas to hot water for a few mins. The peas are then removed from the water and washed in ice-cold water to prevent further cooking. After which the peas are pat dry.

    This is an important step in freezing peas. Without blanching the shelf life of peas will be lesser.

    Ingredients

    Fresh Green peas - Use fresh green peas which are evenly green in color. Select the peas without any uneven patches or discolors.

    Salt - We add salt to maintain the fresh green color of the peas.

    Water & Icecubes - Again water is only for Blanching and we will add ice cubes to the peas after blanching to prevent them from cooking further.

    How to Freeze Green Peas | Homemade Frozen Peas

    FAQ 's

    Why do we thaw the frozen green peas

    We do not use frozen peas directly to cook. We thaw and bring it to room temperature and then cook. The process of bringing them to room temperature is thawing.

    How long can we freeze the green peas

    It stays good for up to 1 year. When handled clean and frozen properly.

    How can we use the frozen peas ?

    We can use it in pulao, gravy, cutlet , or in any cooking which calls for green peas. In fact, frozen peas get cooked quickly as we have already balanced before freezing.

    how long do you blanch peas ?

    Just a few mins. Maximum 2 or 3 mins, until the peas start floating in the water.

    Similar Recipes:

    • Cinnamon Powder Recipe | Homemade Cinnamon Powder
      How to make Cinnamon Powder for Baking
    • How to cook basmathi rice
      How to cook Basmati rice ( Instant Pot + Open Pot + Pressure Cooker )
    How to Freeze Green Peas

    How to Freeze Green Peas

    1.      Remove the green peas from the Pods. Wash the fresh peas really well and set aside.

    Step 1 - De shell the peas

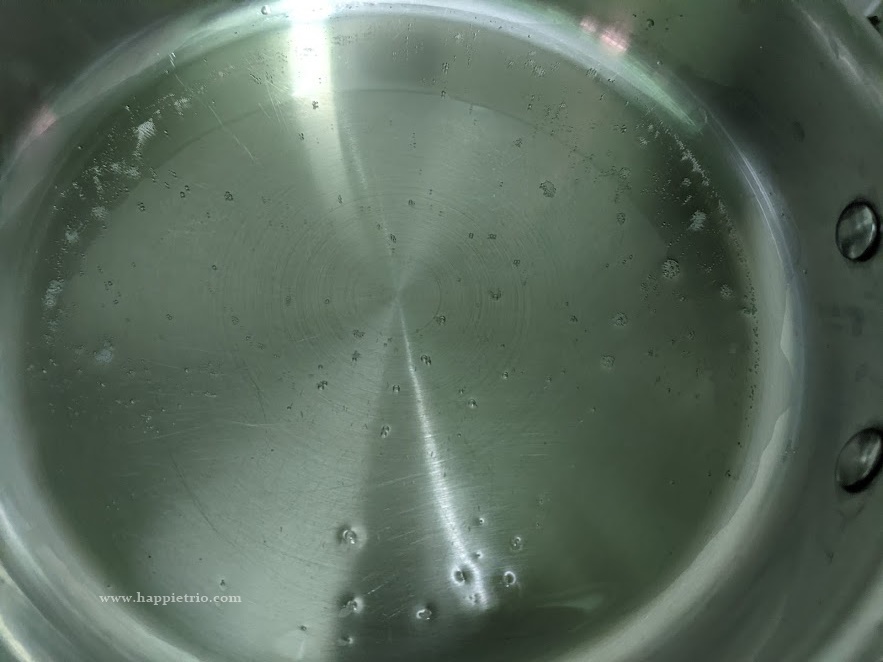
    2.      In a large pan bring in lots of water to boil. Once it starts bubbling up add in the cleaned fresh peas to the boiling water. It will sink to the bottom after immediately adding it to water.

    Step 2 - blanch the deshelled peas

    3.      After around 1-2 mins the peas will start floating in the top switch off the stove immediately and wash well with cold water to prevent it from further cooking. Spread the peas in a kitchen towel and allow it to dry completely.

    Step 3 - dry the green peas to remove the excess moisture

    4.    Once it is dry completely, transfer to a zip lock cover and freeze. It will stay good for months together.

    Step 4 - Homemade Frozen Peas

    Pro Tips: Always freeze in small batches, so that when needed, you can simply thaw a small batch as needed and use.

    Tips to Freeze Green Peas

    • Make sure the peas are dry completely before freezing in zip lock cover, otherwise the shelf life might get reduced.
    • The Frozen peas can be used directly in cooking no need to soak overnight and cook.
    • Thaw the frozen peas for some time before cooking or as needed for the recipe.
    How to Freeze Green Peas | Homemade Frozen Peas

    ★ Did you enjoy this recipe? If you happen to try it out, I would love to hear from you! I’d appreciate it if you could rate and leave a review below in the comments. Your reviews help others know the recipe better too. Thanks for your time. You can also follow me on Facebook, Pinterest, Instagram,Youtube and Twitter for more updates

    📖 Recipe

    How to Freeze Green Peas
    Print Recipe Pin Recipe
    5 from 1 vote

    How to Freeze Green Peas | Homemade Frozen Peas

    Green peas are seasonal and its found in abundance during winter. Freeze it the right way to use it around the year. It is economical too.
    Prep Time30 minutes mins
    Cook Time10 minutes mins
    Total Time40 minutes mins
    Course: Cooking Basics
    Cuisine: Continental
    Servings: 2 cups
    Calories: 59kcal
    Author: Sharmila Kingsly
    Prevent your screen from going dark

    Standard 1 cup measures 240 ml

    Ingredients

    • 2 cup Green Peas
    • Water as needed
    • Salt a pinch

    Instructions 

    • Remove the green peas from the Pods. Wash the fresh peas really well and set aside.
    • In a large pan bring in lots of water to boil. Once it starts bubbling up add in the cleaned fresh peas. It will sink to the bottom after immediately adding it to water.
    • After around 1-2 mins the peas will start floating in the top switch off the stove immediately and wash well with cold water to prevent it from further cooking. Spread the peas in a kitchen towel and allow it to dry completely.
    • Once it is dry completely, transfer to a zip lock cover and freeze. It will stay good for months together.

    Notes

    • Make sure the peas are dry completely before freezing in zip lock cover, otherwise the shelf life might get reduced.
    • The Frozen peas can be used directly in cooking no need to soak and cook.
    • Thaw the frozen peas for some time before cooking.
    • It keeps well for months together.
    • Max I have stored for 6 months.

    Nutrition

    Calories: 59kcal | Carbohydrates: 10.5g | Potassium: 177mg | Fiber: 3.7g | Sugar: 4.1g | Calcium: 18mg | Iron: 1mg
    Tried this recipe?Mention @happietrio or tag #happietrio
    Subscribe to my Channelclick for more videos

    Disclaimer: I am not a nutritionist, the nutrition value provided here is an estimate. It will vary based on the quantity and brands of the products used.

    Gulkand Recipe | Rose Petals Jam

    February 16, 2017 By Sharmila Kingsly 4 Comments

    Gulkand

    Gulkand , or Rose petals Jam is a healthy spread made of rose petals along with Sugar It is a no cooking Jam Recipe.

    Follow us on Pinterest for delicious pins. Join our Facebook group for more Instant Pot and Air Fryer Recipes.

    Gulkand

    Anything made with rose is absolutely fresh and refreshing. Do you know the health benefits of Rose, especially in Ayurveda? So whenever I see a good big natch of Fresh roses I make sure I put them to the best use.

    [feast_advanced_jump_to]

    What is Gulkand

    Gulkand is also known as Rose Petals Jam or Rose Petals Preserve is from the Indian Subcontinent. In Persian, Gul means Flower and gand means sweet. Gulkand is prepared by layering alternate layers of Rose and Sugar and then sun-dried for about 10 - 15 days when the preserve is ready it is stored in an airtight container (source wiki)

    Gulkand has so many health benefits it is widely used as a medicine in Ayurveda. It is mainly used to reduce body heat. It is advisable to have a tap of Gulkand regularly.

    Health benefits of Gulkand

    Gulkand is a powerful antioxidant and a wonderful rejuvenator. It is helpful in treating the ulcers and reduces acidity in the stomach.

    Gulkand has amazing cooling properties - It helps in reducing all the heat-related problems.

    It helps in reducing excessive perspiration and foul body odor.

    It gives a calming effect to the nervous system, thus reducing stress.

    and many more effects it has on our body. The point to consider is Gulkand has sugar and hence if you are the one who wants to avoid sugar you can consume in reduced quantity.

    Ingredients

    Gulkand

    Rose Petals - Traditionally pink rose petals are used. But these days we use either pink or red rose petals.

    Sugar - Sugar melts in the sun while drying and combines with the rose petals. Traditionally, it has granulated sugar. These days sugar-free gulkands or even gulkand with honey is available in the market.

    FAQ's

    Which roses are best for gulkand?

    You can go with any pink or red-colored rose petals. However traditional gulkand used pink rose petals. Make sure the rose petals you use are free from patches or any spots.

    How to make rose petal jam

    1. Collect the rose petals in a mixing bowl, now wash the rose petals really well.

    2. After washing, drain the water completely. Spread them in a kitchen towel and let it dry completely. 

     3.   Once the moisture is completely gone. Collect the rose petals in a blender and pulse them once or twice. Otherwise, tear the petals into small pieces. After pulsing, take a sterilizable jab spread down a layer of pulsed rose petals. Next, put a layer of sugar as shown in pic. Continue the layering with alternate layers of sugar and rose petals.

      4. Allow the jar to stay on sun light up to 6-8 hours a day with lids lightly opened(see notes for instructions) for about 7- 10 days.

    Gulkand Recipe

    Every day mix the layer with the spoon. At night times, you can put the jar indoors. After 7-10 (depending on the sun) days your Gulkand will be ready. Keep it refrigerated it keeps well for months together.

    Gulkand Recipe

    Useful Tips

    • Make sure you always use a clean spoon when handling the Gulkand.
    • Instead of exposing the jar directly to the sun, You can also cover the lid with a mesh cloth. So there is some room for air circulation and you can prevent them from dust and insects.
    • We can use Gulkand in a variety of Indian recipes and it is also used as a medicine in Ayurveda.
    • A tsp of Gulkand a day reduces the body heat.

    How to use gulkand

    You can use the rose petal spread in a variety of recipes. I already have gulkand milkshake recipes in the blog. You can also try gulkand kulfi or gulkand ice cream. Even cakes, cookies, or pudding. It blends perfectly and easily with any ingredients.

    Storage suggestions

    Store Gulkand in an airtight container in the fridge. It keeps good for months together. Make sure you use a clean and dry spoon if using.

    Similar Recipes

    • Strawberry Gulkand Smoothie
      Strawberry Gulkand Smoothie | Strawberry Shots
    • Gulkand Tea
      Gulkand Tea
    • Strawberry Jam
      Instant Pot Strawberry Jam

    ★ Did you enjoy this recipe? If you happen to try it out, I would love to hear from you! I’d appreciate it if you could rate and leave a review below in the comments. Your reviews help others know the recipe better too. Thanks for your time. You can also follow me on Facebook, Pinterest, Instagram, Youtube and Twitter for more updates

    📖 Recipe

    Gulkand
    Print Recipe Pin Recipe
    5 from 1 vote

    Gulkand | Rose Petals Preserve

    Gulkand , or Rose petals Jam is a healthy spread made of rose petals along with Sugar It is a no cooking Jam Recipe.
    Prep Time15 minutes mins
    Cook Time0 minutes mins
    Resting Time10 days d
    Total Time10 days d 15 minutes mins
    Course: Condiments
    Cuisine: Indian
    Servings: 100 gms (appox)
    Calories: 41kcal
    Author: Sharmila Kingsly
    Prevent your screen from going dark

    Standard 1 cup measures 240 ml

    Ingredients

    • 1 cup Rose petals Rose or Red colour petals preferably
    • 4 tbsp Sugar

    Instructions 

    • Collect the rose petals in a mixing bowl, now wash the rose petals really well.
    • After washing, drain the water completely. Spread them in a kitchen towel and let it dry completely.
    • Once the moisture is completely gone. Collect the rose petals in a blender and pulse them once or twice. Otherwise, tear the petals into small pieces. After pulsing, take a sterilizable jab spread down a layer of pulsed rose petals. Next, put a layer of sugar as shown in pic. Continue the layering with alternate layers of sugar and rose petals.
    • Allow the jar to stay on sun light up to 6-8 hours a day with lids lightly opened(see notes for instructions) for about 7- 10 days.
    • Every day mix the layer with the spoon. At night times, you can put the jar indoors. After 7-10 (depending on the sun) days your Gulkand will be ready. Keep it refrigerated it keeps well for months together.

    Video

    Notes

    • Make sure you always use a clean spoon when handling the Gulkand.
    • Instead of exposing the jar directly to the sun, You can also cover the lid with a mesh cloth. So there is some room for air circulation and you can prevent them from dust and insects.
    • We can use Gulkand in a variety of Indian recipes and it is also used as a medicine in Ayurveda.
    • A tsp of Gulkand a day reduces the body heat.

    Nutrition

    Calories: 41kcal | Carbohydrates: 10.7g | Protein: 0.1g | Fat: 0.1g | Potassium: 25mg | Sugar: 9.6g | Calcium: 6mg
    Tried this recipe?Mention @happietrio or tag #happietrio
    Subscribe to my Channelclick for more videos

    Disclaimer: I am not a nutritionist, the nutrition value provided here is an estimate. It will vary based on the quantity and brands of the products used.

    Note: This post is originally from 2016. I have updated with a new Recipe card, Pictures and video now.

    Coriander Chicken Roast

    February 9, 2017 By Sharmila Kingsly Leave a Comment

    Coriander Chicken Roast

    Coriander Chicken Roast is an easy chicken recipe. It is prepared by marinating chicken with coriander Leaves and cooked with spices.

    Today’s recipe is an easy and delicious chicken recipe .This is my mother in law’s signature dish. She serves this coriander chicken roast with Steamed Rice and Rasam. The combo is just out of the world. Hubby loves this a lot. So I learnt this from my mil. Chicken along with the flavour of Coriander leaves is just awesome.

    • Sauteed chicken With Onions and Capsicum
    • Lemon Chicken Roast
    • Chicken Tikka

    How to prepare Coriander Chicken Roast, Pictorial

    1. Clean the chicken really well and then take them in a bowl.

    2. To this add in all the spice powders

    3. Next add in the ginger garlic paste

    4. Next add in the chopped coriander leaves. Mix everything well and allow it to marinate for 1 hour .

    5. Then heat a pan add in oil once it heats up add in the Marinated Chicken and start cooking in a low flame        

    6. Continue cooking and stir in intervals to prevent it from getting burnt in the bottom of the vessel. Switch off the flame once the chicken to perfection. Serve hot with rice.

    Quick Tips

    • Tastes best with Rasam and steamed Rice.
    • Add more coriander leaves as you prefer, if you like even more
    • Makes a great party starter.

    Similar Recipes:

    • Chicken Roast
      Easy Chicken Roast
    • Guntur Chicken Roast
      Guntur Chicken Roast

    ★ Did you enjoy this recipe? If you happen to try it out, I would love to hear from you! I’d appreciate it if you could rate and leave a review below in the comments. Your reviews help others know the recipe better too. Thanks for your time. You can also follow me on Facebook, Pinterest, Instagram, Youtube and Twitter for more updates

    📖 Recipe

    Coriander Chicken Roast
    Print Recipe Pin Recipe
    5 from 1 vote

    Coriander Chicken Roast

    Coriander Chicken Roast is an easy chicken recipe . It is prepared by marinating chicken with coriander Leaves and cooked with spices.
    Prep Time10 minutes mins
    Cook Time15 minutes mins
    Marination Time1 hour hr
    Course: Appetizer
    Cuisine: Indian
    Servings: 5
    Calories: 262kcal
    Author: Sharmila Kingsly
    Prevent your screen from going dark

    Standard 1 cup measures 240 ml

    Ingredients

    • ½ kg Chicken
    • 1 tbsp Chilli powder
    • 1 tsp Garam Masala
    • ¼ tsp Turmeric powder
    • Salt as needed
    • 1 tbsp Ginger Garlic paste
    • ¾ cup Corriander Leaves ½ - ¾ cup finely chopped
    • 2 tbsp Oil

    Instructions 

    • In a bowl take the finely washed and cleaned chicken. To this add in all the ingredients mentioned in the ingredients table except oil.
    • Mix everything well and allow it to marinate for 1 hour .Then heat a pan add in oil once it heats up add in the Marinated Chicken and start cooking in a low flame.
    • Continue cooking and stir in intervals to prevent it from getting burnt in the bottom of the vessel. Switch off the flame once the chicken is cooked. Served hot.

    Video

    Notes

    • Tastes best with Rasam and steamed Rice.
    • More coriander leaves can be added if you prefer the flavour.
    • This can be served as a starter in parties.

    Nutrition

    Calories: 262kcal | Carbohydrates: 1.7g | Protein: 36.6g | Fat: 11.1g | Saturated Fat: 1.9g | Cholesterol: 96mg | Sodium: 116mg | Potassium: 237mg | Fiber: 1.1g | Calcium: 17mg | Iron: 1mg
    Tried this recipe?Mention @happietrio or tag #happietrio
    Subscribe to my Channelclick for more videos

    Disclaimer: I am not a nutritionist, the nutrition value provided here is an estimate. It will vary based on the quantity and brands of the products used.

    Vendakkai mor Kulambu | Okra Butter Milk Curry

    February 7, 2017 By Sharmila Kingsly Leave a Comment

    Vendakkai mor Kulambu

    Vendakkai mor kulambu is a delicious tangy south Indian Curry made with Yogurt and spices. It tastes delicious with boiled white Rice.

    Vendakkai mor Kulambu

    Vendakai mor Kulambu | Okra Butter Milk Curry is an easy and instant curry that can be prepared. I will be preparing this curry very frequently in home and have not blogged it so far.

    So here I am with my version of this famous Mor Kulambu. Based on the various regions of the country the mode of preparing the curry varies. Now let’s get started.

    [feast_advanced_jump_to]

    Mor Kuzhambu

    Mor Kuzhambu or buttermilk curry is just a quick curry. But we love it and it tastes too delicious. We can prepare it in just 15 mins. It goes very well with Rice and any spicy side dish.

    In this recipe, I am sharing the authentic version of soaking the lentils and preparing the curry. I also have a quick version. Check out my quick and instant more kuzhambu recipe too.

    Vendakkai mor kuzhambu without coconut

    Adding coconut to the gravy gives a nice volume and taste to the gravy. But you may also skip it if you run out of coconut or If you do not want to include it.

    Prep Work

    Beat the curd - Beating the curd is a very important step. If the curd is not beaten properly it will remain as lumps when added to the curry. Even beating of the curd ensures it's creamy and blends evenly.

    Soaking Time - Make sure to soak the Coriander seeds, Rice, Toor dal, and Cumin seeds for 20 to 30 mins before you blend them into a paste. It ensures the ingredients are soft and gets blended smoothly.

    Saute the Vegetables - Saute the vegetables and keep them ready.

    Mor Kuzhambu, FQA's

    What all vegetables can be added in Mor Kuzhambu

    We can add Ash gourd, Pumpkin, Bhindi, and Cucumber also. In fact, you can skip the vegetables if you are looking for a quick version of buttermilk curry.

    How to prepare vendakkai mor kulambu, Pictorial

    1.      Take the ingredients mentioned under to soak and grind the table in a vessel add water and allow it to soak for 20-30 mins.

    2.   Now add in coconut along with the soaked ingredients add little water and grind it to a fine paste. Set aside. Wash the bhindi well and pat dry with a kitchen towel. Chop it into 1 inch size pieces and then fry it in a pan till it is cooked and drain it in a paper towel and set aside.

    3.   Take a pan to add in oil, once it heats up add in the To Temper ingredients, and then green chilies fry, and then add in the ground paste. 

        4.      Fry well for a min and then add in the curd. Make sure to whisk the curd well before adding it to the gravy.

    5.      Fry well for a min and then add in the curd. Make sure to whisk the curd well before adding it to the gravy. Wait till the gravy comes to a boil and then switch off the flame.

    Tips to prepare the best Mor Kuzhambu

    • Tastes best with Steamed Rice and Potato Fry or any Chips.
    • Instead of Lady’s Finger any vegetable can be used. Or the vegetable can be left and made it as a plain curry.
    • The Curry may look pale as soon as you add Turmeric but when the gravy starts to boil you will get the yellow color don’t add more Turmeric powder.

    Other Kuzhambu Recipes:

    • Freshly Ground Masala Sambar
      Arachuvitta Sambar| Freshly ground Masala Sambar
    • Radish Sambar
      Radish Sambar |Mullangi Sambar
    • Sundakkai Kuzhambu
      Pacha Sundakkai Kuzhambu | Turkeyberry Curry
    • Chicken Bones Curry
      Country Chicken Bone Curry (Naatu Kozhi Elumbu Kuzhambu)

    ★ Did you enjoy this recipe? If you happen to try it out, I would love to hear from you! I’d appreciate it if you could rate and leave a review below in the comments. Your reviews help others know the recipe better too. Thanks for your time ?

    You can also follow me on Facebook, Pinterest, Instagram, Youtube and Twitter for more updates

    📖 Recipe

    Vendakkai mor Kulambu
    Print Recipe Pin Recipe
    5 from 1 vote

    Vendakkai mor kulambu | Okra Butter Milk Curry

    Vendakkai mor kulambu is a delicious tangy south Indian Curry made with Yogurt and spices. It tastes delicious with boiled white Rice.
    Prep Time15 minutes mins
    Cook Time10 minutes mins
    Total Time25 minutes mins
    Course: Kuzhambu
    Cuisine: Indian
    Servings: 4
    Calories: 79kcal
    Author: Sharmila Kingsly
    Prevent your screen from going dark

    Standard 1 cup measures 240 ml

    Ingredients

    • 1 cup Thick Yogurt | Curd
    • 5 to 8 Lady’s Finger | Bhindi
    • ½ tsp Turmeric powder
    • Salt as needed
    • Water as needed
    • 1 tbsp Grated Coconut
    • 2 Green Chilli

    To Temper :

    • 1 tbsp Oil
    • 1 tsp Mustard Seeds
    • 1 spring Curry Leaves
    • Hing a pinch
    • 3 Dry Red Chilli

    To soak and Grind:

    • 1 tsp Coriander Seeds
    • 1 tbsp Toor Dal
    • 1 tsp Cumin Seeds
    • 1 tbsp Rice

    Instructions 

    • Take the ingredients mentioned under to soak and grind the table in a vessel add water and allow it to soak for 20-30 mins.
    • Now add in coconut along with the soaked ingredients add little water and grind it to a fine paste. Set aside. Wash the bhindi well and pat dry with a kitchen towel. Chop it into 1-inch size pieces and then fry it in a pan till it is cooked and drain it in a paper towel and set aside.
    • Take a pan to add in oil, once it heats up add in the To Temper ingredients and then green chilies fry, and then add in the ground paste.
    • Fry well for a min and then add in the curd. Make sure to whisk the curd well before adding it to the gravy.
    • Fry well for a min and then add in the curd. Make sure to whisk the curd well before adding it to the gravy. Wait till the gravy comes to a boil and then switch off the flame.

    Notes

    • Tastes best with Steamed Rice and Potato Fry or any Chips.
    • Instead of Lady’s Finger, any vegetable can be used. Or the vegetable can be left and made it as a plain curry.
    • The Curry may look pale as soon as you add Turmeric but when the gravy starts to boil you will get the yellow color don’t add more Turmeric powder.

    Nutrition

    Calories: 79kcal | Carbohydrates: 8g | Protein: 1.8g | Fat: 4.2g | Saturated Fat: 0.9g | Cholesterol: 1mg | Sodium: 23mg | Potassium: 30mg | Fiber: 0.4g | Sugar: 3.7g | Calcium: 16mg | Iron: 1mg
    Tried this recipe?Mention @happietrio or tag #happietrio
    Subscribe to my Channelclick for more videos

    Disclaimer: I am not a nutritionist, the nutrition value provided here is an estimate. It will vary based on the quantity and brands of the products used.

    Tandoori Paneer Samosa

    January 30, 2017 By Sharmila Kingsly 2 Comments

    Tandoori Paneer Samosa

    Tandoori Paneer Samosa is an evening snack made with a tandoori paneer filling and then deep-fried with samosa sheets. It goes well with green chutney and chai.

    Tandoori Paneer Samosa

    Making samosa in home is always a tiring job for me. But when it is made I never fail to empty the plate. So few days back when I got a request to do a recipe of Tandoori Paneer Samosa I took it up as a challenge and finally completed. After preparing the Tadoori Paneer Masala only I realized my Samosa patti was out of stock. So with all the efforts and motivation I made my own Samosa sheets.

    It is such a hit recipe in the blog, which I posted few days back. After making my own samosa sheets I realised that hereafter I should make my own Samosa sheets as it is damn easy to make at home.

    I made this Samosa and served with Green Chutney, Tamarind Chutney and Tomato Sauce. We relished each and every bit of the samosa. It was totally yumm.. Now let’s get started.

    Tandoori Paneer Samosa

    How to Prepare Tandoori Paneer Samosa,

    1.      Chop the Paneer into cubes and wash it well, in a big bowl add in Curd, to this add in Red Chilli powder, Ginger Garlic paste, Coriander powder, Amchur powder, Pepper powder, Garam Masala, Turmeric powder and salt.

    2.      Mix everything till it is combined fully. Now add in the cubed paneer and marinate it for about 2 hours.

    3.      After marinating for 2 hours take a pan add in oil and shallow fry the marinated paneer until crisp. Alternatively it can also be grilled instead of frying. Drain in a paper towel to remove the excess oil.

    4.      Now take a pan add in oil once it heats up add in Cumin Seeds and then add in the chopped onions and fry till they become glossy and then add in the chopped capsicum.

    5.      Now add in 2 tbsp of the masala used for marinating the paneer, mix well and then add in Chilli powder and salt if reqd and the grilled Paneer, Mix well and then fry in a low flame for 5 mins and then switch off the stove. Now the filling for Tandoori Paneer Samosa is ready.

    6.      Take the Samosa and roll it as shown in the image it is similar to a cone and the stuff with the prepared Tandoori Paneer Samosa and then seal the edges.

      7.      Take 2 tbsp maida in a bowl add in water and form a paste use this paste to seal the samosa edges. Repeat the same process for all the sheets. In a Pan heat in oil for deep frying.

     8.    Once the oil becomes hot deep fry the samosa until golden brown in a medium flame and then strain using paper towel. Serve hot with Sauce.

    Tandoori Paneer Samosa

    Tips to prepare the best ever Samosa

    • Store bough Samosa Patti can also be used.(Click here how to use store bought Samosa Patti).
    • Instead of deep frying the samosa it can also be baked. Preheat the oven at 180 Deg C for about 10 mins and then grill it for 180 deg C 20 mins. Flip the side and cook after 10 mins.
    • Serve Samosa with Green Chutney, Tamarind Chutney and Tomato Sauce.
    • It can be served as an evening snack along with chai.

    Similar Recipes:

    • Kara Boondi
      Kara Boondi | Khara Boondi
    • Jackfruit Chips
      Raw Jackfruit Chips ( Chakka Chips )
    • Bread Pakora /Bread Bajji
    • Air Fryer Sweet Potato Fries
      Sweet Potato Fries | Air Fryer Sweet Potato Fries

    Serving Suggestions:

    Samosa goes well with Tomato sauce or green Chutney. Also the best with some hot Chai in the evening.

    ★ Did you enjoy this recipe? If you happen to try it out, I would love to hear from you! I’d appreciate it if you could rate and leave a review below in the comments. Your reviews help others know the recipe better too. Thanks for your time . 

    You can also follow me on Facebook, Pinterest, Instagram, Youtube and Twitter for more updates

    📖 Recipe

    Tandoori Paneer Samosa
    Print Recipe Pin Recipe
    5 from 1 vote

    Tandoori Paneer Samosa

    Tandoori Paneer Samosa is an evening snack made with a tandoori paneer filling and then deep-fried with samosa sheets. It goes well with green chutney and chai.
    Prep Time20 minutes mins
    Cook Time40 minutes mins
    Total Time1 hour hr
    Course: Snack
    Cuisine: Indian
    Servings: 4
    Calories: 171kcal
    Author: Sharmila Kingsly
    Prevent your screen from going dark

    Standard 1 cup measures 240 ml

    Ingredients

    • 10 Samosa sheets
    • Oil for deep frying
    • 1 Onions
    • 1 tbsp Capsicum
    • 1 tsp Red Chilli powder
    • Salt as needed
    • ¼ tsp Turmeric
    • 1 tsp Cumin Seeds
    • 2 tbsp Maida

    To Marinate :

    • 200 gm Paneer
    • 1 cup Curd
    • 1 tbsp Ginger garlic paste
    • 1 tsp Red Chilli powder
    • 1 tsp Coriander powder
    • ½ tsp Amchur powder
    • ½ tsp Pepper powder
    • ½ tsp Garam Masala
    • ¼ tsp Turmeric powder
    • Salt

    Instructions 

    • Chop the Paneer into cubes and wash it well, in a big bowl add in Curd, to this add in Red Chilli powder, Ginger Garlic paste, Coriander powder, Amchur powder, Pepper powder, Garam Masala, Turmeric powder, and salt.
    • Mix everything till it is combined fully. Now add in the cubed paneer and marinate it for about 2 hours.
    • After marinating for 2 hours take a pan add in oil and shallow fry the marinated paneer until crisp. Alternatively, it can also be grilled instead of frying. Drain in a paper towel to remove the excess oil.
    • Now take a pan add in oil once it heats up add in Cumin Seeds and then add in the chopped onions and fry till they become glossy and then add in the chopped capsicum.
    • Now add in 2 tbsp of the masala used for marinating the paneer, mix well and then add in Chilli powder and salt if reqd and the grilled Paneer, Mix well and then fry in a low flame for 5 mins and then switch off the stove. Now the filling for Tandoori Paneer Samosa is ready.
    • Take the Samosa and roll it as shown in the image it is similar to a cone and the stuff with the prepared Tandoori Paneer Samosa and then seal the edges.
    • Take 2 tbsp maida in a bowl add in water and form a paste use this paste to seal the samosa edges. Repeat the same process for all the sheets. In a Pan heat in oil for deep frying.
    • Once the oil becomes hot deep fry the samosa until golden brown on a medium flame and then strain using a paper towel. Serve hot with Sauce.

    Notes

    • Store bough Samosa Patti can also be used.(Click here how to use store bought Samosa Patti).
    • Instead of deep frying the samosa it can also be baked. Preheat the oven at 180 Deg C for about 10 mins and then grill it for 180 deg C 20 mins. Flip the side and cook after 10 mins.
    • Serve Samosa with Green Chutney, Tamarind Chutney and Tomato Sauce.
    • It can be served as an evening snack along with chai.

    Nutrition

    Serving: 1samosa | Calories: 171kcal | Carbohydrates: 9.6g | Protein: 5.1g | Fat: 13.2g | Saturated Fat: 3.2g | Cholesterol: 10mg | Sodium: 340mg | Potassium: 146mg | Fiber: 1.7g | Sugar: 1.3g | Calcium: 98mg | Iron: 2mg
    Tried this recipe?Mention @happietrio or tag #happietrio
    Subscribe to my Channelclick for more videos

    How to make Samosa Sheets

    January 27, 2017 By Sharmila Kingsly Leave a Comment

    samosa sheets
    Samosa is a most loved Indian snack .It is either deep fried or baked. It is so popular among the kids too. The only tough job in the samosa preparation is the Samosa sheet, it can also be bought ready made, but when it is so easy to make at home, why do we need to use ready made one!!
    Now let’s get started.
    Similar Recipes:
    • Chicken Keema samosa
    • How to make cinnamon Powder in home
    • How to make coconut Milk
    • How to make Urad Dal Flour in home
    Samosa sheets recipe
    Recipe Cuisine: Indian |  Recipe Category : DIY/Kitchen basics
    Prep Time: 30 mins |Cook Time :30-50 secs/sheet| Makes: 16 |Author :Sharmila
    Ingredients
    Maida / All-purpose flour – 2 cups + 2 tbsp for dusting
    Salt as needed
    Water as needed
    Oil – 3 tbsp + 1 tbsp
    Method:
         1.      Take all-purpose flour and salt in a bowl .Add in water and knead it to a soft dough .Now sprinkle in the Oil and start kneading the dough once again.
        2.      Once the dough is kneaded cover it with a damp cloth and allow it to rest for about 20-30 mins. Now divide the kneaded dough into equal sized balls. Roll the balls using a rolling pin.
        3.      Now take one and with a brush apply oil throughout the surface of the sheet. Sprinkle some more flour over the surface. Spread it over and then place one more on top and stack it.
         4.      Now roll the stacked sheets once again such that it increases in size. Heat a tawa and the cook the sheets for 30 secs each on either sides.
         5.      Remove from heat and slowly peel and separate the stacked sheets. Repeat the same process for all and the cut the sheets in any desired shape and use it for preparing samosa’s. You can put it in a zip lock cover and freeze it. 
         6.      To use it for samosa. Cut the sheet into semi-circle and then roll it to form a cone shape and stuff the fillings and then seal it and use it to samosa.
    Notes:
    • Usually Samosa sheets are prepared in bulk and stored in freezer.
    • It stays good up to 6 months.
    • Put it in a zip lock bag and then freeze. Before using the sheet thaw it for some time and then use.
    • The sheets can be cup into any desired sheets and used.
    • The sheets can be cut into rectangles too.(click here to check how to roll the samosa if used rectangular sheets)
    • It can also be used to prepare spring rolls.

    Rice Kheer | Chawal Ki Kheer | Arisi Payasam

    January 24, 2017 By Sharmila Kingsly Leave a Comment

    Rice Kheer

    Rice Kheer is an easy and tasty dessert. It is prepared by cooking full cream milk along with basmati rice and sugar.

    Follow us on Pinterest for delicious pins. Join our Facebook group for more Instant Pot and Air Fryer recipes.

    Rice Kheer

    Rice Kheer is a very popular Indian dessert. It is a sweet milk pudding by slow cooking fine basmati rice grains with whole milk along with sweeteners and flavors. The creamy kheer comes from the slow cook process. It is perfect for any festival and special occasion.

    [feast_advanced_jump_to]

    What is Kheer

    Kheer is a liquid sweet pudding. It is very popular in the Indian subcontinent. It has a creamer, sweeteners, and a flavoring agent. Commonly there is a tempering added with nuts and dry fruits roasted in ghee. It is considered a rich dessert.

    There are different varieties of kheer made in India. The popular is by slow cooking milk and sweeteners added. There is also another version prepared with lentils and palm Jaggery.

    These days with almost any fruit or lentils we can prepare a kheer It is that popular. Most special occasions or even a Sunday lunch ends in a kheer.

    Ingredients

    Milk - Always use full fat milk for a creamy kheer. We cook the milk until it thickens for kheer. Full fat milk is perfect for the same.

    Sugar - I am using sugar for the sweetness. Condensed milk also works well.

    Basmati Rice - Use good quality basmati rice. I usually pulse the rice and use them for kheer. It gives a lovely texture to the kheer.

    Saffron - Adds a amazing richness and light yellow tint to the kheer.

    Nuts - I am using silvered almonds and pistachios for the kheer. They add a yummy texture for the kheer.

    Rose petals - adding rose petals are optional for the kheer. If you like that flavor you can add them too.

    Rice Kheer

    How to make Rice Kheer

    Wash Basmati rice two or three times and remove the excess starch. Let it soak in water for 30 mins.

    After soaking drain and remove the excess moisture.

    Add the soaked basmati rice to a blender and pulse into grains.

    Heat a saucepan with full fat milk. Let it come to a boil.

    Simmer and keep cooking once the milk boils. Next, add the pulsed basmati rice and cook on a low flame. Keep cooking until rice is cooked completely.

    Next, add sugar. Combine and cook so that the sugar dissolves.

    Next, add cardamom powder

    Also, add saffron strands. combine well.

    Simmer for another min. Add the sliced nuts and switch off.

    Delicious Rice kheer is now ready.

    Rice Kheer

    Tips & Variations

    • The Kheer tends to become thick as it cools down, so add more milk if required.
    • Adjust the sugar quantity based on your taste preference.
    • You can also add more nuts.
    • This would be perfect dessert after a heavy meal.

    Similar Recipes

    • Apple Kheer
      Apple Kheer Recipe | Apple Payasam
    • Badam Kheer
      Badam Kheer | Almond Payasam | Badam Payasam
    • Millet Rose Kheer
      Little Millet Rose Kheer
    • Poppy Seeds Kheer
      Poppy Seeds Kheer

    ★ Did you enjoy this recipe? If you happen to try it out, I would love to hear from you! I’d appreciate it if you could rate and leave a review below in the comments. Your reviews help others know the recipe better too. Thanks for your time. You can also follow me on Facebook, Pinterest, Instagram, Youtube and Twitter for more updates from me.

    📖 Recipe

    Rice Kheer
    Print Recipe Pin Recipe
    5 from 1 vote

    Rice Kheer | Chawal Ki Kheer | Arisi Payasam

    Rice Kheer is an easy and tasty dessert. It is prepared by cooking full cream milk along with basmati rice and sugar.
    Prep Time10 minutes mins
    Cook Time20 minutes mins
    Total Time30 minutes mins
    Course: Dessert
    Cuisine: Indian
    Servings: 3
    Calories: 278kcal
    Author: Sharmila Kingsly
    Prevent your screen from going dark

    Standard 1 cup measures 240 ml

    Ingredients

    • 4 cups Full fat Milk
    • ¼ cup Basmati Rice
    • ½ cup Sugar
    • Saffron generous pinch
    • 2 tbsp Almonds sliced
    • 2 tbsp Pistachios

    Instructions 

    • Wash Basmati rice two or three times and remove the excess starch. Let it soak in water for 30 mins.
    • After soaking drain and remove the excess moisture.
    • Add the soaked basmati rice to a blender and pulse into grains.
    • Heat a sauce pan with full fat milk. Let it come to a boil.
    • Simmer and keep cooking once the milk boils.
    • Next add the pulsed basmati rice and cook in a low flame. Keep cooking until rice is cooked completely.
    • Next add sugar. Combine and cook so that the sugar dissolves.
    • Next add cardamom powder
    • Also add saffron strands. combine well.
    • Simmer for another min. Add the sliced nuts and switch off. Delicious Rice kheer is now ready.

    Video

    Notes

    • The Kheer tends to become thick as it cools down, so add more milk if required.
    • Adjust the sugar quantity based on your taste preference.
    • You can also add more nuts.
    • This would be perfect dessert after a heavy meal.

    Nutrition

    Calories: 278kcal | Carbohydrates: 50.7g | Protein: 4.6g | Fat: 7.3g | Saturated Fat: 2.8g | Cholesterol: 15mg | Sodium: 44mg | Potassium: 77mg | Fiber: 1g | Sugar: 33.7g | Calcium: 119mg
    Tried this recipe?Mention @happietrio or tag #happietrio
    Subscribe to my Channelclick for more videos

    Disclaimer: I am not a nutritionist, the nutrition value provided here is an estimate. It will vary based on the quantity and brands of the products used.

    Note: This post is originally from 2017. I have updated with new Recipe card, Pictures and video now.

    Karnataka Special Bisebelebath

    January 17, 2017 By Sharmila Kingsly Leave a Comment

    Bisi bele bath

    Bisebelebath or Bisi bele bath is a traditional rice based recipe from the Indian State of Karnataka. Bisi bele bath mean hot lentil rice.

    Follow us on Pinterest for delicious pins. Join our Facebook group for more Instant Pot and Air Fryer recipes.

    Bisi bele bath

    MTR Bisibelebath is a lip smacking delicacy. If you ever happen to visit Bangalore or any MTR restaurant you should definitely consider trying their bisi bele bath.

    The Preparation steps might look overwhelming, but believe me if you have the bisi bele bath powder handy and vegetables chopped. It is so easy to make.

    [feast_advanced_jump_to]

    What is bisi bele bath

    Bisi bele bath is a traditional rice based recipe from the Indian State of Karnataka. In Kannada Bisi means hot , bele means lentil and bath means rice. In short Bisi bele bath mean hot lentil rice.

    In kannada bisi means hot bele means lentil and bath means rice.

    While the preparation seems to be quite elaborate task.

    We start off with dry roasting the masala preparing the masala powder. Next cook the rice ,dal and vegetables separately along with preparing the tamarind water. Finally cooking everything together and then tempered with the tadka. Always served hot with drizzle of ghee topped with Hot and Crispy Kara Bhoondi.

    How to make bisi bele bath

    Chop in all the vegetables before you start. Cube the tomato, Potato and Onions and chop the Beans and Carrots lengthwise. In a cooking pan add 2 cups of water and then add the Chopped vegetables.

    Along with the veggies add turmeric powder and salt and cover and cook the veggies till done. It may take around 20 mins in a medium flame.

    Cook the dal and rice and keep it ready.

    Once the vegetables are cooked. Add cooked rice, Dal.

    Also add tamarind water.

    Combine everything well, let it come to a boil. Check for salt and then add in the Bisi bele bath Masala.

    In a low flame cook for another 10 mins till the raw smell of the masala leaves. If the rice is too thick add more water as it tends to get thick once it cools down. Now switch off the flame.

    Next lets prepare tadka . In a pan heat the Ghee. To the hot ghee add in mustard seeds, Cashew nuts ,Curry Leaves and Dry Red Chilli.

    Finally add dry Coconut and sauté until slightly golden.

    Switch off and add prepared tadka to bisi bele bath.

    Super bisebelebath is now ready. Serve hot with boondi.

    Bisi bele bath

    Top Tips

    • Instead of open pot you can also prepare bisebelebath in pressure cooker.
    • If so cook the vegetables in cooker for 2 whistles and then do the same like rest of the process. But make sure the veggies and rice don’t get mashed.
    • Serve hot with Chips or Boondi.
    • Tastes best when served hot topped with Ghee.

    Similar Recipes

    • Instant pot khichdi with vegetables
      Instant pot khichdi with vegetables | Rice with Lentils & Vegetables
    • tomato rice
      Tomato Rice ( Tomato bath )
    • Kootanchoru
      Kootanchoru

    ★ Did you enjoy this recipe? If you happen to try it out, I would love to hear from you! I’d appreciate it if you could rate and leave a review below in the comments. Your reviews help others know the recipe better too. Thanks for your time. You can also follow me on Facebook, Pinterest, Instagram, Youtube and Twitter for more updates

    📖 Recipe

    Bisi bele bath
    Print Recipe Pin Recipe
    5 from 2 votes

    Bisi bele bath

    Bisi bele bath is a traditional rice based recipe from the Indian State of Karnataka. Bisi bele bath mean hot lentil rice. 
    Prep Time10 minutes mins
    Cook Time10 minutes mins
    Total Time20 minutes mins
    Course: Main Course
    Cuisine: karnataka
    Servings: 3
    Calories: 337kcal
    Author: Sharmila Kingsly
    Prevent your screen from going dark

    Standard 1 cup measures 240 ml

    Ingredients

    • 1 Onion
    • 1 Tomato
    • 1 Carrot
    • 5-8 Beans
    • 1 Potato
    • ½ cup Green Peas
    • ⅓ cup Peanuts
    • 1 cup Rice
    • 1 cup Toor Dal
    • Tamarind lemon sized
    • 4 tsp Bibi bele bath powder
    • Water
    • ½ tsp Turmeric powder
    • Salt as needed

    To Temper:

    • 2 tbsp Ghee
    • 1 tsp Mustard Seeds
    • 3 Dry Red Chilli
    • 2 sprigs Curry Leaves
    • 10 Cashew Nuts
    • Hing a pinch
    • 2 tbsp Dry Coconut

    Instructions 

    • Chop in all the vegetables before you start. Cube the tomato, Potato and Onions and chop the Beans and Carrots lengthwise. In a cooking pan add 2 cups of water and then add the Chopped vegetables.
    • Along with the veggies add turmeric powder and salt and cover and cook the veggies till done. It may take around 20 mins in a medium flame.
    • Cook the dal and rice and keep it ready.
    • Once the vegetables are cooked. Add cooked rice, Dal.
    • Also add tamarind water.
    • Combine everything well, let it come to a boil. Check for salt and then add in the Bisi bele bath Masala.
    • In a low flame cook for another 10 mins till the raw smell of the masala leaves. If the rice is too thick add more water as it tends to get thick once it cools down. Now switch off the flame.
    • Next lets prepare tadka . In a pan heat the Ghee. To the hot ghee add in mustard seeds, Cashew nuts ,Curry Leaves and Dry Red Chilli.
    • Finally add dry Coconut and sauté until slightly golden. Switch off and add prepared tadka to bisi bele bath serve hot with boondi.

    Notes

    • The entire process can be carried out in the pressure cooker too.
    • If so cook the vegetable sin cooker for 2 whistle and then the same like rest of the process. But make sure the veggies and rice don’t get mashed.
    • Serve with Chips or Mixture.
    • Tastes best when served hot topped with Ghee and Boondi.

    Nutrition

    Calories: 337kcal | Carbohydrates: 57.2g | Protein: 9.3g | Fat: 8.5g | Saturated Fat: 4.1g | Cholesterol: 1mg | Sodium: 30mg | Potassium: 496mg | Fiber: 6.4g | Sugar: 5.7g | Calcium: 605mg
    Tried this recipe?Mention @happietrio or tag #happietrio
    Subscribe to my Channelclick for more videos

    Disclaimer: I am not a nutritionist, the nutrition value provided here is an estimate. It will vary based on the quantity and brands of the products used.

    Bisibelebath powder

    January 16, 2017 By Sharmila Kingsly Leave a Comment

    bisibelebath powder

    Bisibelebath powder is a traditional homemade condiment used to prepare the Karnataka famous Bisibelebath.

    bisi bele bath powder


    Bisibelebath is a traditional rice recipe from the Indian State of Karnataka. Bibi bele bath means hot lentil rice. There are many readymade mixes for this traditional recipe however homemade is the best anytime. Now let’s get started.

    Bisibelebath powder ingredients

    Bisibelebath powder ingredients

    How to make bisi bele bath masala powder

    Take all the ingredients ready before you start preparing the masala. In a pan dry roast the Channa Dal, Urad Dal, Coriander Seeds, Black Pepper, Cumin Seeds, Fenugreek seeds. Roast until a nice aroma comes out of the spices make sure not to burn roast in a medium or low flame. Once roasted remove it to a plate.

    dry roast the Channa Dal, Urad Dal, Coriander Seeds, Black Pepper, Cumin Seeds, Fenugreek seeds

    Next add the sesame seeds, Poppy seeds, Curry Leaves and dry roast till they start to brown and the curry leaves become crisp remove it to a plate

    add the sesame seeds, Poppy seeds, Curry Leaves and dry roast till they start to brown

    Next dry roast the cinnamon sticks, Cloves and green cardamom. Remove when it gives a nice aroma.

    dry roast the cinnamon sticks, Cloves and green cardamom

    And then add dry red chilli and dry roast till they become crisp and remove.

    dry roast Red chili till they become crisp

    Finally dry roast the coconut till they become golden colour.

    dry roast the coconut till they become golden colour.

    Remove everything to a plate and allow it to cool down completely.

    Remove everything to a plate and allow it to cool down completely.

    Once the spices cool down in a blender pulse in the dry red chili first.

    in a blender pulse in the dry red chili first

    Then add rest of the spices to the blender.

    add rest of the spices to the blender.

    Add Hing and blend everything to a very fine or coarse powder.

    Add hing for preparing Bisibelebath powder

    Bisibelebath Masala Powder is now ready.

    Bisibelebath powder

    Store the blended bisi-bele bath masala in an air tight container. It tastes good for up to a year. Use it to prepare the famous bisi bele bath anytime 

    Bisibelebath powder

    Top Tips

    • Keep all the spices ready before preparing the masala.
    • Make sure the spices are completely cooled down before blending the powder.
    • The Masala powder stays good upto a year.
    • Store in an air tight container and use when needed.
    • We can also double or triple the ingredients and prepare the masala in bulk.
    • Usually in all Kannadiga house hold the masala is prepared in bulk and distributed to friends and family and stored up to a year.
    • If preparing the masala in bulk , we can also grind them in flour mill. As we prepare in a very small quantity in houses I used my blender to grind the masala.

    Similar Recipes

    • Cinnamon Powder Recipe | Homemade Cinnamon Powder
      How to make Cinnamon Powder for Baking
    • Sundal Podi
      Sundal Podi| Dry spice mix powder for Sundal
    • Fenugreek Seeds powder
      How to make Fenugreek Powder
    • Ellu Podi
      Ellu Podi Recipe

    ★ Did you enjoy this recipe? If you happen to try it out, I would love to hear from you! I’d appreciate it if you could rate and leave a review below in the comments. Your reviews help others know the recipe better too. Thanks for your time. You can also follow me on Facebook, Pinterest, Instagram, Youtube and Twitter for more updates

    📖 Recipe

    bisibelebath powder
    Print Recipe Pin Recipe
    No ratings yet

    Bisi bele bath Masala Powder

    Bisi bele bath Masala Powder is a homemade condiment used to prepare the Karnataka special Bisi bele bath .
    Prep Time10 minutes mins
    Cook Time10 minutes mins
    Total Time20 minutes mins
    Course: Condiments
    Cuisine: karnataka
    Servings: 1 Jar
    Calories: 67kcal
    Author: Sharmila Kingsly
    Prevent your screen from going dark

    Standard 1 cup measures 240 ml

    Ingredients

    • 2 tsp Urad Dal
    • 4 tsp Channa Dal
    • 4 tsp Coriander Seeds
    • 1 tsp Cumin Seeds
    • ½ tsp Whole Black Pepper
    • 2 tsp Poppy Seeds | Khus Khus
    • 1 tsp Sesame Seeds
    • ¼ tsp Fenugreek seeds
    • 2 sprig Curry Leaves
    • 2 Green Cardamom
    • 1 inch Cinnamon
    • 2 Cloves
    • 12 Dry Red Chilli
    • ⅛ cup Dry Coconut
    • Hing | Asafoetida a generous pinch

    Instructions 

    • Take all the ingredients ready before you start preparing the masala. In a pan dry roast the Channa Dal, Urad Dal, Coriander Seeds, Black Pepper, Cumin Seeds, Fenugreek seeds. Roast until a nice aroma comes out of the spices make sure not to burn roast in a medium or low flame. Once roasted remove it to a plate.
    • Next add the sesame seeds, Poppy seeds, Curry Leaves and dry roast till they start to brown and the curry leaves become crisp remove it to a plate
    • Next dry roast the cinnamon sticks, Cloves and green cardamom. Remove when it gives a nice aroma.
    • And then add dry red chilli and dry roast till they become crisp and remove.
    • Finally dry roast the coconut till they become golden colour.
    • Remove everything to a plate and allow it to cool down completely.
    • Once the spices cool down in a blender pulse in the dry red chili first.
    • Then add rest of the spices to the blender.
    • Add Hing and blend everything to a very fine or coarse powder.
    • Bisibelebath Masala Powder is now ready. Store the blended bisi-bele bath masala in an air tight container. It tastes good for up to a year. Use it to prepare the famous bisi bele bath anytime

    Notes

    • Keep all the spices ready before preparing the masala.
    • Make sure the spices are completely cooled down before blending the powder.
    • The Masala powder stays good upto a year.
    • Store in an air tight container and use when needed.
    • We can also double or triple the ingredients and prepare the masala in bulk.
    • Usually in all Kannadiga house hold the masala is prepared in bulk and distributed to friends and family and stored up to a year.
    • If preparing the masala in bulk , we can also grind them in flour mill. As we prepare in a very small quantity in houses I used my blender to grind the masala.

    Nutrition

    Calories: 67kcal | Carbohydrates: 14.2g | Protein: 3.1g | Fat: 1.4g | Saturated Fat: 0.2g | Sodium: 22mg | Potassium: 321mg | Fiber: 8.4g | Sugar: 0.4g | Calcium: 154mg | Iron: 4mg
    Tried this recipe?Mention @happietrio or tag #happietrio
    Subscribe to my Channelclick for more videos

    Cashew Pound Cake

    January 12, 2017 By Sharmila Kingsly Leave a Comment

    Cashew Pound Cake
    Cashew pound cake
    Cashew pound cake recipe with step by step pictures.Sharing today a simple Cake with loads of cashew nuts .The cake is very close to my heart as this is the cake which I used to bake very frequently for my hubby as he prefer simple cakes. The Cake has a very soft texture .The different between the vanilla sponge cake and Pound cake is that the pound cake texture is little thick compared to the sponge.
    However both cakes tastes good in their own ways. Now let’s get started!!
     
    Similar Recipes:
    • Eggless Dates Cake
    • Banana Bread
    • Christmas Fruit Cake
    • Tutti Frutti ButterScotch Loaf cake- Eggless
    • Basic Vanilla Sponge Cake - Eggless
    Cashew pound cake

    Step by Step Method:

         1.      In a blender or using an electric beater blend together the butter and sugar until creamy. 

     2.      To this now break open the eggs one by one and beat well next add in the Vanilla essence and beat everything together once gain till nice and creamy. 


     3.      Sieve together the All-purpose flour, Baking powder and salt twice or thrice.


     4.      Slowly fold together the dry ingredients and wet ingredients and finally add in the cashew nuts and fold the batter once again, don’t over mix.


     5.      Grease and line a loaf pan with parchment paper and the preheat the oven at 180 Deg C for about 10 mins and bake at 180 Deg C for about 30 mins or till a tooth pick when inserted comes out clean ,Allow it to cool completely and then slice into pieces.

     
    Enjoy some cashew pound cake with your evening chai. It is an absolutely delicious treat!!
     
    Cashew pound cake


    📖 Recipe

    Cashew Pound Cake
    Print Recipe Pin Recipe
    5 from 3 votes

    Cashew Pound cake

    Pound Cakes are simple tea cake. It is perfect for the tea time . This recipe is a pound cake with loads of cashew nuts.
    Prep Time15 minutes mins
    Bake Time30 minutes mins
    Total Time45 minutes mins
    Course: Dessert
    Cuisine: International
    Servings: 10 slice
    Calories: 197kcal
    Author: Sharmila Kingsly
    Prevent your screen from going dark

    Standard 1 cup measures 240 ml

    Equipment

    • Oven
    • Oven

    Ingredients

    • 1 cup All purpose flour
    • ½ tsp Baking powder
    • ½ cup Sugar
    • 1 stick Butter 115 gms
    • 2 Eggs
    • ½ cup Cashew nuts
    • 1 tsp Vanilla extract
    • Salt a pinch

    Instructions 

    • In a blender or using an electric beater blend together the butter and sugar until creamy.
    • To this now break open the eggs one by one and beat well next add in the Vanilla essence and beat everything together once gain till nice and creamy.
    • Sieve together the All-purpose flour, Baking powder and salt twice or thrice.
    • Slowly fold together the dry ingredients and wet ingredients and finally add in the cashew nuts and fold the batter once again, don’t over mix.
    • Grease and line a loaf pan with parchment paper and the preheat the oven at 180 Deg C for about 10 mins and bake at 180 Deg C for about 30 mins or till a tooth pick when inserted comes out clean ,Allow it to cool completely and then slice into pieces.

    Notes

    • Allow the cake to cool completely before slicing else the cake might crumble.
    • Says good for a week.
    • Store in the refrigerator after 3 days.
    • Goes good for breakfast with a glass of milk or chai.

    Nutrition

    Serving: 1slice | Calories: 197kcal | Carbohydrates: 20.8g | Protein: 4.1g | Fat: 12.6g | Saturated Fat: 6.7g | Cholesterol: 99mg | Sodium: 43mg | Potassium: 1572mg | Fiber: 0.7g | Sugar: 5.4g | Calcium: 666mg | Iron: 2mg
    Tried this recipe?Mention @happietrio or tag #happietrio
    Subscribe to my Channelclick for more videos
    • « Previous Page
    • 1
    • …
    • 55
    • 56
    • 57
    • 58
    • 59
    • …
    • 67
    • Next Page »
    Sharmila Kingsly

    Hi, I'm Joshie!

    Food Blogger, Biryani Lover , Software Engineer .. In no particular order.I love to cook and that is why I am here!! Welcome to my space!!. 

    Read more about me!

    • Instagram
    • Facebook
    • YouTube
    • Pinterest
    • X

    Vegan Recipes

    • Masala Paratha
      Masala Paratha
    • Tomato basil pasta
      Tomato Basil Pasta
    • Chickpea Spinach Curry
      Chickpea Spinach Curry
    • Vegan Chickpea Soup
      Vegan Chickpea Soup
    • Instant Pot Pumpkin Pasta
      Instant Pot Pumpkin Pasta
    • Basil Fried Rice
      Thai Basil Fried Rice

    Popular Posts

    • Nandu Rasam
      Nandu Rasam
    • Indian Dinner Party Menu Ideas, Sample Menus + Recipes
    • Nandu Kulambu
      Nandu Kuzhambu |Crab Curry |Nandu Kulambu
    • Instant Pot Peas Curry
      Instant Pot Peas Curry | Green Peas Curry
    • Payaru Kanji
      Payaru Kanji | Green Gram Porridge
    • Mushroom Egg Bhurji
      Mushroom Egg Burji

    Footer

    ↑ back to top

    As an Amazon Associate I earn from qualifying purchases.

    Copyright ©  2025 COOK WITH SHARMILA

    Rate This Recipe

    Your vote:


    A rating is required
    A name is required
    An email is required