Cook with Sharmila

  • Home
  • About Me
    • Video Recipes
    • Media Mentions
    • Privacy Policy
  • Recipe Index
    • Recipes
  • Nanjilnad Recipes
  • Shop
menu icon
go to homepage
  • Home
  • Recipe Index
  • Air Fryer
  • About Me
  • Subscribe
    • Facebook
    • Instagram
    • Pinterest
    • Twitter
    • YouTube
  • subscribe
    search icon
    Homepage link
    • Home
    • Recipe Index
    • Air Fryer
    • About Me
    • Subscribe
    • Facebook
    • Instagram
    • Pinterest
    • Twitter
    • YouTube
  • ×
    Home » Recipe Index

    Kambu Sadham ( Bajra Rice )

    August 8, 2017 By Sharmila Kingsly Leave a Comment

    How to Cook Bajra Rice
    Bajra/Kambu/Pearl Millet rice recipe
    How to cook Bajra/Kambu/Pearl Millet rice recipe with step by step photos. Bajra is one of the Oldest grown Crops among all the Millets. It is widely cultivated in the African Sub continent and Indian Region. It is so rich in Protein, Iron and many other nutrients. Usually out of Bajra gruel is made using buttermilk and had for lunch .It is so filling and heavy and keeps us really full.
    So I guess it is wise to include some healthy food once in our regular diet. One more healthy reason to include Bajra is it lowers the rice of Cardiac arrest. It is actually very bland in taste so usually paired with any Spicy accomplishment. So now let’s see how to cook Bajra/Kambu rice.
    Similar Recipes:
     
    • Foxtail millet idli dosa
    • Little Millet Ven Pongal
     
    Bajra/Kambu/Pearl Millet rice recipe

    Bajra Rice

     
         Step by step Method with pictures: 
     
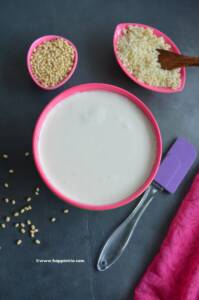
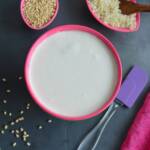
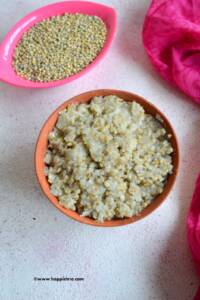
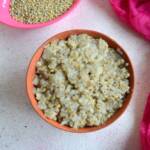
         1.    Soak the Bajra in Water for 2-3 hours. After soaking drain the water completely .Use a Muslin Cloth or a fine sieve to drain the water as the Bajra grains are very small.Step 1 - How to cook Bajra Rice
          2.    Now take the drained bajra in a blender and pulse it twice or thrice. This step is just to break the grains. Make sure to just pulse it and not to grind. If you are using broken bajra then no need to break the grains. Bring Water to boil in a pressure cooker.
    Step 2 - How to cook Bajra Rice
          3.    Add in a pinch of Salt and the Bajra wait till it comes to a boil the bajra will start to cook and become creamy. Now close the pressure cooker and cook for 2 whistles in a high flame and Simmer it for 10 mins and switch off the flame. Let the pressure gets released all by itself and then open the cooker. Bajra Rice is now ready to be served.
    Step 3 - How to cook Bajra Rice
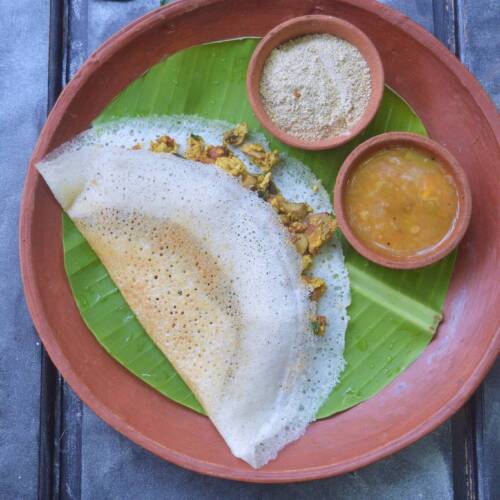
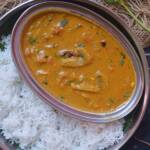
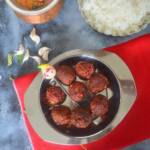
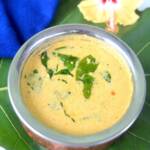
    I Served Bajra Rice with Spicy Potato Fry and Chicken Fry.
    Bajra/Kambu/Pearl Millet rice recipe

    📖 Recipe

    How to Cook Bajra Rice
    Print Recipe Pin Recipe
    5 from 1 vote

    Kambu Sadham | How to Cook Bajra Rice

    Bajra is one of the Oldest grown Crops among all the Millets It takes more time than the usual rice and other millets to cook.
    Prep Time3 hours hrs
    Cook Time15 minutes mins
    Total Time3 hours hrs 15 minutes mins
    Course: Main Course
    Cuisine: Indian
    Servings: 2
    Calories: 189kcal
    Author: Sharmila Kingsly
    Prevent your screen from going dark

    Standard 1 cup measures 240 ml

    Ingredients

    • 1 cup Bajra / Kambu / Pearl Millet
    • 3.5 cups Water Optional – Check Notes
    • Salt a pinch

    Instructions 

    • Soak the Bajra in Water for 2-3 hours. After soaking drain the water completely .Use a Muslin Cloth or a fine sieve to drain the water as the Bajra grains are very small.
    • Now take the drained bajra in a blender and pulse it twice or thrice. This step is just to break the grains. Make sure to just pulse it and not to grind. If you are using broken bajra then no need to break the grains. Bring Water to boil in a pressure cooker.
    • Add in a pinch of Salt and the Bajra wait till it comes to a boil the bajra will start to cook and become creamy.
    • Now close the pressure cooker and cook for 2 whistles in a high flame and Simmer it for 10 mins and switch off the flame.
    • Let the pressure gets released all by itself and then open the cooker. Bajra Rice is now ready to be served

    Notes

    • If you feel the rice still not cooked you can add half cup of Hot water and cook the rice again with the pressure cooker opened. But this happens only if the Bajra is not soaked properly
    •  You can also cook Bajra in a Open pot instead of pressure cooker. In that case Add 3 ½ cup if water to 1 Cup Bajra and Cook. However the Soaking and grinding part are the same.
    •  Rice will be creamy after opening the cooker but it will becomes thick once it cools down
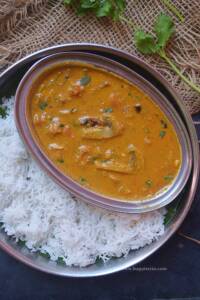
    •  Serve Bajra Rice with any Spicy curry Or Gravy.
    •  Bajra Koozh and Curd Bajra Koozh are some other recipes we can prepare with Bajra rice.

    Nutrition

    Calories: 189kcal | Carbohydrates: 36.4g | Protein: 5.5g | Fat: 2.1g | Saturated Fat: 0.4g | Sodium: 3mg | Potassium: 98mg | Fiber: 4.3g | Calcium: 4mg | Iron: 2mg
    Tried this recipe?Mention @happietrio or tag #happietrio
    Subscribe to my Channelclick for more videos

    5 taste Uthappam Recipe

    August 3, 2017 By Sharmila Kingsly Leave a Comment

    5 taste Uthappam

    5 taste Uthappam. One Dosa Batter but the options are tremendous. An easy and lovely way to show variations over your breakfast.

    5 taste Uthappam Recipe

    Five taste Uthappam with step by step pictures. Uthappam is a thicker version of Dosa (lentil crepes).It is not crispy like dosa is a thick pancake.Five taste Uthappam is a delicious breakfast that can be served on a weekend.

    We can make this breakfast interesting with some delicious and interesting toppings this sure will please your family and kids. Also I made few elaborate side dish to go along with five taste Uthappam.

    I served it along with Mixed Vegetable Kurma, Coconut Chutney, Sambar, Potato Masala. Now let see how to prepare this delicious spread.

    Similar Recipes:

    • Dal Adai/Parupu Adai
    • Pesarattu dosa / Green Gram Dosa
    5 taste Uthappam Recipe

    5 taste Uthappam

     
          1.    Chop all the veggies and make it ready. Take dosa batter in a small ladle and pour in the dosa pan. Don’t spread much as the uthappam will be thick. Top it with Coriander leaves.
    Step 1 five taste Uthappam Recipe
          2.    Pour in oil over the sides and cover cook in a low flame for some time thick the bottom becomes light brown .Now flip and cook for few secs.
    Step 2 five taste Uthappam Recipe
          3.    Once the uthappam is fully cooked remove it to the plate. Repeat the same for uthappam however only the toppings differ. Next for Onion tomato dosa. Top the uthappam with a generous sprinkle of Onion and tomato and sprinkle oil over the sides. Flip and cook till it is done .After  Flipping press the dosa a little with a ladle so that the toppings becomes intact and will not fall apart.
    Step 3 five taste Uthappam Recipe
           4.    For Carrot Cucumber dosa top the Uthappam with Carrot and Cucumber and cook till it is done.
    Step 4 five taste Uthappam Recipe
          5.    For podi Uthappam sprinkle a lavish amount of podi over the uthappam and sprinkle ghee over the uthappam and along the edges cook till it is done.
    Step 5 five taste Uthappam Recipe
          6.    For Potato Masala dosa. Scoop a generous amount of potato masala over the uthappam and cook. After flipping press he uthappam a little so that the masala remains intact with the Uthappam. 
    Step 6 five taste Uthappam Recipe

    A closer look : Potato Masala Uthappam

     Podi Uthappam

     Onion tomato Uthappam

     Carrot Cucumber Uthappam


     Coriander Uthappam


    5 taste Uthappam Recipe

    Few other toppings ideas:

    Some Other toppings which you can try for Uthappam:

    • Egg Uthappam
    • Pepper Uthappam
    • Green Peas Uthappam
    • Vegetable Uthappam

    Serving Suggestions:

    Serve this delicious Uthappam with a cup of hot filter coffee.

    ★ Did you enjoy this recipe? If you happen to try it out, I would love to hear from you! I’d appreciate it if you could rate and leave a review below in the comments. Your reviews help others know the recipe better too. Thanks for your time. You can also follow me on Facebook, Pinterest, Instagram, Youtube and Twitter for more updates from me.

    📖 Recipe

    5 taste Uthappam
    Print Recipe Pin Recipe
    5 from 1 vote

    5 taste Uthappam

    5 taste Uthappam. One Dosa Batter but the options are tremendous. An easy and lovely way to show variations over your Uthappam and this a lovely gig on the breakfast table.
    Prep Time20 minutes mins
    Cook Time10 minutes mins
    Total Time30 minutes mins
    Course: Breakfast
    Cuisine: Indian
    Servings: 5
    Calories: 102kcal
    Author: Sharmila Kingsly
    Prevent your screen from going dark

    Standard 1 cup measures 240 ml

    Ingredients

    • 1 cup Idli Dosa Batter
    • Oil or Ghee as needed

    For Toppings:

    • 3 tbsp Onion finely chopped
    • 2 tbsp Tomatoes finely chopped
    • 3 tbsp Grated Carrot
    • 2 tbsp Cucumber
    • 2 tbsp Coriander Leaves
    • Idli Podi as needed
    • Potato Masala a generous scoop

    Instructions 

    • Chop all the veggies and make it ready. Take dosa batter in a small ladle and pour in the dosa pan. Don’t spread much as the uthappam will be thick. Top it with Coriander leaves.
    • Pour in oil over the sides and cover cook in a low flame for some time thick the bottom becomes light brown .Now flip and cook for few secs.
    • Once the uthappam is fully cooked remove it to the plate. Repeat the same for uthappam however only the toppings differ. Next for Onion tomato dosa. Top the uthappam with a generous sprinkle of Onion and tomato and sprinkle oil over the sides.Flip and cook till it is done .After Flipping press the dosa a little with a ladle so that the toppings becomes intact and will not fall apart.
    • For Carrot Cucumber dosa top the Uthappam with Carrot and Cucumber and cook till it is done.
    • For podi Uthappam sprinkle a lavish amount of podi over the uthappam and sprinkle ghee over the uthappam and along the edges cook till it is done.
    • For Potato Masala dosa. Scoop a generous amount of potato masala over the uthappam and cook. After flipping press he uthappam a little so that the masala remains intact with the Uthappam.

    Notes

    · Make the toppings as per your preference, what I have suggested is just a few many variations can be made over the toppings.
    · I served 5 taste uthappam with Idli Podi, Sambar, Coconut Chutney, Potato Masala, and Mixed Vegetable Kurma.

    Nutrition

    Calories: 102kcal | Carbohydrates: 16.8g | Protein: 3.4g | Fat: 3.1g | Saturated Fat: 0.4g | Sodium: 87mg | Potassium: 440mg | Fiber: 4.8g | Sugar: 5.7g | Calcium: 69mg | Iron: 4mg
    Tried this recipe?Mention @happietrio or tag #happietrio
    Subscribe to my Channelclick for more videos

    How to make Idli-Dosa Batter

    August 2, 2017 By Sharmila Kingsly Leave a Comment

    Idli Dosa Batter

    Idli Dosa Batter is like a mandatory stuff for any South Indian household. It comes handy and we can make a variety of dishes with a single batter.

    Follow us on Pinterest for delicious pins. Join our Facebook group for more Instant Pot and Air Fryer recipes.

    how to prepare Idli/dosa Batter

    How to prepare Idli/Dosa batter with step by step photos. Idli and dosa are comfort food for most of the South Indians. Both the breakfast are really healthy and can be prepared in less time.

    In a week of 7 days , we prepare Idli or Dosa at least 4-5 days at times. Usually, we grind the Idli Dosa batter in the Weekends so for the entire week there can be hassle-free good food.

    soft Idli

    But nowadays we do get ready-made Idli/dosa batter in stores which is comparatively expensive. While the batter can be prepared so easily at the home. So now let’s get started with the preparation steps.

    how to prepare Idli/dosa Batter

    How to make Idli/ Dosa Batter

    1.    Measure the ingredients as mentioned. Soak The Idli Rice and Urad Dal in Separate Vessels for about 4 hours. You can add Fenugreek seeds in anyone either Urad Dal or Idli Rice for soaking. Soak it for 4 hours.

    step 1 how to prepare Idli/dosa Batter

    2.    Next in a mixer or grinder add in the soaked Urad Dal and add in the required water for grinding. Blend well to form a fine paste. Make sure there are no whole grains in the batter after grinding. Transfer the ground Urad Dal to a separate vessel

    step 2 how to prepare Idli/dosa Batter

        3.    Now add in the Soaked Rice flour with the required water for grinding in a blender or grinder. Blend well and then transfer to the same vessel where we have kept the ground, Urad Dal. Mix both the rice flour and Urad Dal flour together such that they are homogeneously mixed. After mixing add in the required salt and allow it to ferment overnight or 6 hours in a warm place. The Batter would have raised which indicates the batter is fermented. The batter is now ready to use. Before preparing Idli or dosa mix the batter with the required water to get the correct consistency for Idli or Dosa.

    step 3 how to prepare Idli/dosa Batter

    Soft Idli

    Tips & Variations

    • Make sure you don’t forget to add Fenugreek seeds in the batter as it gives really soft and fluffy Idli or Dosa.
    •  The fermentation part plays an important role in getting really soft idli and crispy dosa. If you live in a cold region in might take even more time for fermentation.
    • Always mix the ground urad dal and idli rice with hands and make sure they are mixed evenly. This helps in fermentation process.
    •  In that case, you can keep the batter inside an empty microwave oven or in the top of the refrigerator. Sometimes if you have old fermented batter you can add that to the new batter and mix well for fermenting (Just like how we prepare curd )
    •  The Proportion can be doubled or increased as per your preference.
    •  I used my blender for grinding the batter you can use the grinder too.
    •  Make sure you wash the Idli Rice and Urad Dal really well before you start soaking and soak the Grains with enough Water. So when you are grinding you can use the water used for soaking Idli Rice and Urad dal for grinding too. This prevents us from not losing the vitamins plus it helps in giving soft idli. This is actually tried and tested by me and a few of my friends.
    •  Always use a big vessel when keeping the batter for fermenting as the batter will double in size and will overflow it the vessel is small.
    •  The idli batter is slightly thick than dosa better is slightly.
    •  If the Idli Better is watery then Your Idli will be flat and may not be fluffy. So don’t add too much water before grinding. So be cautious while adding.

    ★ Did you enjoy this recipe? If you happen to try it out, I would love to hear from you! I’d appreciate it if you could rate and leave a review below in the comments. Your reviews help others know the recipe better too. Thanks for your time. You can also follow me on Facebook, Pinterest, Instagram, Youtube and Twitter for more updates

    📖 Recipe

    Idli Dosa Batter
    Print Recipe Pin Recipe
    5 from 1 vote

    How to make Idli/Dosa Batter

    Idli Dosa Batter is like a mandatory stuff for any Indian household. It comes handy and we can make a varitey of dishes with a single batter.
    Prep Time15 minutes mins
    Cook Time0 minutes mins
    Soaking + Fermenting Time10 hours hrs
    Total Time10 hours hrs 15 minutes mins
    Course: Breakfast
    Cuisine: Indian
    Servings: 2 cups
    Calories: 112kcal
    Author: Sharmila Kingsly
    Prevent your screen from going dark

    Standard 1 cup measures 240 ml

    Equipment

    • Grinder or Blender
    • Grinder or Blender

    Ingredients

    • 1 Cup Idli Rice
    • ¼ Cup Urad Dal
    • ½ tsp Fenugreek Seeds
    • Water as needed
    • Salt as needed

    Instructions 

    • Measure the ingredients as mentioned. Soak The Idli Rice and Urad Dal in Separate Vessels for about 4 hours. You can add Fenugreek seeds in anyone either Urad Dal or Idli Rice for soaking. Soak it for 4 hours.
    • Next in a mixer or grinder add in the soaked Urad Dal and add in the required water for grinding. Blend well to form a fine paste. Make sure there are no whole grains in the batter after grinding. Transfer the ground Urad Dal to a separate vessel
    • Now add in the Soaked Rice flour with the required water for grinding in a blender or grinder. Blend well and then transfer to the same vessel where we have kept the ground, Urad Dal. Mix both the rice flour and Urad Dal flour together such that they are homogeneously mixed. After mixing add in the required salt and allow it to ferment overnight or 6 hours in a warm place. The Batter would have raised which indicates the batter is fermented. The batter is now ready to use. Before preparing Idli or dosa mix the batter with the required water to get the correct consistency for Idli or Dosa.

    Notes

    •  Make sure you don’t forget to add Fenugreek seeds in the batter as it gives really soft and fluffy Idli or Dosa.
    •  The fermentation part plays an important role in getting really soft idli and crispy dosa. If you live in a cold region in might take even more time for fermentation.
    • Always mix the ground urad dal and idli rice with hands and make sure they are mixed evenly. This helps in fermentation process.
    •  In that case, you can keep the batter inside an empty microwave oven or in the top of the refrigerator. Sometimes if you have old fermented batter you can add that to the new batter and mix well for fermenting (Just like how we prepare curd )
    •  The Proportion can be doubled or increased as per your preference.
    •  I used my blender for grinding the batter you can use the grinder too.
    •  Make sure you wash the Idli Rice and Urad Dal really well before you start soaking and soak the Grains with enough Water. So when you are grinding you can use the water used for soaking Idli Rice and Urad dal for grinding too. This prevents us from not losing the vitamins plus it helps in giving soft idli. This is actually tried and tested by me and a few of my friends.
    •  Always use a big vessel when keeping the batter for fermenting as the batter will double in size and will overflow it the vessel is small.
    •  The idli batter is slightly thick than dosa better is slightly.
    •  If the Idli Better is watery then Your Idli will be flat and may not be fluffy. So don’t add too much water before grinding. So be cautious while adding.
    •  

    Nutrition

    Serving: 1portion | Calories: 112kcal | Carbohydrates: 23.1g | Protein: 3.8g | Fat: 0.3g | Saturated Fat: 0.1g | Sodium: 1mg | Potassium: 102mg | Fiber: 2.9g | Sugar: 0.2g | Calcium: 6mg | Iron: 6mg
    Tried this recipe?Mention @happietrio or tag #happietrio
    Subscribe to my Channelclick for more videos

    Apple Custard

    August 1, 2017 By Sharmila Kingsly Leave a Comment

    Apple Custard
    Apple Custard

    Apple Custard Recipe with step by step photos. Apple Custard is one of the simple and yummy dessert. All it takes is a handful of ingredients and few mins to prepare this delicious and creamy heaven. It is such a healthy option as we will have the goodness of Milk and Apples in a single dish. Now let’s get started with the recipe. .

    Similar Recipes:

    Apple Kheer

    Apple Halwa

    Apple Muffins

    Apple Custard

    How to make Apple Custard

    1.    Wash an apple and peel the skin. Chop the apples into small pieces and set aside.

    Step 1 how to prepare Apple Custard

    2. In another bowl take the custard powder and add in 4 tbsp milk and mix well such that no lumps remains and keep aside. Heat the milk in a sauce pan, let it come to a boil and then simmer it

    Step 2 how to prepare Apple Custard

    3.    Now add in the prepared Custard mix and mix well and then add in sugar .Mix everything well.

    Step 3 how to prepare Apple Custard

     4.    Mix the custard milk, it will start becoming thick and creamy switch off the flame at that consistency and allow it to cool down for 5 mins and then add in the chopped apples mix well and refrigerate. Serve Chilled.

    Step 4 how to prepare Apple Custard

    If you don’t have custard Powder your can add in Corn Flour and a tsp of Vanilla essence and food colour if you prefer. It tastes best when served chilled J

    Apple Custard

    ★ Did you enjoy this recipe? If you happen to try it out, I would love to hear from you! I’d appreciate it if you could rate and leave a review below in the comments. Your reviews help others know the recipe better too. Thanks for your time .You can also follow me on Facebook, Pinterest, Instagram, Youtube and Twitter for more updates

    📖 Recipe

    Apple Custard
    Print Recipe Pin Recipe
    No ratings yet

    Apple Custard

    Apple Custard is one of the simple and yummy dessert. It is prepared with Custard powder and Apples.
    Prep Time1 hour hr
    Cook Time10 minutes mins
    Total Time1 hour hr 10 minutes mins
    Course: Dessert
    Cuisine: International
    Servings: 4
    Calories: 133kcal
    Author: Sharmila Kingsly
    Prevent your screen from going dark

    Standard 1 cup measures 240 ml

    Ingredients

    • ½ Lit Milk 500 ml
    • 2 Apple
    • 2 tsp Custard Powder Vanilla Flavoured
    • 5 tbsp Sugar

    Instructions 

    • Wash an apple and peel the skin. Chop the apples into small pieces and set aside.
    • In another bowl take the custard powder and add in 4 tbsp milk and mix well such that no lumps remains and keep aside. Heat the milk in a sauce pan, let it come to a boil and then simmer it.
    • Now add in the prepared Custard mix and mix well and then add in sugar .Mix everything well.
    • Mix the custard milk, it will start becoming thick and creamy switch off the flame at that consistency and allow it to cool down for 5 mins and then add in the chopped apples mix well and refrigerate. Serve Chilled.

    Notes

    • Instead of apple you can also add any fruits of your choice or mixed fruits.
    •  Tastes best when served chilled
    •  You can also have this with Vanilla Ice Cream.

    Nutrition

    Calories: 133kcal | Carbohydrates: 32.4g | Protein: 1.4g | Fat: 0.9g | Saturated Fat: 0.4g | Cholesterol: 3mg | Sodium: 17mg | Potassium: 137mg | Fiber: 2.7g | Sugar: 28.3g | Calcium: 41mg | Iron: 1mg
    Tried this recipe?Mention @happietrio or tag #happietrio
    Subscribe to my Channelclick for more videos

    Cauliflower Egg Bhurji

    July 29, 2017 By Sharmila Kingsly Leave a Comment

    Cauliflower Egg Bhurji

    Cauliflower Egg Burji is an easy and simple lunch side dish made with cauliflower florets and egg. It tastes good with any spicy Curry.

    Cauliflower Egg Bhurji

    Cauliflower Egg Bhurji Recipe with step by step photos. As a newly married girl when I was left alone in the kitchen initially this Cauliflower Egg Recipe came to my rescue. It is so simple and easy to prepare. It needs very minimal ingredients but tastes awesome.

    This recipe was passed on to me by one of my colleagues and from then on it used to take a regular place in my kitchen.

    Cauliflower Egg Burji goes very well with both Rice and Roti. Instead of the stovetop method, we can even use the baked Cauliflower version which will be similar to the cauliflower au gratin which tastes equally good. I will try to share that version soon!

    Similar Recipes:

    Carrot Egg stir fry

    Cauliflower Egg bhurji

     Step by step Method with pictures: 

        1.    Cut the cauliflower florets into small pieces and blanch them in water till they are half cooked by adding a pinch of turmeric powder and Salt. It will take about 5 mins. Switch off the flame and then strain the Cauliflower florets using a colander. Allow it to cool down, once cooled Chop them into small pieces, and set aside. In a Pan add in oil once it becomes hot add in Mustard Seeds let it splutter and then add in Channa Dal and Green Chilli saute for few secs and then add in the Curry Leaves.
    Step 1 how to prepare Cauliflower Egg Burji
         2.    Next add in the onion and cook till they become soft, Next add in the Chopped Cauliflower and then add in Turmeric powder, Salt, and Pepper powder, mix well and cook till they are fully done.
    Step 2 how to prepare Cauliflower Egg Burji

    3.    Now move the cauliflower towards once side of the Kadai and then break open the 3 Eggs, Scramble and cook in a low flame till the eggs are completely done. Finally, mix together the Cauliflower and Eggs and give a good Stir and Switch off the flame. Serve hot with Rice or Roti.

     
    Step 3 how to prepare Cauliflower Egg Burji
     

     This recipe was in my draft for a long time so when I had a quick look over my draft this caught my attention. I served my Cauliflower Egg burji with Steamed rice and Rasam.

    Cauliflower Egg Burji

    📖 Recipe

    Cauliflower Egg Bhurji
    Print Recipe Pin Recipe
    5 from 1 vote

    Cauliflower Egg Burji

    Cauliflower Egg Burji is an easy and simple lunch side dish made with cauliflower florets and egg. It tastes good with any spicy Curry.
    Prep Time10 minutes mins
    Cook Time15 minutes mins
    Total Time25 minutes mins
    Course: Side Dish
    Cuisine: Indian
    Servings: 4
    Calories: 85kcal
    Author: Sharmila Kingsly
    Prevent your screen from going dark

    Standard 1 cup measures 240 ml

    Ingredients

    • ½ head Cauli Flower
    • 3 Eggs
    • 1 Onion
    • 2 Green Chili
    • ½ tsp Turmeric powder
    • 1 tsp Pepper powder
    • Salt as needed

    To Temper:

    • 1 tsp Oil
    • 1 tsp Mustard Seeds
    • 1 tsp Channa Dal
    • 1 sprig Curry Leaves

    Instructions 

    • Cut the cauliflower florets into small pieces and blanch them in water till they are half cooked by adding a pinch of turmeric powder and Salt. It will take about 5 mins. Switch off the flame and then strain the Cauliflower florets using a colander. Allow it to cool down, once cooled Chop them into small pieces, and set aside. In a Pan add in oil once it becomes hot add in Mustard Seeds let it splutter and then add in Channa Dal and Green Chilli saute for few secs and then add in the Curry Leaves
    • Next add in the onion and cook till they become soft, Next add in the Chopped Cauliflower and then add in Turmeric powder, Salt, and Pepper powder, mix well and cook till they are fully done.
    • Now move the cauliflower towards once side of the Kadai and then break open the 3 Eggs, Scramble and cook in a low flame till the eggs are completely done. Finally, mix together the Cauliflower and Eggs and give a good Stir and Switch off the flame. Serve hot with Rice or Roti.

    Notes

    · Tastes good when served hot with Roti or Steamed Rice.
    · You can also add in some freshly grated coconut in the end before you switch off the flame. It gives a nice taste.
    · Add salt carefully as we have already added Salt while cooking Cauliflower.

    Nutrition

    Calories: 85kcal | Carbohydrates: 6.8g | Protein: 5.3g | Fat: 4.4g | Saturated Fat: 1.1g | Cholesterol: 10mg | Sodium: 56mg | Potassium: 214mg | Fiber: 4.4g | Sugar: 1.1g | Calcium: 36mg | Iron: 1mg
    Tried this recipe?Mention @happietrio or tag #happietrio
    Subscribe to my Channelclick for more videos

    Easy Mushroom Gravy

    July 17, 2017 By Sharmila Kingsly Leave a Comment

    Mushroom Curry is an easy and quick curry that goes well with any breakfast especially appam or idiyappam (Rice noodles).

    Mushroom Curry

    Mushroom Masala with step by step photos. This South Indian Style Mushroom Curry or precisely mushroom curry Kerala style is my go to dish. I usually prepare them for Idiyappam or Appam. It also goes well with Set dosa or Idli too. Mushroom is loved by many of us and it can be used in preparing gravy, biryani, pulav, appetizer, and many more.

    Mushroom has an intense flavor and blends very well with any curry base. Also, mushrooms in curry get cooked easily and the volume shrinks once it's cooked. It might appear that we are adding a lot of mushrooms, but then once it gets cooked the volume decreases.

    [feast_advanced_jump_to]

    Mushroom Masala

    Mushroom masala is a thicker version of the gravy. Instead of the gravy, we can also make thick masala mushrooms goes well with roti or rice. So with one recipe so many variations are possible and you can serve them with almost anything.

    Types of Mushroom

    White button mushrooms are the most commonly used mushroom in Indian Cooking. Apart from them shiitake mushrooms, portobello, or exotic mushrooms like oyster mushrooms are the popular edible ones.

    Ingredients

    Mushroom Curry Ingredients

    Mushroom - Use fresh and medium sized white button mushrooms.

    Onion & Tomato - Chop the onions finely and then use ripe tomatoes. It gives the base for the curry

    Ginger garlic paste - I personally do not use ginger garlic paste, I used crushed ginger and garlic. It gives the gravy an aromatic flavor

    Coconut paste - Use fresh coconut. If you do not get the fresh ones you may use the dried ones or even desiccated coconut will work.

    Spice Powders - we use the basic spices powders like red chilli powder, coriander powder, Garsam Masala, and Tuermweic powder in the gravy.

    Curry Leaves & Cilantro - We use the curry leaves for tempering and Cilantro for garnishing the curry. Both are flavorful and do not miss adding. you can also sprinkle in some Kasoori Methi if you like that flavor.

    How to Clean and Cut Mushroom

    • Always get the fresh mushrooms and check for the expiry date while buying.
    • Immerse in lukewarm water for 15 mins. And then wash them by pressing the mushrooms slightly to remove the dirt and dust particles.
    • You can chop a small portion of the stem if it's hard.
    • And then slice the mushrooms lengthwise.
    • For the bigger-sized Mushroom, you can scrap the black portion beneath the mushroom head.

    How to make Mushroom Gravy

    1. In a pan add in the coconut and dry roast till it's aromatic and the color slightly changes to golden. To this add red chili powder, Coriander powder and Garam Masala Powder saute for 30 secs and switch off the flame

    In a pan add in the coconut and dry roast till it's aromatic and the color slightly changes to golden

    2.allow it to cool down and then in a blender add in little water and grind it to a fine paste.

    allow it to cool down and then in a blender add in little water and grind it to a fine paste.

    3. Once the oil heats up add in Mustard Seeds, let it splutter, and then add in Dry Red Chilli and Curry Leaves. Fry for 30 secs.

    Once the oil heats up add in Mustard Seeds, let it splutter, and then add in Dry Red Chilli and Curry Leaves. Fry for 30 secs.

    4. Next add in the finely chopped onions. Cook till it becomes translucent 5. Next add in the tomatoes. Cook till they turn soft.

    6. next add in the ginger garlic paste saute till the raw smell leaves.

    next add in the ginger garlic paste saute till the raw smell leaves.

    7. Clean the button mushrooms. Slice them. Next add in the chopped mushrooms saute for 2 mins the mushroom will start leaving the water.

    8. Add the ground masala to the mushroom. Add salt and turmeric powder. Cover cook for 5 mins.

    9. Finally garnish with coriander leaves and switch off the stove . Serve hot.

    Mushroom Curry is ready

    Variations & Tips

    • Mushroom Curry with coconut milk - So adding coconut milk makes the curry more flavorful than the coconut paste. I personally like coconut milk flavor more than coconut paste.
    • Mushroom curry Andhra style - In Andhra style, we usually add dried red chilies along with the coconut and roast.
    • Mushroom Curry with cashew paste - If you do not want to add coconut you may also replace coconut with cashew nuts paste. Soak the cashew nut in hot water for 10 mins and then you can blend them with the spices.
    • Creamy Mushroom Curry - You can also add in ¼ cup of Creamy of a creamier version.
    • Capsicum Mushroom curry - In this recipe, you may also add bell peppers along with mushrooms. Adding red, Yellow, and Green together makes the curry look rich and vibrant.
    • Mushroom Butter Masala & Mushroom Tikka masala are other lovely dishes that we usually try with Mushroom. You can very well use the Makhani base and try the same with sauteing mushrooms.

    More Mushroom Recipes

    • Mushroom Cutlet
      Mushroom Cutlet
    • Chettinadu Mushroom Gravy
      Chettinadu Mushroom Gravy
    • Mushroom Biryani
      Mushroom Biryani , Kalan Biryani
    • Mushroom Masala Dosa
      Mushroom Egg Masala Dosa

    ★ Did you enjoy this recipe? If you happen to try it out, I would love to hear from you! I’d appreciate it if you could rate and leave a review below in the comments. Your reviews help others know the recipe better too. Thanks for your time. You can also follow me on Facebook, Pinterest, Instagram, Youtube and Twitter for more updates

    📖 Recipe

    Print Recipe Pin Recipe
    5 from 1 vote

    Mushroom Gravy

    Mushroom Curry is an easy and quick curry that goes well with any breakfast especially appam or idiyappam (Rice noodles).
    Prep Time10 minutes mins
    Cook Time25 minutes mins
    Total Time35 minutes mins
    Course: Main Course
    Cuisine: Indian
    Servings: 5
    Calories: 100kcal
    Author: Sharmila Kingsly
    Prevent your screen from going dark

    Standard 1 cup measures 240 ml

    Ingredients

    • 2 cups Mushroom sliced
    • 2 Onions
    • 2 Tomato
    • 1 tbsp Ginger garlic paste
    • Salt as needed
    • ½ tsp Turmeric powder
    • Water as needed
    • Coriander leaves to garnish
    • 1 tbsp Oil
    • 1 tsp Mustard Seeds
    • 2 Dry Red Chilli
    • 1 spring Curry Leaves

    To Roast and Grind:

    • 4 tbsp Freshly ground coconut
    • 1.5 tsp Chilli powder
    • 1 tbsp Coriander powder
    • 1 tsp Garam Masala

    Instructions 

    • In a pan add in the coconut and dry roast till it's aromatic and the color slightly changes to golden. To this add red chili powder, Coriander powder and Garam Masala Powder saute for 30 secs and switch off the flame.
    • allow it to cool down and then in a blender add in little water and grind it to a fine paste.
    • Once the oil heats up add in Mustard Seeds, let it splutter, and then add in Dry Red Chilli and Curry Leaves. Fry for 30 secs.
    • Next add in the finely chopped onions. Cook till it becomes translucent
    • Next add in the tomatoes. Cook till they turn soft.
    • next add in the ginger garlic paste saute till the raw smell leaves.
    • Clean the mushrooms. Slice them. Next add in the chopped mushrooms saute for 2 mins the mushroom will start leaving the water.
    • Add the ground masala to the mushroom. Add salt and turmeric powder. Cover cook for 5 mins.
    • Finally garnish with coriander leaves and switch off the stove . Serve hot.

    Notes

    · Tastes good with Idli ,Dosa,Idiyappam,Chapathi or Puri.
    · The freshly ground coconut masala gives the unique taste to the recipe so don’t skip that.
    · I used button mushroom for this gravy but any variety of mushroom can be used.

    Nutrition

    Serving: 1portion | Calories: 100kcal | Carbohydrates: 10.5g | Protein: 3.1g | Fat: 6g | Saturated Fat: 2.7g | Sodium: 708mg | Potassium: 389mg | Fiber: 2.6g | Sugar: 3.5g | Calcium: 37mg | Iron: 3mg
    Tried this recipe?Mention @happietrio or tag #happietrio
    Subscribe to my Channelclick for more videos

    Disclaimer: I am not a nutritionist , the nutrition value provided here is an estimate.It will vary based on the quantity and brands of the products used.

    This post is originally from 2017. It is now updated with new Pictures, details and recipe card.

    Crispy Bitter gourd Chips

    July 14, 2017 By Sharmila Kingsly 28 Comments

    Crispy Bitter gourd Chips

    Bitter gourd chips or Karela Chips is an easy and delicious crispy snack. It also goes well as a lunch side dish.

    Crispy Bitter gourd Chips

    Ingredients

    Bitter Gourd: The star ingredient. Use fresh raw thinly sliced bitter gourd.

    Spice Powders: Commonly used spices include turmeric, red chili powder, and Amchur powder.

    Flour: Rice flour is often used to achieve crispiness.

    Besan - Besan or gram flour adds a lovely taste.

    Corn flour - Helps in binding the spices with bitter gourd

    Oil: For frying or a light drizzle if baking.

    How to make Bitter gourd Chips

    Prep the Bitter gourd:

    Wash bitter gourd well and wipe with paper towels to remove excess moisture.

    Next Chop the bitter gourd in to thin slices. The thinner the slices crispier the chips. Remove the thick seeds in the bitter gourd as we slice.

    slice bitter gourd and remove the seeds

    Season the bitter gourd

    Transfer to a bowl. Now add besan flour , Rice flour and corn flour.

    add besan , Rice flour and corn flour to sliced bittergourd

    Next add the spice powders. I am using Red Chili powder, amchur powder ,Turmeric powder and Salt. Toss everything once so that the spices mix well.

    add the spice powders to bittergourd

    Sprinkle little water and mix everything. The spice powders evenly coat over the bitter gourd as you mix. Check for taste and adjust if anything is required.

    sprinkle little water and combine the spice powders

    Cook Bitter gourd Chips

    Heat the oil for deep frying . Let it come to smoking hot now reduce the flame. Drop the bitter gourd pieces in batch. Don’t overcrowd fry in a medium flame.

    deep fry bitter gourd in oil

    Cook for 3-5 mins. Once the bitter gourd turns crispy and fully cooked remove from the hot oil. Drain in a paper towels to remove the excess oil. Serve hot

    Once cooked to crisp and golden remove bittergourd from oil

    Serving Suggestions

    As a Snack: Enjoy them on their own as a munch on.

    As a Side: Serve alongside your meals for lunch .

    With Dip: Pair with Green chutney for a flavorful duo.

    Storage Tips

    Airtight Container: Store in an airtight container to maintain their crispiness.

    Cool Place: Keep them in a cool, dry place to prevent them from becoming soggy.

    ★ Did you enjoy this recipe? If you happen to try it out, I would love to hear from you! I’d appreciate it if you could rate and leave a review below in the comments. Your reviews help others know the recipe better too. Thanks for your time . You can also follow me on Facebook, Pinterest, Instagram, Youtube and Twitter for more updates

    📖 Recipe

    Crispy Bitter gourd Chips
    Print Recipe Pin Recipe
    5 from 1 vote

    Crispy Bitter gourd Chips

    Crispy bitter gourd chips made with bitter gourd makes a perfect snack.
    Prep Time10 minutes mins
    Cook Time15 minutes mins
    Total Time25 minutes mins
    Course: Snack
    Cuisine: Indian
    Servings: 4
    Calories: 153kcal
    Author: Sharmila Kingsly
    Prevent your screen from going dark

    Standard 1 cup measures 240 ml

    Ingredients

    • 3 Bitter gourd
    • 3 tbsp Besan flour
    • 1.5 tbsp Rice flour
    • 1 tbsp Corn flour
    • 1 tsp Chili powder
    • ½ tsp Turmeric powder
    • ½ tsp Amchur powder
    • Salt as needed
    • Oil for deep frying
    • Water as needed to sprinkle in the bitter gourd
    • 2 tbsp yogurt optional ( Check notes )

    Instructions 

    Prep the Bitter gourd:

    • Wash bitter gourd well and wipe with paper towels to remove excess moisture.
    • Next Chop the bitter gourd in to thin slices. The thinner the slices crispier the chips. Remove the thick seeds in the bitter gourd as we slice.

    Season the bitter gourd

    • Transfer to a bowl. Now add besan flour , Rice flour and corn flour.
    • Next add the spice powders. I am using Red Chili powder, amchoor powder ,Turmeric powder and Salt. Toss everything once so that the spices mix well.
    • Sprinkle little water and mix everything. The spice powders evenly coat over the bitter gourd as you mix. Check for taste and adjust if anything is required.

    Cook Bitter gourd Chips

    • Heat the oil for deep frying . Let it come to smoking hot now reduce the flame. Drop the bitter gourd pieces in batch. Don’t overcrowd fry in a medium flame.
    • Cook for 3-5 mins. Once the bitter gourd turns crispy and fully cooked remove from the hot oil. Drain in a paper towels to remove the excess oil. Serve hot

    Notes

    1.  Bitter gourd fry goes very well as a lunch side dish. It can also be served as snack along with a cup of chai.
    2.  If you want to remove the bitterness in bitter gourd after slicing and removing the seeds mix with 2 tbsp of curd and allow it to rest for 10 mins it will start leaving water. Squeeze out the excess water and then continue with the rest of the process.
    3.  If you prefer the bitter gourd chips more like bajji add in extra 2 tbsp of Besan flour.
    4.  Serve Bitter gourd chips with bise bele bath or Curd Rice .The combo is just awesome.

    Nutrition

    Calories: 153kcal | Carbohydrates: 12g | Protein: 2.8g | Fat: 10.5g | Saturated Fat: 1.3g | Sodium: 270mg | Potassium: 89mg | Fiber: 1.3g | Sugar: 0.9g | Calcium: 10mg | Iron: 1mg
    Tried this recipe?Mention @happietrio or tag #happietrio
    Subscribe to my Channelclick for more videos

    Chettinad Beetroot Kola Urundai

    July 8, 2017 By Sharmila Kingsly Leave a Comment

    Chettinad Beetroot Kola Urundai
    Chettinadu Beetroot Kola Urundai

    Chettinadu Beetroot Kola Urundai with step by step photos. Chettinadu cuisine is famous for its aromatic cooking, in most of their cooking they grind the masala freshly and use it. Kola Urundai (Dumplings) is another famous dish in their cuisine. It can be prepared in any vegetable and even Meat .

    Mutton Kola urundai is really famouns among all. Today I have shared a simple and tasty Chettinad style Beetroot Kola Urundai.

    Beetroot is really a wonder vegetable which is neglected by many even my kiddo don’t touch it when I make a poriyal for her. But this deep fried goodness can never be neglected the addition of fennels seeds in the Kola urundai brings in an awesome flavour to this and I go gaga over them .so after preparing the Kola Urundai my little one never cared it is made out of beetroot she just enjoyed it J What else is needed for a mom 😀

    Beetroot Kola urundai

    My favourite dish from the Chettinad cuinie is Chettinad chicken and Anjappar restaurant serves the best chettinad chicken curry will try and post the recipe soon. I served my Beetroot Kola Urundai with Poondu kuzhambu and I have shared a pic of that in my Instagram already few days back. Follow me in Instagram to get to know my daily culinary journey J

    Click here for more Chettinad Recipes

    How to prepare Beetroot Kola Urundai

    1.   Peel the skin of the beetroot and grate it. Take roasted Gram Dal in a blender and blend it to form a fine powder and set aside.

    Peel the skin of the beetroot and grate it. Take roasted Gram Dal in a blender and blend it to form a fine powder and  set aside.

    2. Heat a pan with oil once it becomes hot add in Cumin seeds ,Urad Dal and Fennel seeds. Let them splutter. Next add then add crushed Ginger and Curry Leaves.

    Heat a pan with oil once it becomes hot add in Cumin seeds ,Urad Dal and Fennel seeds. Let them splutter. Next add then add crushed Ginger and Curry Leaves.

    3. Next add chopped onion and sauté till they becomes transparent.

    Next add chopped onion and sauté till they becomes transparent.

    4. Now add the grated beetroot.

    Now add the grated beetroot. Saute for 2 mins. To this add Chili powder, Turmeric powder and Salt. Mix well.

    5. Saute for 2 mins. To this add Chili powder, Turmeric powder and Salt. Mix well.

    Saute for 2 mins. To this add Chili powder, Turmeric powder and Salt. Mix well.

    6. Saute for 5 mins until the moisture goes and then switch off the flame and let it cool down.

    Saute for 5 mins until the moisture goes and then switch off the flame and let it cool down.

    7. Transfer the grated beetroot to a plate. Now add the powdered gram Dal.

    8. Combine everything together and Shape them into evenly sized firm balls.

    Combine everything together and Shape them into evenly sized firm balls.

    StoveTop Method

    9. You can either deep fry or fry them in appe pan. Add oil and let it heat. Once hot add the shaped beetroot balls.

    10. Flip and cook on both sides until crisp. Remove from the pan and drain in paper towels.

    Flip and cook on both sides until crisp. Remove from the pan and drain in paper towels.

    Air Fryer Method

    11. Preheat the air fryer at 200 Deg C / 400 F for 5 mins. Arrange the shaped kola balls in air fryer basket. Brush or spray oil

    Preheat the air fryer at 200 Deg C / 400 F for 5 mins. Arrange the shaped kola balls in air fryer basket. Brush or spray oil

    12. Air fry at 180 C / 356 F for 12 mins. Open the air fryer half way and shake the basket.

    Air fry at 180 C / 356 F for 12 mins. Open the air fryer half way and shake the basket.

     Delicious Air fryer beetroot kola urundai is now ready.

    Enjoy yummy Beetroot Kola Urundai as a lunch accomplishment or as a snack J

    Beetroot Kola urundai

    Similar Recipes:

    • Banana Blossom Kola Urundai
      Vazhaipoo Kola Urundai
    • Fish Kofta
      Fish Kofta Balls | Meen Kola Urundai
    • Chettinad Cauliflower Green Peas Roast
      Chettinad Cauliflower GreenPeas Roast
    • Chettinad Khara Kuzhi Paniyaram
      Chettinad Khara Kuzhi Paniyaram

    ★ Did you enjoy this recipe? If you happen to try it out, I would love to hear from you! I’d appreciate it if you could rate and leave a review below in the comments. Your reviews help others know the recipe better too. Thanks for your time. You can also follow me on Facebook, Pinterest, Instagram, Youtube and Twitter for more updates

    📖 Recipe

    Chettinad Beetroot Kola Urundai
    Print Recipe Pin Recipe
    5 from 1 vote

    Chettinad Beetroot Kola Urundai

    Kola Urundai is prepared in any vegetable and even Meat and made as a dumplied and fried to perfection.
    Prep Time10 minutes mins
    Cook Time15 minutes mins
    Total Time25 minutes mins
    Course: Snack
    Cuisine: Chettinad
    Servings: 12
    Calories: 67kcal
    Author: Sharmila Kingsly
    Prevent your screen from going dark

    Standard 1 cup measures 240 ml

    Ingredients

    • 1 cup Beetroot grated
    • ½ cup Fried Gram Dal Powder/Pottukadalai
    • 1 Onion finely chopped
    • 1 tbsp Ginger crushed
    • ½ tsp Chilli powder
    • ¼ tsp Turmeric powder
    • Salt as needed
    • ½ tsp Fennel Seeds
    • ½ tsp Cumin Seeds
    • ½ tsp Urad Dal
    • 1 spring Curry Leaves
    • 1 Green chilli
    • Oil for deep frying

    Instructions 

    • Peel the skin of the beetroot and grate it. Take roasted Gram Dal in a blender and blend it to form a fine powder and set aside.
    • Heat a pan with oil once it becomes hot add in Cumin seeds ,Urad Dal and Fennel seeds. Let them splutter. Next add then add crushed Ginger and Curry Leaves.
    • Next add chopped onion and sauté till they becomes transparent.
    • Now add the grated beetroot. Saute for 2 mins. To this add Chili powder, Turmeric powder and Salt. Mix well.
    • Saute for 5 mins until the moisture goes and then switch off the flame and let it cool down.
    • Transfer the grated beetroot to a plate. Now add the powdered gram Dal.
    • Combine everything together and Shape them into evenly sized firm balls.

    Stove Top

    • You can either deep fry or fry them in appe pan. Add oil and let it heat. Once hot add the shaped beetroot balls.
    • Flip and cook on both sides until crisp. Remove from the pan and drain in paper towels.

    Air Fryer.

    • Preheat the air fryer at 200 Deg C / 400 F for 5 mins. Arrange the shaped kola balls in air fryer basket. Brush or spray oil
    • Air fry at 180 C / 356 F for 12 mins. Open the air fryer half way and shake the basket.
    • Delicious Air fryer beetroot kola urundai is now ready.
    • Heat oil in a pad for deep frying in a medium heat fry the prepared balls until golden brown.
    • Drain them in paper towels to absorb the excess oil and serve hot.

    Notes

    •  Make sure there is no moisture in the prepared beetroot balls otherwise it will absorb more oil while deep frying.
    •  Make it into small lemon shaped balls for even frying.
    •  Tastes good with any spicy gravy and Steamed Rice.
    •  You can also prepare the balls and freeze them and deep while just before eating.

    Nutrition

    Calories: 67kcal | Carbohydrates: 0.9g | Protein: 0.3g | Fat: 6.1g | Saturated Fat: 3.8g | Sodium: 329mg | Potassium: 10mg | Fiber: 0.2g | Sugar: 0.8g | Calcium: 4mg
    Tried this recipe?Mention @happietrio or tag #happietrio
    Subscribe to my Channelclick for more videos

    Avicha meen KanyaKumari Style (Zero Oil Fish Kuzhambu)

    July 7, 2017 By Sharmila Kingsly Leave a Comment

    Nagercoil Fish Curry

    Avicha Meen | Kanyakumari Style Avicha meen | Easy Zero Oil Fish Kuzhambu recipe with step by step pictures. Avicha Meen literally translates to boiled Fish and yes it is actually boiling or cooking Fish by adding a few spices and coconut. It is one of the signature dishes in the Kanyakumari district which is located in South Tamil Nadu. Avicha Meen , Verum Curry is one of the most heard phrases in their households as both the dishes come very handy we just need to add all the ingredients mix and cook till it is done. Kanyakumari district is very famous for its greenery similar to Kerala it has so many Coconut trees and hence the cooking here has an influence the same as Kerala. We use coconut in most of the dishes and hence the taste is so authentic. Also the place it surrounded be coastal areas and hence we get fresh fish in abundance, so fish is almost used in cooking daily J So now let’s learn how to prepare Kanyakumari style avich meen .

     
        Step by step Method with pictures:     
     
    1.     In the cooking vessel add in the cleaned fish Cut Raw Mango pieces and Drumstick. Soak the tamarind in water and extract the tamarind juice, add this tamarind water to the fish.
    step 1 how to prepare avicha meen
    2.     Add Red chilli powder, Coriander powder, Turmeric powder and Salt.
    step 2 how to prepare avicha meen
    3.     Add in the ingredients mentioned in to the To Grind Section to a blender along with little water and blend well to form a fine paste.
    step 3 how to prepare avicha meen
    4.     Add in the coconut paste to the fish and mix well with hand and check for salt and spice. Now put this in the stove and cook for 10 mins or till the fish is cooked. Switch off the flame and serve with Steamed rice and Verum Kuzhambu.
    step 4 how to prepare avicha meen
    Serve Yummy avicha meen with Steamed rice and verum Kuzhambu.
     

    📖 Recipe

    Nagercoil Fish Curry
    Print Recipe Pin Recipe
    5 from 1 vote

    KanyaKumari Style Avicha meen (Easy Zero Oil Fish Kuzhambu)

    Avicha Meen literally translates to boiled Fish and yes it is actually boiling or cooking Fish by adding few spices and coconut. It is one of the signature dishes in Kanyakumari district which is located in South Tamil Nadu.
    Prep Time10 minutes mins
    Cook Time15 minutes mins
    Total Time25 minutes mins
    Course: Kuzhambu
    Cuisine: TamilNadu
    Servings: 4
    Calories: 104kcal
    Author: Sharmila Kingsly
    Prevent your screen from going dark

    Standard 1 cup measures 240 ml

    Ingredients

    • ½ kg Fish
    • 1 cup Raw Mango
    • 1 Drum Stick
    • ½ tsp Turmeric powder
    • Salt as needed
    • 1 tbsp Red Chilli powder
    • 1.5 tbsp Coriander powder
    • Tamarind small lemon sized ball

    To Grind

    • ½ cup Grated Coconut
    • 4 Shallots
    • 1 tsp Cumin Seeds
    • 1 sprig Curry Leaves

    Instructions 

    • In the cooking vessel add in the cleaned fish Cut Raw Mango pieces and Drumstick. Soak the tamarind in water and extract the tamarind juice, add this tamarind water to the fish.
    • Add Red chilli powder, Coriander powder, Turmeric powder and Salt.
    • Add in the ingredients mentioned in to the To Grind Section to a blender along with little water and blend well to form a fine paste.
    • Add in the coconut paste to the fish and mix well with hand and check for salt and spice. Now put this in the stove and cook for 10 mins or till the fish is cooked. Switch off the flame and serve with Steamed rice and Verum Kuzhambu

    Video

    Notes

    • Avich meen is usually very thick in its consistency so adjust the water level accordingly.
    •  Any kind of fish can be used to prepare this.
    •  Use freshly grated coconut for better taste.
    •  You can skip Mango and Drumstick if you don’t prefer.
    •  If using Mango adjust the level of tamarind water added.

    Nutrition

    Calories: 104kcal | Carbohydrates: 6.7g | Protein: 9.5g | Fat: 4.7g | Saturated Fat: 3.3g | Cholesterol: 2mg | Sodium: 147mg | Potassium: 230mg | Fiber: 0.2g | Sugar: 3.6g | Calcium: 33mg | Iron: 3mg
    Tried this recipe?Mention @happietrio or tag #happietrio
    Subscribe to my Channelclick for more videos

    Verum Curry (Verum Kuzhambu )

    July 2, 2017 By Sharmila Kingsly 2 Comments

    Verum Kuzhambu Recipe | Verum Curry Recipe |Thenga aracha Kuzhambu Recipe
     
    Verum Kuzhambu Recipe


    Verum Curry  | Verum Kuzhambu | Thenga aracha Kuzhambu | freshly ground Coconut Kuzhambu with step by step pictures. Verum Curry is one of my favourite curry since childhood. It is so simple to prepare but tastes divine. If you love coconut based Kuzhambu then you definitely got to try this easy and delicious Kuzhambu.

    Verum Kuzhambu is very famous in Kanyakumari District, it is in the south most part of Tamil Nadu .Myself being from Nagercoil, and I am no exception I just love to have to this anytime. Verum Kuzhambu is usually paired with Avicha Meen (Sautéed Fish).It is another signature Fish Curry in Kanyakumari district. I will be sharing the recipe soon.
    Back in my native we get plenty of fresh fish in abundance and hence they usually prepare verum Curry and avicha meen almost every alternate days. Even Fish Fry goes very well with Verum Kuzhambu.

    Similar Recipes:

    • Parupu  Curry/Dal Curry
    Verum Kuzhambu Recipe
         Step by step Method with pictures:     
    1.     Take the ingredients mentioned under To Grind Section in a blender add in little water and blend everything to form a fine paste. Soak Tamarind in Water and extract juice out of it. Take a kadai and add in the ground coconut paste.

    2.     Along with the coconut add in Turmeric powder, Chilli powder, Salt and the extracted Tamarind Water.


     3.     Mix everything together now switch on the stove and cook till everything comes to a boil in a medium flame and then switch off. Don’t allow it to boil.


     4.     Now take another pan and add in oil once it becomes hot add in the Mustard Seeds, Fenugreek Seeds, Curry Leaves and finely chopped Shallots cook till it becomes golden brown. Now add this over the kuzhambu and mix well. Serve Verum Kuzhambu with Steamed Rice and Fish.

     
    Serve Verum Kuzhambu with Steamed Rice and Fish
    Verum Kuzhambu Recipe


    📖 Recipe

    Verum Kuzhambu Recipe | Verum Curry Recipe |Thenga aracha Kuzhambu Recipe
    Print Recipe Pin Recipe
    5 from 3 votes

    Verum Curry (Verum Kuzhambu )

    Verum Kuzhambu is very famous in Kanyakumari District, it is in the south most part of Tamil Nadu .It is so simple to prepare but tastes divine. If you love coconut based Kuzhambu then you definitely got to try this easy and delicious Kuzhambu.
    Prep Time10 minutes mins
    Cook Time8 minutes mins
    Total Time18 minutes mins
    Course: Kuzhambu
    Cuisine: TamilNadu
    Servings: 4
    Calories: 69kcal
    Author: Sharmila Kingsly
    Prevent your screen from going dark

    Standard 1 cup measures 240 ml

    Ingredients

    To Grind

    • ½ cup Coconut
    • 1 tsp Cumin Seeds
    • 1 sprig Curry Leaves
    • 3 Shallots

    To Temper

    • 2 tsp Oil
    • 1 tsp Mustard Seeds
    • 3 Shallots /Small Onions finely chopped
    • ½ tsp Fenugreek Seeds
    • 1 sprig Curry Leaves

    Other Ingredients

    • ½ tsp Turmeric powder
    • 2 tsp Chilli powder
    • Salt as needed
    • Tamarind small lemon sized small lemon sized
    • Water as needed

    Instructions 

    • Take the ingredients mentioned under To Grind Section in a blender add in little water and blend everything to form a fine paste. Soak Tamarind in Water and extract juice out of it. Take a kadai and add in the ground coconut paste.
    • Along with the coconut add in Turmeric powder, Chilli powder, Salt and the extracted Tamarind Water.
    • Mix everything together now switch on the stove and cook till everything comes to a boil in a medium flame and then switch off. Don’t allow it to boil.
    • Now take another pan and add in oil once it becomes hot add in the Mustard Seeds, Fenugreek Seeds, Curry Leaves and finely chopped Shallots cook till it becomes golden brown. Now add this over the kuzhambu and mix well. Serve Verum Kuzhambu with Steamed Rice and Fish.

    Notes

    • Verum Kuzhambu tastes best with steamed rice and Sauted Fish (Avicha meen ,Will share the recipe tomorrow)
    •  Using coconut oil give a nice aroma to the Kuzham
    •     The Kuzhambu is usually watery in consistemcy so adjust and add the water accordingly.

    Nutrition

    Calories: 69kcal | Carbohydrates: 4.3g | Protein: 1g | Fat: 5.7g | Saturated Fat: 3.2g | Sodium: 4mg | Potassium: 71mg | Fiber: 2g | Sugar: 1.2g | Calcium: 11mg | Iron: 2mg
    Tried this recipe?Mention @happietrio or tag #happietrio
    Subscribe to my Channelclick for more videos
    • « Previous Page
    • 1
    • …
    • 51
    • 52
    • 53
    • 54
    • 55
    • …
    • 67
    • Next Page »
    Sharmila Kingsly

    Hi, I'm Joshie!

    Food Blogger, Biryani Lover , Software Engineer .. In no particular order.I love to cook and that is why I am here!! Welcome to my space!!. 

    Read more about me!

    • Instagram
    • Facebook
    • YouTube
    • Pinterest
    • X

    Vegan Recipes

    • Masala Paratha
      Masala Paratha
    • Tomato basil pasta
      Tomato Basil Pasta
    • Chickpea Spinach Curry
      Chickpea Spinach Curry
    • Vegan Chickpea Soup
      Vegan Chickpea Soup
    • Instant Pot Pumpkin Pasta
      Instant Pot Pumpkin Pasta
    • Basil Fried Rice
      Thai Basil Fried Rice

    Popular Posts

    • Nandu Rasam
      Nandu Rasam
    • Indian Dinner Party Menu Ideas, Sample Menus + Recipes
    • Nandu Kulambu
      Nandu Kuzhambu |Crab Curry |Nandu Kulambu
    • Instant Pot Peas Curry
      Instant Pot Peas Curry | Green Peas Curry
    • Payaru Kanji
      Payaru Kanji | Green Gram Porridge
    • Mushroom Egg Bhurji
      Mushroom Egg Burji

    Footer

    ↑ back to top

    As an Amazon Associate I earn from qualifying purchases.

    Copyright ©  2025 COOK WITH SHARMILA

    Rate This Recipe

    Your vote:


    A rating is required
    A name is required
    An email is required