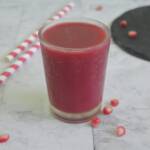
Cook with Sharmila

  • Home
  • About Me
    • Video Recipes
    • Media Mentions
    • Privacy Policy
  • Recipe Index
    • Recipes
  • Nanjilnad Recipes
  • Shop
menu icon
go to homepage
  • Home
  • Recipe Index
  • Air Fryer
  • About Me
  • Subscribe
    • Facebook
    • Instagram
    • Pinterest
    • Twitter
    • YouTube
  • subscribe
    search icon
    Homepage link
    • Home
    • Recipe Index
    • Air Fryer
    • About Me
    • Subscribe
    • Facebook
    • Instagram
    • Pinterest
    • Twitter
    • YouTube
  • ×
    Home » Recipe Index

    Ragi Flakes Granola (Ragi Muesli)

    May 8, 2020 By Sharmila Kingsly Leave a Comment

    Ragi Granola | FingerMillet Granola
    Ragi Flakes Granola Recipe | Finger Millet Granola Recipe | Ragi Muesli Recipe
    Ragi Flakes Granola Recipe | Finger Millet Granola Recipe | Ragi Muesli Recipe with step by step pictures and a video. Making Granola / Muesli is always fun.We can mix and match and add all our favourite ingredients and the granola is ready. Granola is really not pocket friendly when bought in shops. For a small amount we need to pay large bucks. So I never buy outside. I easily make some batched in home every weekend. It is one of my favourite guilt free snack.
     
    I also have a regular Granola with Rolled Oats recipe posted in blog already. I also have a stove top version of Granola coming soon in blog. Ragi flakes can be easily sourced from any organic shops. Also fakes comes in all the millets. Now lets see how to prepare Ragi Granola.
    Ragi Flakes Granola Recipe | Finger Millet Granola Recipe | Ragi Muesli Recipe
    This is how Ragi flakes looks and it is easily available in all the organic stores.
    Ragi Flakes Granola Recipe | Finger Millet Granola Recipe | Ragi Muesli Recipe
    Similar Recipes
    Granola Recipe
    Almond Butter Granola Bars
     
     
    Ragi Flakes Granola Recipe | Finger Millet Granola Recipe | Ragi Muesli Recipe
    Step by Step Method with Pictures : 
    1.    Heat a pan with 1 tsp of coconut oil, once its hot add in the ragi flakes. Saute in a low flame until it is crisp. It may take around 2-3 mins. If you touch and break the flakes you may feel the crunch. Switch off at this stage.

     2.    Transfer it to a plate, spread out and Allow it to cool down.

     3.    Next in the same pan add in the Almonds saute in a medium flame for 5 mins. And then add in the Pumpkin Seeds and Chia seeds, Roast for another 3 mins.

     4.    Transfer them to the same plate along with the Ragi Flakes. Mix well. To this add in the Dried Figs, Silvered pistachios and the dried cranberries. Mix well.

     6.    Finally add in the country sugar Mix well and the ragi flakes granola are now ready to be served.

    Healthy and delicious granola flakes is now ready to serve.
    Ragi Flakes Granola Recipe | Finger Millet Granola Recipe | Ragi Muesli Recipe

    ★ Did you enjoy this recipe? If you happen to try it out, I would love to hear from you! I’d appreciate it if you could rate and leave a review below in the comments. Your reviews help others know the recipe better too. Thanks for your time . You can also follow me on Facebook, Pinterest, Instagram, Youtube and Twitter for more updates

    📖 Recipe

    Ragi Granola | FingerMillet Granola
    Print Recipe Pin Recipe
    5 from 2 votes

    Ragi Flakes Granola

    Ragi Granola is a healthy granola recipe made with ragi flakes. It is so easy to make in home.
    Prep Time10 minutes mins
    Cook Time10 minutes mins
    Total Time20 minutes mins
    Course: Breakfast
    Cuisine: International
    Servings: 5
    Calories: 157kcal
    Author: Sharmila Kingsly
    Prevent your screen from going dark

    Standard 1 cup measures 240 ml

    Ingredients

    • 1 tsp Coconut oil
    • 1.5 cups Ragi Flakes
    • ¼ cup Almonds / Badam
    • ¼ cup Pumpkin Seeds
    • ¼ cup Chia Seeds
    • 3 tbsp Dried Figs
    • 2 tbsp pistachios Silvered
    • ¼ cup Cranberry Dried
    • 3 tbsp Country Sugar

    Instructions 

    • Heat a pan with 1 tsp of coconut oil, once its hot add in the ragi flakes. Saute in a low flame until it is crisp. It may take around 2-3 mins. If you touch and break the flakes you may feel the crunch. Switch off at this stage
    • Transfer it to a plate, spread out and Allow it to cool down.
    • Next in the same pan add in the Almonds saute in a medium flame for 5 mins. And then add in the Pumpkin Seeds and Chia seeds, Roast for another 3 mins.
    • Transfer them to the same plate along with the Ragi Flakes. Mix well.
    • To this add in the Dried Figs, Silvered pistachios and the dried cranberries. Mix well.
    • Finally add in the country sugar Mix well and the ragi flakes granola are now ready to be served.

    Video

    Notes

    • Store in an airtight container. Keeps good for a month.
    • Add any nuts and dry fruits based on your preference and availability to the ragi flakes.
    • You can also use any sweeteners of your choice.
    • Can be served as a breakfast along with any smoothie .
    • Makes a healthy snack as well.

    Nutrition

    Calories: 157kcal | Carbohydrates: 16.1g | Protein: 4.2g | Fat: 7.7g | Saturated Fat: 1.6g | Sodium: 5mg | Potassium: 130mg | Fiber: 3.2g | Sugar: 3.9g | Calcium: 51mg | Iron: 2mg
    Tried this recipe?Mention @happietrio or tag #happietrio
    Subscribe to my Channelclick for more videos

    Pigeon Peas Pulao

    April 15, 2020 By Sharmila Kingsly Leave a Comment

    Pigeon Peas Pulao Recipe | Fresh Tuvar Pulao | Tuvar Lilva Pulao
    Pigeon Peas Pulao Recipe | Fresh Tuvar Pulao | Tuvar Lilva Pulao

    Pigeon Peas Pulao Recipe | Fresh Tuvar Pulao | Tuvar Lilva Pulao with step by step pictures. Fresh Pigeon peas is a seasonal produce. It is available only during the winters. Pigeon peas are very good source of dietary fibres. It can be cooked similar to the regular green peas and when in season we definitely can replace green peas with pigeon peas.

    It tastes good in kurma, paratha,pulao, and many more. I usually stock it up during the winter and use it for quite some time. Only a time-consuming job is the de-shelling process, but it is definitely worth it. Now let's see how to prepare pigeon peas pulao.

    Checkout the other Lunch Box Recipes as well from the website.

    Pigeon Peas Pulao Recipe | Fresh Tuvar Pulao | Tuvar Lilva Pulao

    How to Prepare Pigeon Peas Pulao

    1.        Wash the Basmati Rice and Soak in water for 30 mins. Heat a pan with oil or ghee, once its hot add in the fennel seeds ,Cardamom pods,Cinnamom Stick, Star Anise, Maarti Mooku, Stone flower and cashew nuts let it splutter and the cashew nuts turn slightly golden.

    2.        Next add in the ginger garlic paste and saute till the raw smell leaves. Meanwhile grind the mint leaves, Coriander leaves, Green Chilli and cashew nuts to a fine paste by adding little water and set it aside.

    3.        Next add in the onions, Saute till the onions turn glossy.

    4.        Next add in the ground mint coriander cashew nuts puree. Mix well and cook till the raw smell leave

    5.        Now add in the Pigeon Peas. Saute for 2 mins.

    6.        Next add in the Garam Masala, Turmeric powder and Required salt mix well and cook till the masala blends well. Now add in the soaked basmati Rice. Mix well and roast for a minute.

    7.        Now add in the measured 1 ½ cups of water and mix well. Check for salt and add if necessary, Next add in the Curd and lemon juice.

    8.        Close the cooker and cook in a high flame and wait till the pressure comes out vigorously and then put on the whistle and cook for 3 mins and switch off the flame. Wait till the pressure subsides on its own and then open the cooker. Carefully fluff the rice without breaking. Serve hot

    Pigeon Peas Pulao Recipe | Fresh Tuvar Pulao | Tuvar Lilva Pulao

    ★ Did you enjoy this recipe? If you happen to try it out, I would love to hear from you! I’d appreciate it if you could rate and leave a review below in the comments. Your reviews help others know the recipe better too. Thanks for your time . You can also follow me on Facebook, Pinterest, Instagram, Youtube and Twitter for more updates

    📖 Recipe

    Pigeon Peas Pulao Recipe | Fresh Tuvar Pulao | Tuvar Lilva Pulao
    Print Recipe Pin Recipe
    5 from 1 vote

    Pigeon Peas Pulao

    Fresh Pigeon peas is a seasonal produce. It is available only during the winters. Pigeon peas are very good source of dietary fibres.
    Prep Time10 minutes mins
    Cook Time20 minutes mins
    Total Time30 minutes mins
    Course: Main Course
    Cuisine: Indian
    Servings: 2
    Calories: 382kcal
    Author: Sharmila Kingsly
    Prevent your screen from going dark

    Standard 1 cup measures 240 ml

    Ingredients

    • 1 tbsp Oil / Ghee
    • 1 tsp Fennel seeds
    • 1 inch Cinnamon Stick
    • 2 Cardamom pods
    • 1 Star Anise
    • 1 Marati Mooku
    • Kal paasi / Stone flower a small piece
    • 8 Cashew nuts
    • 2 Onion
    • 1 tbsp Ginger garlic paste
    • 1 cup Pigeon Peas
    • ½ tsp Garam Masala
    • ½ tsp Fennel seeds powder
    • ½ tsp Turmeric powder
    • 2 tbsp Curd
    • Salt as needed
    • 1 cup Basmati Rice
    • 1¼ cup Water
    • 1 tsp Lemon Juice

    To grind:

    • ¼ cup Coriander leaves
    • ¼ cup Mint
    • 10 Cashew nuts
    • 3 Green Chilli

    Instructions 

    • Wash the Basmati Rice and Soak in water for 30 mins. Heat a pan with oil or ghee, once its hot add in the fennel seeds ,Cardamom pods,Cinnamom Stick, Star Anise, Maarti Mooku, Stone flower and cashew nuts let it splutter and the cashew nuts turn slightly golden.
    • Next add in the ginger garlic paste and saute till the raw smell leaves. Meanwhile grind the mint leaves, Coriander leaves, Green Chilli and cashew nuts to a fine paste by adding little water and set it aside.
    • Next add in the onions, Saute till the onions turn glossy.
    • Next add in the ground mint coriander cashew nuts puree. Mix well and cook till the raw smell leaves.
    • Now add in the Pigeon Peas. Saute for 2 mins.
    • Next add in the Garam Masala, Turmeric powder and Required salt mix well and cook till the masala blends well. Now add in the soaked basmati Rice. Mix well and roast for a minute.
    • Now add in the measured 1 ½ cups of water and mix well. Check for salt and add if necessary, Next add in the Curd and lemon juice.
    • Close the cooker and cook in a high flame and wait till the pressure comes out vigorously and then put on the whistle and cook for 3 mins and switch off the flame. Wait till the pressure subsides on its own and then open the cooker. Carefully fluff the rice without breaking. Serve hot

    Notes

    • Serve with chicken fry and Raita.
    • Can be made quickly in 20 mins.
    • I used fresh pigeon peas it is seasonal and available only during the winter season.
    • As I used fresh pigeon peas. No pre-soaking was needed.

    Nutrition

    Calories: 382kcal | Carbohydrates: 71.1g | Protein: 10.5g | Fat: 6g | Saturated Fat: 3.5g | Cholesterol: 15mg | Sodium: 55mg | Potassium: 467mg | Fiber: 7g | Sugar: 3.3g | Calcium: 95mg | Iron: 2mg
    Tried this recipe?Mention @happietrio or tag #happietrio
    Subscribe to my Channelclick for more videos

    Palak Soup Recipe| Spinach Soup Recipe

    April 7, 2020 By Sharmila Kingsly Leave a Comment

    PAlak Soup

    Palak Soup with breadsticks makes a whole meal. Palak is one healthy spinach variety. It is filled with nutrients and perfect for a meal.

    Palak Soup Recipe  | Spinach Soup Recipe | How to make Palak Soup

    Palak Soup Recipe | Spinach Soup Recipe | How to make Palak Soup with step by step pictures. Palak is one healthy spinach variety. It is rich in nutrients. Many of us dislike spinach but when made as a soup it tastes really delicious.

    Palak ka soup has a really pleasant color and makes it more appealing. So treat your family with some yummy palak Soup and Garlic bread. Makes a perfect meal.

    Palak Soup Recipe  | Spinach Soup Recipe | How to make Palak Soup

    How to make Palak Soup

     
    1.Heat a pan with butter, once it melts add in the sliced garlic pods and crushed ginger. Sauté for a min in low flame.
    Palak Soup Recipe  | Spinach Soup Recipe | How to make Palak Soup

    2.Next add in the Bay leaf saute for few secs and then add in a cup of sliced onions. Sauté till it turns glossy.

    Palak Soup Recipe  | Spinach Soup Recipe | How to make Palak Soup

    3.Next add in a cup of chopped tightly packed palak leaves. Saute in medium flame. It will shrink.

    Palak Soup Recipe  | Spinach Soup Recipe | How to make Palak Soup

    4.Once it shrinks and completely cooked switch off the flame and allow it to cool down. Remove the bay leaf and then transfer the contents to a blender.Add half cup of water 

    Palak Soup Recipe  | Spinach Soup Recipe | How to make Palak Soup

    5.Blend it into a fine puree. Now transfer the blended palak back to the pan and start cooking.Add ½  a cup of water more. Cook in a medium flame.Add in the required salt

    Palak Soup Recipe  | Spinach Soup Recipe | How to make Palak Soup

    6.Add in the pepper powder. Cook for 2 mins.Next add in ¾ cup of milk. Check for salt add more if required and cook till it comes to a boil and then switch off the flame.

    Palak Soup Recipe  | Spinach Soup Recipe | How to make Palak Soup

    Yummy Palak soup is now ready to serve.

    Palak Soup Recipe  | Spinach Soup Recipe | How to make Palak Soup
    Click here for more Soup recipes.
    Palak Soup Recipe  | Spinach Soup Recipe | How to make Palak Soup

    ★ Did you enjoy this recipe? If you happen to try it out, I would love to hear from you! I’d appreciate it if you could rate and leave a review below in the comments. Your reviews help others know the recipe better too. Thanks for your time . You can also follow me on Facebook, Pinterest, Instagram, Youtube and Twitter for more updates

    📖 Recipe

    PAlak Soup
    Print Recipe Pin Recipe
    5 from 3 votes

    Palak Soup | Spinach Soup

    Palak Soup with bread sticks makes a whole meal. Palak is one healthy spinach variety. It is filled with nutrients and perfect for a meal.
    Prep Time10 minutes mins
    Cook Time20 minutes mins
    Total Time30 minutes mins
    Course: Soup
    Cuisine: Indian
    Servings: 2
    Calories: 125kcal
    Author: Sharmila Kingsly
    Prevent your screen from going dark

    Standard 1 cup measures 240 ml

    Ingredients

    • 1 tbsp Butter
    • 1 tsp Ginger
    • 4 Garlic pods
    • 1 Bay leaf
    • 1 Onion
    • 1 cup Palak chopped and tightly packed
    • 1 cup Water
    • Salt as needed
    • ½ tsp Pepper Powder
    • ¾ cup Milk
    • 1 tbsp Fresh cream optional

    Instructions 

    • Heat a pan with butter, once it melts add in the sliced garlic pods and crushed ginger. Sauté for a min in low flame.
    • Next add in the Bay leaf saute for few secs and then add in a cup of sliced onions. Sauté till it turns glossy.
    • Next add in a cup of chopped tightly packed palak leaves. Saute in medium flame. It will shrink.
    • Once it shrinks and completely cooked switch off the flame and allow it to cool down. Remove the bay leaf and then transfer the contents to a blender.
    • Add half cup of water and blend it into a fine puree. Now transfer the blnder palak back to the pan and start cooking.
    • Add ½ a cup of water more. Cook in a medium flame.
    • Add in the required salt and pepper powder. Cook for 2 mins.
    • Next add in ¾ cup of milk. Check for salt add more if required and cook till it comes to a boil and then switch off the flame.
    • Add 1 tbsp of fresh cream if you prefer and serve.

    Video

    Notes

    · Serve with garlic bread or toasted bread.
    · Garnish with a tbsp of fresh cream to make it more rice.
    · Makes a complete meal when served with bread.

    Nutrition

    Calories: 125kcal | Carbohydrates: 10.8g | Protein: 4.2g | Fat: 7.8g | Saturated Fat: 4.8g | Cholesterol: 23mg | Sodium: 179mg | Potassium: 232mg | Fiber: 1.6g | Sugar: 6.5g | Calcium: 143mg | Iron: 1mg
    Tried this recipe?Mention @happietrio or tag #happietrio
    Subscribe to my Channelclick for more videos

    Disclaimer: I am not a nutritionist, the nutrition value provided here is an estimate. It will vary based on the quantity and brands of the products used.

    Sweet Corn Raw Mango Salad |Sweet Corn Salad

    March 31, 2020 By Sharmila Kingsly Leave a Comment

    Sweet Corn Mango Salad

    Sweet Corn Raw Mango Salad | Sweet Corn Salad  with step by step pictures. Sweet corn along with raw mango, Cucumber makes a yummy combo. The sourness from the mangoes are perfectly balanced by the sweet corn and cucumber.

    Salad

    If you have some boiled sweet corn ready you can prepare the salad in no time. Just that do serve the salad immediately after preparing. Feel free to add the ingredients as you wish.

    Topping it with some toasted sesame seeds and peanuts gives a nice crunch. Also, you can also add some pumpkin seeds, Cucumber seeds many more.

    I try to add different combinations of ingredients as per the availability and it turns out to be great every single time. Now let's see how to prepare Sweet corn Salad.

    Sweet Corn Salad | Sweet Corn Raw Mango Salad

    How to Prepare Sweet corn Salad, Pictorial

    1.        In a mixing bowl add in the Sweet corn, add in a tsp of butter and mix well This is optional but it gives a nice taste to the sweet corn. Next, add in finely chopped onion and tomato.

    2.        Next add in Raw mango and cucumber, chop them into small cubes. Give everything a good mix. Now add in the finely chopped coriander leaves.

    3.        Required Salt, Pepper and Lemon Juice. 

    4.Mix everything together and serve immediately.

    Serve as a meal for weight watchers.

    Sweet Corn Salad | Sweet Corn Raw Mango Salad

    Similar Recipes:

    • Mushroom Chickpea Salad
      Mushroom Chickpea Salad
    • Black Bean and Corn Salad
    • Tandoori Chicken Salad
    • Arugula Strawberry salad
      Arugula Strawberry Salad | Strawberry rocket salad

    ★ Did you enjoy this recipe? If you happen to try it out, I would love to hear from you! I’d appreciate it if you could rate and leave a review below in the comments. Your reviews help others know the recipe better too. Thanks for your time ? 

    You can also follow me on Facebook, Pinterest, Instagram, Youtube and Twitter for more updates

    📖 Recipe

    Sweet Corn Mango Salad
    Print Recipe Pin Recipe
    5 from 1 vote

    Sweet Corn Salad | Sweet Corn Raw Mango Salad

    Sweet Corn Raw Mango Salad. Sweet corn along with raw mango, Cucumber makes a yummy combo. It makes a perfect meal salad.
    Prep Time10 minutes mins
    Cook Time0 minutes mins
    Total Time10 minutes mins
    Course: Salad
    Cuisine: Indian
    Servings: 2
    Calories: 84kcal
    Author: Sharmila Kingsly
    Prevent your screen from going dark

    Standard 1 cup measures 240 ml

    Ingredients

    • 1 cup Sweet Corn
    • ½ cup Raw Mango grated
    • 1 cup Cucumber
    • ¼ cup Onion finely chopped
    • ¼ cup Tomato finely chopped
    • 1 tsp Butter optional, or use Vegan Butter
    • 1 tbsp Cilantro
    • Salt as needed
    • ¼ tsp Pepper
    • ½ tsp Lemon juice

    Instructions 

    • In a mixing bowl add in the Sweet corn, add in a tsp of butter and mix well This is optional but it gives a nice taste to the sweet corn
    • Next add in finely chopped onion and tomato.
    • Next add in Raw mango and cucumber, chop them into small cubes.
    • Give everything a good mix. Now add in the finely chopped coriander leaves.
    • Required Salt, Pepper and Lemon Juice. Mix everything together and serve immediately.

    Video

    Notes

    · If you are not serving immediately. Add the lemon juice before you serve.
    · You can also add in a tbsp of crushed peanuts for the crunch.
    · Makes a wholemeal. If you are on a diet it can be served for dinner.

    Nutrition

    Calories: 84kcal | Carbohydrates: 16.7g | Protein: 2.4g | Fat: 2.1g | Saturated Fat: 1g | Cholesterol: 3mg | Sodium: 19mg | Potassium: 291mg | Fiber: 2.5g | Sugar: 6.8g | Calcium: 14mg | Iron: 2mg
    Tried this recipe?Mention @happietrio or tag #happietrio
    Subscribe to my Channelclick for more videos

    Disclaimer: I am not a nutritionist, the nutrition value provided here is an estimate. It will vary based on the quantity and brands of the products used.

    Paneer Fried Rice

    March 28, 2020 By Sharmila Kingsly Leave a Comment

    Paneer Fried Rice

    Paneer Fried Rice is an Indo-Chinese restaurant style main course. It is prepared with cooked basmati rice, sauces, paneer, and a few vegetables.

    Paneer Fried Rice Recipe | How to make Paneer Fried Rice

    Paneer Fried Rice Recipe | How to make Paneer Fried Rice with step by step pictures. Fried Rice is always a good and complete meal. It goes well for any meal of the day. It can be made with any veggies or meat. I have already shared Chicken Fried Rice, Egg Fried Rice, and Vegetable Fried Rice recipes in blog.

    Paneer Fried Rice
     
    Recipe Cuisine: Indo Chinese | Recipe Category: Main Course
    Prep Time: 10 mins | Cook Time: 10 mins  | Serves: 2 | Author: Sharmila Kingsly
    Ingredients:

    Cooked Basmati Rice – 1 cup

    Onion – 1

    Garlic 5 pods
    Capsicum - ¼  cup chopped
    Carrot – 3 tbsp (optional)
    Beans – 3 tbsp (optional)
    Cabbage – 3 tbsp (optional)
    Sweet Corn – 2 tbsp (optional)
    Sugar – 1 tsp
    Salt as needed
    Soy Sauce – ½ tsp
    Green Chilli sauce – 1 tsp
    Pepper powder – 1 tbsp
    Spring onion – as needed
         Method: 
    1.    Chop the Paneer and crumble it or you can saute in a pan until light golden. Heat oil to this add in the finely chopped garlic pods and saute well. Next, add in the Chopped onions and cook for 2 mins in a high flame.
    2.  Add the chopped Bell Peppers/Capsicum and mix well. Then add in the chopped and other veggies if using. Cook for 5 mins. The veggies should have a crunch and hence no need to cook fully Then add in the Soy sauce and Green Chilli Sauce. Mix well so that everything mix evenly.
     3.    Next add in Sugar and Salt and mix well. Now add in the paneer
     4.    Now add in the cooked Rice and mix well. Toss in high for 2 mins.        Finally add in the pepper powder and give a good mix.  garnish with spring onions and switch off the flame.
          Notes:
    ·       Next miss to add Sugar as it helps to maintain the crunch and freshness of the veggies.
    ·       Always cook in a high flame while cooking fried rice.
    ·       Check here for how to cook rice perfectly for fried rice.
    ·       You can either crumble and use the paneer or saute until light golden cubes and then use.
    ·       You can skip the veggies if you don’t prefer them. However, it gives a nice volume to the fried rice.
     
         Step by Step Method with Pictures: 
    1.        Chop the Paneer and crumble it or you can saute in a pan until light golden. Heat oil to this add in the finely chopped garlic pods and saute well ,Next add in the Chopped onions and cook for 2 mins in a high flame.

    2.        Next add in the chopped Bell Peppers/Capsicum and mix well. Then add in the chopped and other veggies if using. Cook for 5 mins. The veggies should have a crunch and hence no need to cook fully Then add in the Soy sauce and Green Chilli Sauce. Mix well so that everything mix evenly.

     3.    Next add in Sugar and Salt and mix well. Now add in the paneer

    4.    Now add in the cooked Rice and mix well. Toss in high for 2 mins. Finally add in the pepper powder and give a good mix. Garnish with spring onions and switch off the flame.

    Yummy Fried Rice is now ready to serve.
     
    Paneer Fried Rice Recipe | How to make Paneer Fried Rice

    It goes well with any Chinese gravy or just tomato ketchup.

     
    Paneer Fried Rice Recipe | How to make Paneer Fried Rice

    Palak Methi Sweet Potato Paratha

    March 26, 2020 By Sharmila Kingsly Leave a Comment

    Palak Methi Sweet Potato Paratha
    Palak Methi Sweet Potato Paratha | Healthy Paratha
    Palak Methi SweetPotato Paratha with step by step pictures. Parathas are a lovely way to include more nutrients to a vegetable. We can add as many ingredients and stuff in to the parathas. I have used sweet potato ,palak and Methi in this paratha and my kids enjoyed it and I had the satisfaction of feeding the family more vegetables. Now lets see how to prepare this yummy paratha.
    Similar Paratha Recipe:
    Rajma Paratha
    Palak Methi Sweet Potato Paratha | Healthy Paratha
        Step by Step Method with Pictures: 
        1.    Heat a pan with water and blanch the palak for 3 mins. Switch off drain the excess water. Allow it to cool down and blend well to a fine puree.

     2.    Clean the Methi leaves. Cook the sweet potato in a cooker for 4 whistles. Wait till the pressure is released on it own and then peen the skin and mash well. In a bowl add in the mashed sweet potato , palak puree and add the methi leaves.

    3.    Mix well and then add in the wheat flour, Chilli powder.

    4.    Next add the Turmeric powder, Garam Masala  and Salt.

    5.    Sprinkle water little by little and knead it to a fine dough. Allow the sough to rest for 30 mins. Divide the dough into small balls of equal sizes. Flatten it to parathas with a rolling pin.

    6.    Heat a tawa with oil ,once hot add the paratha ,drizzle in ghee or oil and spread on the parathas.

    7.    Cook on both sides. Serve hot.

    I served it curd and kovakai Masala.
    Palak Methi Sweet Potato Paratha | Healthy Paratha

    📖 Recipe

    Palak Methi Sweet Potato Paratha
    Print Recipe Pin Recipe
    5 from 1 vote

    Palak Methi Sweet Potato Paratha

    Parathas are a lovely way to include more nutrients to a vegetable. We can add as many ingredients and stuff in to the parathas. I have used sweet potato ,palak and Methi in this paratha
    Prep Time30 minutes mins
    Cook Time2 minutes mins
    Total Time32 minutes mins
    Course: Breakfast
    Cuisine: Indian
    Servings: 12 paratha
    Calories: 119kcal
    Author: Sharmila Kingsly
    Prevent your screen from going dark

    Standard 1 cup measures 240 ml

    Ingredients

    • 1 cup Palak
    • 1 cup Methi leaves
    • 1 Sweet potato medium sized
    • 2 cups Atta / Wheat Flour
    • ½ tsp Chilli powder
    • ¼ tsp Turmeric powder
    • ½ tsp Garam Masala
    • Salt as needed
    • Water as needed
    • Oil or Ghee as needed

    Instructions 

    • Heat a pan with water and blanch the palak for 3 mins. Switch off drain the excess water. Allow it to cool down and blend well to a fine puree.
    • Clean the Methi leaves. Cook the sweet potato in a cooker for 4 whistles. Wait till the pressure is released on it own and then peen the skin and mash well. In a bowl add in the mashed sweet potato , palak puree and add the methi leaves.
    • Mix well and then add in the wheat flour, Chilli powder.
    • Next add the Turmeric powder, Garam Masala and Salt.
    • Sprinkle water little by little and knead it to a fine dough. Allow the sough to rest for 30 mins. Divide the dough into small balls of equal sizes. Flatten it to parathas with a rolling pin.
    • Heat a tawa with oil ,once hot add the paratha ,drizzle in ghee or oil and spread on the parathas.
    • Cook on both sides. Serve hot.

    Notes

    • Serve hot with curd and pickle.
    • You can also used finely chopped onions and coriander leaves for more flavour.
    • More variations can be made to the parathas.

    Nutrition

    Calories: 119kcal | Carbohydrates: 22.9g | Protein: 4.6g | Fat: 1.6g | Saturated Fat: 0.2g | Sodium: 18mg | Potassium: 174mg | Fiber: 4.6g | Sugar: 0.7g | Calcium: 21mg | Iron: 5mg
    Tried this recipe?Mention @happietrio or tag #happietrio
    Subscribe to my Channelclick for more videos

    Basundi ( No Condensed Milk Basundi )

    March 24, 2020 By Sharmila Kingsly Leave a Comment

    Basundi Recipe | How to prepare Basundi | No Condensed Milk Basundi
     
    Basundi Recie | How to prepare Basundi | No Condensed Milk Basundi with step by step pictures and video. Basundi is a creamy and rich milk-based dessert. It is made with milk, nuts, saffron. Just the few ingredients and we get the delicious basundi. It can be made for any festival occasions. Today being Ugadi / Teugu New Year I felt this is the right time to post this recipe. Happy Ugadi to everyone who is celebrating.
    My kids loved this version of Basundi and we enjoyed this is an after-meal dessert after our Sunday Lunch. No need to reduce the milk so much the reduced version is called Rabdi , it is usually slightly thin consistency than rabdi. Now let see how to prepare this delicious dessert.
    Similar Recipes
    Almond Milk
    Ice Apple Almond Milk
    Basundi Recie | How to prepare Basundi | No Condensed Milk Basundi
        Step by Step Method with Pictures:
        1.Heat milk in a sauce pan. Soak a generous pinch of saffron in t tbsp of milk and set aside. Keep the nuts ready.

    2.Bring the milk to a boil and then reduce the flame. Keep stirring continuously. Scrap the edges and keep cooking.

    3.Cook until the milk is slightly reduced, and the colour turns to a pal yellow. It may take upto 20 minutes in low flame. Meanwhile keep stirring and scrap the edges to avoid burning the bottom. However, the milk need not to be reduced to half. Now add in the sugar and keep cooking. Also add in the cardamom powder and mix well.

    4.Heat a pan with ghee and add in the nuts and roast until it is lightly roasted. I used cucumber seeds, Pumpkin seeds, sunflower seeds and crushed almonds. Use any nuts as per your preference. Add the roasted nuts to the basundi and mix well. Finally add in the saffron soaked milk. Cook for another 2 minutes and switch off.


    Creamy rich basundi is now ready to serve.

    creamy rich basundi

    Makes a lovely dessert for any occasion.

    📖 Recipe

    Basundi Recipe | How to prepare Basundi | No Condensed Milk Basundi
    Print Recipe Pin Recipe
    5 from 1 vote

    Basundi

     Basundi is a creamy and rich milk-based dessert. It is made with milk, nuts, saffron. Just the few ingredients and we get the delicious basundi.
    Prep Time10 minutes mins
    Cook Time30 minutes mins
    Total Time40 minutes mins
    Course: Dessert
    Cuisine: Indian
    Servings: 4
    Calories: 170kcal
    Author: Sharmila Kingsly
    Prevent your screen from going dark

    Standard 1 cup measures 240 ml

    Ingredients

    • 2 cup Full Fat Milk
    • ½ cup Sugar
    • ½ tsp Cardamom powder
    • 2 tsp Ghee
    • 3 tbsp Mixed nuts
    • Saffron a generous pinch

    Instructions 

    • Heat milk in a sauce pan. Soak a generous pinch of saffron in t tbsp of milk and set aside. Keep the nuts ready.
    • Bring the milk to a boil and then reduce the flame. Keep stirring continuously. Scrap the edges and keep cooking.
    • Cook until the milk is slightly reduced, and the colour turns to a pal yellow. It may take upto 20 minutes in low flame. Meanwhile keep stirring and scrap the edges to avoid burning the bottom. However, the milk need not to be reduced to half. Now add in the sugar and keep cooking. Also add in the cardamom powder and mix well.
    • Heat a pan with ghee and add in the nuts and roast until it is lightly roasted. I used cucumber seeds, Pumpkin seeds, sunflower seeds and crushed almonds. Use any nuts as per your preference. Add the roasted nuts to the basundi and mix well. Finally add in the saffron soaked milk. Cook for another 2 minutes and switch off.

    Video

    Notes

    • Serve hot or chilled ,it tastes good either way.
    • No need to reduce the milk too much.
    • Condensed milk is usually added for a creamier basundi ,but it tasted good the same way even without adding. Add if you prefer.
    • Add any nuts as you prefer.

    Nutrition

    Calories: 170kcal | Carbohydrates: 19.3g | Protein: 4.5g | Fat: 9.3g | Saturated Fat: 2.3g | Cholesterol: 8mg | Sodium: 11mg | Potassium: 22mg | Fiber: 0.3g | Sugar: 12.7g | Calcium: 125mg
    Tried this recipe?Mention @happietrio or tag #happietrio
    Subscribe to my Channelclick for more videos

    Foxtail Millet Idli Dosa

    March 20, 2020 By Sharmila Kingsly Leave a Comment

    Foxtail Millet Idli Dosa Recipe | Thinal Idi Dosa Recipe | Millet Recipes
    Foxtail Millet Idli Dosa

    Foxtail Millet Idli Dosa Recipe | Thinal Idi Dosa Recipe | Millet Recipes with step by step pictures and video. Millet recipes are getting very much popular these days. It is a healthy alternative to the regular rice. It has more nutrients and definitely we can cook instead rice.

    I have shared many millet recipes in blog already and today lets see a healthy Idli and dosa with Foxtail Millet. 

    Check out Bajra Dosa and Kodo Millet Dosa recipe too.

    Thinal Idi Dosa

    How to make Foxtail Millet Idli and Dosa

        1.    Wash the foxtail millet and Urad Dal and Soak them in separate bowls for 4 hours.

      2.    After soaking them, Grind the foxtail millet and Urad Dal separately. You can grind the soaked Fenugreek seeds along with the Urad Dal.

     3.    Transfer the soaked Urad dal and Fenugreek seeds in a blender and grind it to a fine paste. Transfer it to a bowl. Next in the same blender grind the soaked Foxtail Millet. Grind them without any grains. Transfer it to the Bowl with the Urad Dal batter.

      4.    Mix the batter well and all it to ferment for 8 hours or overnight. After fermenting mix well.

     5.    Just before cooking add Salt and mix well. For preparing Idli Add the required water to the batter and bring t to the idli batter consistency. Grease the idli plate with oil and then steam cook in a medium flame for 10 mins.

      6.    Allow it cool down a bit and then sprinkle little water and remove the idli.Serve hot.

     7.    For preparing the dosa, add water and adjust the batter to the desired consistency. Heat a dosa tawa once hot pour a ladle full of batter and evenly spread. Drizzle oil over the edges and cook.

      8.    Flip and cook the other side as well. Once its cooked remove from the tawa and serve hot.

    Serve hot.
    Foxtail Millet Idli Dosa Recipe | Thinal Idi Dosa Recipe | Millet Recipes
    I served Foxtail Millet with spicy khara chutney and Black Urad Dal Idli Podi.
    Foxtail Millet Idli Dosa Recipe | Thinal Idi Dosa Recipe | Millet Recipes

    📖 Recipe

    Foxtail Millet Idli Dosa Recipe | Thinal Idi Dosa Recipe | Millet Recipes
    Print Recipe Pin Recipe
    5 from 1 vote

    Foxtail Millet Idli Dosa

    Millet's are a healthy alternate to the regular rice. It has more nutrients and definitely we can cook instead rice.This recipe features a healthy millet Idli and Dosa.
    Prep Time20 minutes mins
    Cook Time10 minutes mins
    Resting Time8 hours hrs
    Total Time8 hours hrs 30 minutes mins
    Course: Breakfast
    Cuisine: Indian
    Servings: 30 servings
    Calories: 103kcal
    Author: Sharmila Kingsly
    Prevent your screen from going dark

    Standard 1 cup measures 240 ml

    Ingredients

    • 3 cup Foxtail Millet
    • 1 cup Urad Dal
    • ¼ tsp Methi/ Fenugreek Seeds
    • Oil as needed
    • Water as needed
    • Salt as needed

    Instructions 

    • Wash the foxtail millet and Urad Dal and Soak them in separate bowls for 4 hours.
    • After soaking them, Grind the foxtail millet and Urad Dal separately. You can grind the soaked Fenugreek seeds along with the Urad Dal.
    • Transfer the soaked Urad dal and Fenugreek seeds in a blender and grind it to a fine paste. Transfer it to a bowl. Next in the same blender grind the soaked Foxtail Millet. Grind them without any grains. Transfer it to the Bowl with the Urad Dal batter.
    • Mix the batter well and all it to ferment for 8 hours or overnight. After fermenting mix well.
    • Just before cooking add Salt and mix well. For preparing Idli Add the required water to the batter and bring t to the idli batter consistency. Grease the idli plate with oil and then steam cook in a medium flame for 10 mins.
    • Allow it cool down a bit and then sprinkle little water and remove the idli.Serve hot.
    • For preparing the dosa, add water and adjust the batter to the desired consistency. Heat a dosa tawa once hot pour a ladle full of batter and evenly spread. Drizzle oil over the edges and cook.
    • Flip and cook the other side as well. Once its cooked remove from the tawa and serve hot.

    Video

    Notes

    • Serve hot with chutney and sambar.
    • Don’t ferment it for more time, the batter might get soar.
    • If using for more days. Take the required portion of the batter and add required salt and water and use for preparing idli and dosa.
    • You can use up to ¾ cup of Urad Dal.

    Nutrition

    Calories: 103kcal | Carbohydrates: 18.9g | Protein: 4g | Fat: 1.1g | Saturated Fat: 0.2g | Sodium: 2mg | Potassium: 107mg | Fiber: 3.9g | Sugar: 0.1g | Calcium: 7mg | Iron: 1mg
    Tried this recipe?Mention @happietrio or tag #happietrio
    Subscribe to my Channelclick for more videos

    Vegan Avocado Milkshake

    March 12, 2020 By Sharmila Kingsly Leave a Comment

    Vegan Avocado Milk shake Recipe | Avocado Milkshake | Butterfruit Milkshake

    Vegan Avocado Milkshake is a delicious Vegan version Milkshake with avocado or butter fruit. It is so filling and healthy version

    Follow us on Pinterest for delicious pins. Join our Facebook group for more Instant Pot and Air Fryer recipes.

    Vegan Avocado Milk shake Recipe | Avocado Milkshake

    Avocado Milkshake Recipe | Vegan Avocado Milkshake with step by step pictures and video. Avocado is a heathy fruit, It is so creamy and rich in minerals. I have prepared a vegan version of the milkshake here, Now let's see how to prepare Avocado Milkshake.

    Vegan Avocado Milk shake Recipe | Avocado Milkshake

    How to make Avocado Milkshake

       1.    Cut open the avocado and scoop the pulp . Add the avocado pulp to a blender. Add in the Almond milk.

     2.    Next add in the coconut sugar and black raisins.

     3.    Next add in the cardamom pods and blend well until creamy.

    4.    Delicious Vegan Avocado Milkshake is now ready to be served.

    Vegan Avocado Milk shake Recipe | Avocado Milkshake

    Tips & Variations

    • You can replace the sugar with any vegan sweeteners like Maple sugar, or Stevia.
    • Serve Chilled.
    • You can also use normal milk, I used Almond Milk. For the Vegan version, any Nut Milk should be used,

    Similar Recipes

    • Strawberry Blueberry smoothie | Breakfast Smoothie

    ★ Did you enjoy this recipe? If you happen to try it out, I would love to hear from you! I’d appreciate it if you could rate and leave a review below in the comments. Your reviews help others know the recipe better too. Thanks for your time ? You can also follow me on Facebook, Pinterest, Instagram, Youtube and Twitter for more updates

    📖 Recipe

    Vegan Avocado Milk shake Recipe | Avocado Milkshake | Butterfruit Milkshake
    Print Recipe Pin Recipe
    5 from 1 vote

    Vegan Avocado Milk shake Recipe

    A delicious Vegan Milk shake with avocado or butter fruit. It is so filling and healthy version
    Prep Time10 minutes mins
    Total Time10 minutes mins
    Course: Drinks
    Cuisine: Indian
    Servings: 2
    Calories: 189kcal
    Author: Sharmila Kingsly
    Prevent your screen from going dark

    Standard 1 cup measures 240 ml

    Ingredients

    • 1 Avocado
    • 1 cup Almond Milk or Coconut Milk
    • 1 tbsp Coconut Sugar
    • 8 Black Raisins
    • 2 Cardamom pods

    Instructions 

    • Cut open the avocado and scoop the pulp . Add the avocado pulp to a blender. Add in the Almond milk.
    • Next add in the coconut sugar and black raisins.
    • Next add in the cardamom pods and blend well until creamy.
    • Delicious Vegan Avocado Milkshake is now ready to be served.

    Video

    Notes

    • You can replace the sugar with any vegan sweeteners like Maple sugar,Stevia .
    • Serve Chilled.
    • You can also use normal milk, I used Almond Milk . For Vegan version any Nut Milk should be used,

    Nutrition

    Calories: 189kcal | Carbohydrates: 14.1g | Protein: 2.4g | Fat: 15.4g | Saturated Fat: 3.1g | Sodium: 31mg | Potassium: 480mg | Fiber: 6.4g | Sugar: 5.1g | Calcium: 163mg | Iron: 1mg
    Tried this recipe?Mention @happietrio or tag #happietrio
    Subscribe to my Channelclick for more videos

    Disclaimer: I am not a nutritionist, the nutrition value provided here is an estimate. It will vary based on the quantity and brands of the products used.

    Kollu Thogayal | Horsegram Chutney

    March 11, 2020 By Sharmila Kingsly Leave a Comment

    Kollu Thogayal Recipe | Horsegram Chutney
    Kollu Thogayal Recipe | Horsegram Chutney Recipe | Kollu Recipes
    Kollu Thogayal Recipe | Horsegram Chutney Recipe | Kollu Recipes with step by step pictures and video. Kollu is a healthy ingredient for weight loss and many have been looking for this recipe when I have shared the same in Instagram. Finally i made it and clicked it .Kollu Thogayal Horsegram Chutney goes very well with rice. It can be mixed and had as such with rice. Can be served with idli and dosa too.Kollu Thogayal Horsegram Chutney is one wonderful find and this recipes is a treasure.,Now lets see how to prepare Kollu Thogayal
    Kollu Thogayal Recipe | Horsegram Chutney Recipe | Kollu Recipes
     
    Kollu Thogayal  Recipe
        Step by Step Method with Pictures: 
        1.    Heat a pan to this add in the Horse gram. Dry roast in a medium flame. At one stage the seeds start to pop switch off at this stage.

    2.    Allow it to cool down. Transfer it to a blender and pulse it 5 times.

    Kollu Thogayal  Horsegram Chutney

    3.    Transfer the blended horse gram to a bamboo muram or any big plate and remove the skin. If needed pulse the horse gram more to remove the skin.

    4.    Transfer the cleaned horse gram back to the blender, now add the Tamarind.

    5.    Dry roast the red chilli or show it in direct flame and then add it to the blender, Next add Garlic pods, Curry Leaves.

    Kollu Thogayal  Horsegram Chutney

    6.    Grated Coconut, Salt and Cumin Seeds. Pulse it, Add required water and grind it to a thogayal consistency.

    Kollu Thogayal  Horsegram Chutney

    Mix with rice and can be had as it is.

    Kollu Thogayal Recipe | Horsegram Chutney Recipe | Kollu Recipes

    📖 Recipe

    Kollu Thogayal Recipe | Horsegram Chutney
    Print Recipe Pin Recipe
    5 from 1 vote

    Kollu Thogayal | Horsegram Chutney

    Kollu Thogayal | Horsegram Chutney is a spicy and yummy thogayal Kollu is a healthy ingredient for weight loss.
    Prep Time10 minutes mins
    Cook Time8 minutes mins
    Total Time18 minutes mins
    Course: Side Dish
    Cuisine: Indian
    Servings: 4
    Calories: 108kcal
    Author: Sharmila Kingsly
    Prevent your screen from going dark

    Standard 1 cup measures 240 ml

    Ingredients

    • ¾ cup Kollu / Horsegram
    • 4 Dry Red Chilli
    • 4 Garlic pods
    • Tamarind amla sized
    • ½ cup Grated Coconut
    • 2 sprig Curry Leaves
    • ½ tsp Cumin Seeds
    • Salt as needed
    • Water as needed

    Instructions 

    • Heat a pan to this add in the Horse gram. Dry roast in a medium flame. At one stage the seeds start to pop switch off at this stage.
    • Allow it to cool down. Transfer it to a blender and pulse it 5 times.
    • Transfer the blended horse gram to a bamboo muram or any big plate and remove the skin. If needed pulse the horse gram more to remove the skin.
    • Transfer the cleaned horse gram back to the blender, now add the Tamarind.
    • Dry roast the red chilli or show it in direct flame and then add it to the blender, Next add Garlic pods, Curry Leaves.
    • Grated Coconut, Salt and Cumin Seeds. Pulse it, Add required water and grind it to a thogayal consistency.

    Video

    Notes

    • It goes very well with rice, dosa ,idli .
    • As it has coconut in it, It can be stored only for 2 days in fridge.
    • Use long variety of red chilli, I did have and hence used the round variety.
    • Adjust the red chillies as per your spice level.

    Nutrition

    Calories: 108kcal | Carbohydrates: 14.2g | Protein: 4.9g | Fat: 3.7g | Saturated Fat: 3g | Sodium: 8mg | Potassium: 52mg | Fiber: 3.4g | Sugar: 2g | Calcium: 42mg | Iron: 2mg
    Tried this recipe?Mention @happietrio or tag #happietrio
    Subscribe to my Channelclick for more videos
    • « Previous Page
    • 1
    • …
    • 30
    • 31
    • 32
    • 33
    • 34
    • …
    • 67
    • Next Page »
    Sharmila Kingsly

    Hi, I'm Joshie!

    Food Blogger, Biryani Lover , Software Engineer .. In no particular order.I love to cook and that is why I am here!! Welcome to my space!!. 

    Read more about me!

    • Instagram
    • Facebook
    • YouTube
    • Pinterest
    • X

    Vegan Recipes

    • Masala Paratha
      Masala Paratha
    • Tomato basil pasta
      Tomato Basil Pasta
    • Chickpea Spinach Curry
      Chickpea Spinach Curry
    • Vegan Chickpea Soup
      Vegan Chickpea Soup
    • Instant Pot Pumpkin Pasta
      Instant Pot Pumpkin Pasta
    • Basil Fried Rice
      Thai Basil Fried Rice

    Popular Posts

    • Nandu Rasam
      Nandu Rasam
    • Indian Dinner Party Menu Ideas, Sample Menus + Recipes
    • Nandu Kulambu
      Nandu Kuzhambu |Crab Curry |Nandu Kulambu
    • Instant Pot Peas Curry
      Instant Pot Peas Curry | Green Peas Curry
    • Payaru Kanji
      Payaru Kanji | Green Gram Porridge
    • Mushroom Egg Bhurji
      Mushroom Egg Burji

    Footer

    ↑ back to top

    As an Amazon Associate I earn from qualifying purchases.

    Copyright ©  2025 COOK WITH SHARMILA

    Rate This Recipe

    Your vote:


    A rating is required
    A name is required
    An email is required